Tuesday, November 30, 2010

Daring Bakers November 10: Pistachio Pear Crostada/Galette

The 2010 November Daring Bakers’ challenge was hosted by Simona of briciole. She chose to challenge Daring Bakers’ to make pasta frolla for a crostata. She used her own experience as a source, as well as information from Pellegrino Artusi’s Science in the Kitchen and the Art of Eating Well.


This post is a bit late, but better late than never!  I completed the challenge on time, but then got sick in the middle of Thanksgiving break, and so my pictures and this post suffered a bit.  My apologies!

Mom holding one of my new business cards with dessert at L.I.M.E

For this challenge, I "recycled" one of the desserts I created for L.I.M.E. earlier this month: a Pistachio Frangipan tart/crostada/galette with spiced red wine poached pears & pate sucree crust.  When I plated it for L.I.M.E., I also included poaching liquid reduction, vanilla bean ice cream, pistachio lace tuile & pistachio garnish.


unbaked crostada/galette 

I have always been taught that a "crostada" or "galette" is a freeform tart, made without a tart pan.  While I used a tart pan for L.I.M.E., I decided to make free form-style tarts with dough left over from the event.   The small ones were happily consumed before the photoshoot, but  I did get a shot before they were eaten.  


I went a bit too "frangipan happy" and overfilled the crust, though they did taste delicious anyway. If you've never had frangipan before, you're missing out!  Usually, it's made with almonds (ground, paste, flour etc), but I have a particular fondness for pistachios and so I ground some of the raw pistachios I bought in France for the filling instead.  


My pistachios had a wonderfully brilliant green color that contrasted beautifully with the red wine poached pears.  I like to leave the pears in the poaching liquid at least 48 hrs before slicing so the pears retain a beautiful red color. 


I hope this challenge inspires you to make a free-form tart sometime this holiday season!  

THE RECIPES
Note: these are the recipes I used for L.I.M.E. and so the amounts may be a bit high....  

SHORT CRUST DOUGH WITH ALMONDS
Ingredients
250 g Flour
150 g Butter
173 g Icing Sugar
32 g Almond Flour
pinch  Fine Salt
55 g Eggs

In an electric mixer fitted with the paddle, mix the butter and flour until you get a sandy mass.  Add the other ingredients and knead only until incorporated.  

Wrap and refrigerate at least 24 hours before using.  

RED WINE POACHED PEARS
3 pears, peeled just before use.  
3c red wine
1.5c granulated sugar
peel of 1/2 orange
juice of 1 lemon
1 cinnamon stick
2 whole cloves

boil 5 minutes, simmer 20 minutes or until pears are tender.  Cool on ice bath.  Chill pears in poaching liquid at least 48 hours before use.

PISTACHIO FRANGIPAN
100 grams organic unsalted butter, softened
100 grams sugar
1 organic egg
30 grams unbleached all purpose flour
100 grams raw pistachios, ground to a fine meal
1 tsp Almond Extract

Cream the butter and the sugar together. Add the egg. Scrape and mix well. Add the flour and the ground pistachios and mix until all ingredients are well incorporated.

Place the frangipane in a pastry bag and pipe onto the rolled out crust.  


Thursday, November 25, 2010

Pumpkin Panna Cotta & Happy Thanksgiving


Happy Thanksgiving!  I hope this has been a blessed day filled with family, friends & good food.


...And once again, too much time has lapsed since my last post.  I've hardly had time to even think about Thanksgiving, that's how busy this last month has gone.  Between teaching regular classes, and then teaching two back-to-back months of Continuing Education, and then getting ready for the November L.I.M.E. event, it's a wonder I've even gotten any sleep!  (p.s. I do have a LIME post in the works as well....)

But, in preparation for the "Advanced Pastry Boot Camp" Continuing Education course I've been teaching, I tested two delicious panna cotta recipes: Pumpkin Panna Cotta & Nutella Panna Cotta.  They weren't so delicious the first time around, but with some tweeking, they're fabulous now!


Panna Cotta, Italian for "cooked cream," is an item that I had seldom made before this fall.  For whatever reason, I simply hadn't given it enough of a chance.  I am now a believer!  For those who maybe haven't had panna cotta before, it's an egg-less custard that is thickened with gelatin, essentially a "milk jello" but much more delicious than that sounds.  It's a cinch to prepare (like 5 to 10 minutes tops) and it doesn't require an oven (though you do need enough refrigerator space).   Some people use a higher ratio of gelatin, which then allows the custard to be unmolded once firm.  I, however, do not like that much gelatin in my panna cotta (I'd rather lean towards a custard-y texture than a jello-y texture), so mine must be served in their chilling vessels.


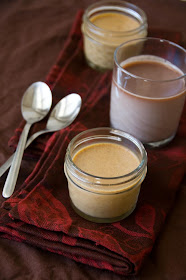
I'm especially pleased with the Nutella panna cotta that I got to use the adorable Nutella glasses I brought back from France (with the assistance of my friend Kelli).  Did you know that in France, the small jar of Nutella becomes the most adorable little glass vessel once all the Nutella has been consumed?  While Kelli was in France, she happily consumed several of these jars; and then once I visited, I helped consume more.  Kelli wasn't going to keep the adorable glasses, but I rescued them and carried them in my travel pack for the rest of the trip.  I knew they would one day serve a special purpose :)


If you don't have adorable Nutella glasses, 4 oz mason jars work well too.  I had some left from various canning adventures and they were the perfect size. Anything larger and you won't be able to finish the rich custard in one sitting (or at least I couldn't and I've got an insatiable sweet tooth).  I really like serving panna cotta in vessels which allow one to see the contents inside.   Plus, with the jars, you've got ready-made lids as well!


Another option is to use plastic cups.  I searched high and low for little, clear cups, and alas, none could be found....  But I did find some cute little white ones that worked instead. The nice thing about using plastic cups is that they can be very easily brought to an event and there's no worry about misplacing any of the dishes afterwards.  And there's no dishes to wash!  :)

Perhaps there's some leftover pumpkin puree from Thanksgiving festivities or a spare jar of Nutella that you can use to make one (or both) of these recipes.  


NUTELLA PANNA COTTA

Ingredients
1.5 oz Cold Water
16 oz Heavy Whipping Cream (you may substitute milk or half-and-half if you find cream to be too rich)
5.25 oz Granulated Sugar
2.5 oz Nutella
0.25 oz Pure Vanilla Extract
¼ oz Granulated Gelatin (1 Packet)


Instructions
1.  Into a medium size bowl, add cold water and sprinkle the gelatin package on top of water. Do not stir; set aside.

2.  Place your cream and sugar into a sauce pan over medium heat. Stirring frequently with a wooden spoon until well combined, continue cooking until it nears boiling.

3.  Melt your Nutella for about 30 seconds in the microwave and then add to the cream mixture. Whisk together to combine well.

4.  Remove from heat, add vanilla extract.  Melt the bloomed gelatin in the microwave for 20 seconds. Slowly pour the melted gelatin mixture into the cream mixture and whisk together until well-combined.

5.  Equally divide the mixture into your prepared custard cups. Place in the refrigerator to set up for a minimum of 2 hours or until firm.


PUMPKIN PANNA COTTA

Ingredients
43 g Water, cold
¼ oz         Gelatin (1 package)
342 g Half-and-Half (171 g Cream; 171 g milk)
40 g         Maple Syrup
85 g         Brown Sugar
228 g Pureed Pumpkin (Canned is fine)
7 g         Cinnamon
2 g         Ginger
pinch Nutmeg
pinch Salt
to taste Vanilla

Instructions
1.  Place the water in a small bowl and sprinkle the gelatin over it. Leave for 5 minutes to soften.

2.  Combine the half-and-half in a small saucepan with the syrup, sugar  and pumpkin, and heat until the mixture just reaches the scalding point but does not boil, whisking often. Remove from the heat and whisk in the spices.

3.  Melt bloomed gelatin in the microwave for 20 seconds. Whisk the gelatin mixture into the hot dairy mixture until smooth.

4.  Divide the mixture into 4 glasses or ramekins and refrigerate.