Tuesday, December 24, 2013

White Hot Cocoa Peppermint Affogato (GF)

White Hot Cocoa Peppermint Affogato (GF)

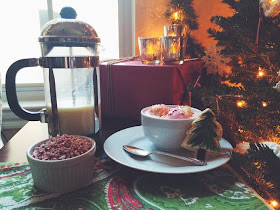
Merry Christmas Eve! I accidentally left my camera on while we were out of town for a few days & I didn’t discover the dead battery until I was ready to shoot this post.  So, iPhone images it is :)

White Hot Cocoa Peppermint Affogato (GF)

This year’s Christmas will be rather low-key, just my husband and myself. We’re looking forward to cooking Christmas brunch and Christmas dinner together while watching some festive movies and developing some of our own Christmas traditions. I am currently voting for the “stay in your pjs most of the day” tradition. :)

White Hot Cocoa Peppermint Affogato (GF)

My family always has hot cocoa on Christmas Eve or Christmas day--it’s a tradition that stems from my maternal grandma’s childhood and involves a very special antique hot cocoa set.  I’m a little sad to miss out on the family hot cocoa session, so I’m planning to incorporate something similar into our Christmas Eve festivities. We’re going to have our hot cocoa affogato style instead.  

White Hot Cocoa Peppermint Affogato (GF)

Affogato is an Italian-based dessert where a shot of hot espresso (or very strong coffee) is poured over a cold scoop of ice cream.  The heat melts the ice cream & espresso and ice cream become self-saucing. Sometimes liqueurs are also added.  Vanilla ice cream is most classic, but really any kind could be used.

White Hot Cocoa Peppermint Affogato (GF)

For my version, I substituted a white hot chocolate for the espresso & candy cane ice cream for the vanilla ice cream.  Store bought ice cream works perfectly (which is a good thing because our freezer is so full that my ice cream maker bowl would never fit), but the white hot cocoa needs to be homemade. Luckily, it’s super simple.  Good quality white chocoalte is a must--always make sure the chocolate bar ingredients include cocoa butter & real vanilla.  I used a bar of Lindt chocolate I found in the candy bar aisle of the grocery store. I like to garnish with an extra sprinkle of crushed candy cane pieces & a little chopped white chocolate, but those are totally optional garnishes.

White Hot Cocoa Peppermint Affogato (GF)

Serving the affogato with a crunchy festive cookie on the side completes the dessert (feel free to dunk away). Voila, an easy dessert that also fulfills the Christmas cocoa tradition.

White Hot Cocoa Peppermint Affogato (GF)

I wish you all the merriest of holidays. I hope you are able to spend it with loved ones. And if you’re still stressing over an easy holiday dessert, consider the affogato.  It’s easily made for two or for 12.  And it’s gluten free!

White Hot Cocoa Peppermint Affogato (GF)

White Hot Cocoa Peppermint Affogato 

2 c Milk (I used whole milk)
4 oz Good quality white chocolate (I used Lindt)
1 tsp Vanilla Extract
{optional} splash Vanilla Bean Paste 

Candy Cane Ice Cream (store bought is fine) 
crushed candy canes, for garnish
chopped white chocolate, for garnish

  1. In a small sauce pan, heat the milk to a simmer. 
  2. Chop the white chocolate into small pieces. Whisk into the simmering milk and continue stirring until all the chocolate is melted. Do not allow to boil. Remove from the heat and whisk in the vanilla(s). Pour the white hot cocoa into a vessel with a spout, such as a liquid measuring cup or a french press. 
  3. In a mug or bowl, add a couple scoops of candy cane ice cream. Pour the prepared white hot cocoa over the ice cream. Garnish with a sprinkle of crushed candy canes and white chocolate. Serve immediately.  
White Chocolate Mocha variation:

  • When simmering the milk for the hot cocoa, add a little instant espresso powder for a mocha kick.   
If you can’t find candy cane ice cream:

  • Substitute vanilla ice cream & make the white hot cocoa peppermint/candy cane flavored instead.  Add a few drops of peppermint extract (a little goes a long way) to the finished white hot cocoa.  Or, melt some candy cane pieces into the simmering milk before adding the white chocolate. 
This post contains affiliate links, meaning Sweet Treats makes a small commission off items purchased 
after an Amazon link is clicked with no additional cost to you. Thanks for your support.

Saturday, December 21, 2013

Cranberry Orange Jam & GF Baked Brie


Giving gifts is something I love to do, especially during the Christmas season. While I’m not opposed to buying gifts, there’s something extra special about handmaking things.


Jam (or other preserves) is always one of my go-to gift ideas because 1) it is easy to make multiple jars at a time, and 2) the jam has a shelf life of a year (or more) if processed correctly so that the lids seal, and thus the recipient can wait to open the jar, if they so desire.


This year, I’ve made a couple batches of Cranberry Orange Jam with Pecans that I’ll be giving to many of my family members and friends.  Sorry, family and friends, for the spoiler alert!  I made a version of this jam (minus the orange component) last year, but all the jars in my single batch sold out almost instantly! I didn’t even have enough left to give any as gifts.  So, this year’s remedy was to make more than one batch & not to sell any at all :)


A couple jars didn’t seal properly during the waterbath processing stage, so instead I had to refrigerate them & we’ve been enjoying them instead, not that that’s been too difficult a task!  I love eating jam on toast or english muffins or croissants, etc. but I sometimes forget that not everyone is as in to baked goods as I am.  Some people don’t know what exactly to do with a jar of jam because they have a hard time thinking outside the toast and/or pb&j box.  


One of the beauties of this particular jam is how versatile it is.  On the sweeter side, jam could be stirred into plain yogurt to create your own custom flavor, or even in to oatmeal. it could be sandwiched between two butter cookies. Warm jam could be spooned over ice cream... or pancakes... or waffles! .  Really, the possibilities are endless.


This jam is sweet, but it wonderfully compliments savory ingredients as well.  It could be served with turkey or pork. It would make a great condiment on a sandwich. And don't even get me started on paring it with cheese!


Case in point, baked brie.  Often baked brie is wrapped in puffed pastry before it is baked, but for this much more simple (and naturally gluten free) option, I simply topped a round of triple creme goat brie with a few spoonfuls of jam before baking it to oozy cheesy perfection.  The finished brie was served with some gluten free crackers, though honestly, it was difficult to not just eat the jammy cheese with a spoon!


So, if you’re still searching for gift options, consider making a batch of preserves of some sort.  And, tying a small Cinnamon Applesauce Ornament is a great way to dress up any jars for gift giving.


Cranberry Orange Jam with Pecans 
Adapted from Kraft Recipes
yields 6 half pint jars, plus a little extra for the fridge

1 12 oz bag of fresh cranberries
1 c (8 fl oz) Orange Juice, 
1/2 c (4 fl oz) Water
zest of half an orange
45.5 oz (6 1/2 c) Granulated Sugar 
1 c Chopped Pecans
1 pouch Certo liquid pectin 

  1. Fill a large stock pot with water & bring to a simmer.  Add a splash of white vinegar to the water if the water is hard. Wash 6 half pint jars, along with rings and new lids. Let stand in hot water until ready to use. 
  2. In a second large stock pot, bring the cranberries, orange juice and water to a boil over high heat. Reduce the heat to low, cover and simmer for 10 minutes. 
  3. Infuse the sugar with the orange zest.  Add the infused sugar and nuts to the prepared heat. Increase the heat to high heat and bring to a rolling boil, stirring constantly. Remove the pot from the heat. Stir in the pectin, return to the stove & boil for exactly 1 minute, stirring constantly. 
  4. Remove the pot from the heat and skim off any foam that may have developed.  Increase the heat under the first water-filled stock pot to high. 
  5. Portion the jam into prepared jars, leaving 1/8” headroom. Run a knife around the edges of the jam to remove any potential air pockets. Add a little additional jam to the jar, if necessary. Wipe the rim & threads of the jars. Cover with the lids& screw on the rings until they are finger tight. 
  6. Lower the jars into the boiling water & cover the pot. Process the jars for 10 minutes. Remove the pot from the heat, and let stand for 5 minutes before removing the jars.  Let the jars cool completely. If after cooling any jars have not sealed, store those in the refrigerator. The sealed jars will keep at room temperature for 1 year.
Note: If you’re completely new to canning, Food In Jars has some great resources!  


Gluten Free Baked Brie with Cranberry Orange Jam 
adapted from The Kitchn 

1 round of brie cheese--I used a triple creme goat brie that was 6.5 oz in size
Cranberry Orange Pecan Jam 
Additional Pecans (optional)
Fresh herbs to garnish--I used Rosemary 
Crackers for serving-- I used ones like these.
  1.  Preheat the oven to 425 F. 
  2. Cut off the top of the brie & scoop out a bit of the center. 
  3. Place the cheese onto a piece of parchment paper and onto a baking dish. 
  4. Top the cheese with several spoonfuls of jam & extra pecans, if desired. Place into the oven.
  5. Bake for 8 to 10 minutes, or until the cheese is softened, but has not completely collapsed.  
  6. Remove from the oven & use the parchment paper to lift the cheese onto a serving platter. Garnish with a sprig of herbs & serve with crackers. 


Sunday, December 15, 2013

Cinnamon Applesauce Ornaments


This holiday season, I’m trying to keep many things homemade, or home crafted.  Some in the spirit of frugality, and other simply because I like to challenge myself to use things already on hand. 


In past years, we’ve been back visiting family on actual Christmas Eve/Day, so I have been content with a tiny artificial christmas tree & minimal decorations.  But this year, we will be staying here in Texas, and thus a mini tree simply would not do!  I grew up with real Christmas trees, but my husband’s family always had artificial trees, so it took some convincing to persuade him we should get a real tree this year.


I don’t mind artificial trees, I just know that we don’t really have space to store one during the off season & also a decent artificial tree costs a good chunk of change!  And there is something so, almost magical about going and picking out your own tree each year. 


After buying the actual tree, plus the tree stand and lights, I knew that I wanted to be a bit more creative with the remaining decorations (we only had mini ornaments & a tiny string of lights for our aforementioned tiny tree of the past). Instead of a tree skirt, I used a big piece of burlap I already had. I crocheted a simple garland for the tree out of some leftover white homespun yarn. We added some old snowflake ornaments that I at one time intended to tape on windows, as well as some candy canes. And finally, I made some Cinnamon Applesauce Ornaments from a recipe I pinned last year.


I have a vague childhood memory of one of my sisters making something similar to these ornaments either in grade school or Sunday School.  But I really do not remember.... What does stick in my mind is how fragrant these type of ornaments are!  Isn’t it amazing how much of a memory trigger smells can be?  Cinnamon, along with evergreen, bayberry, cranberry & peppermint, really is one of those smells that transports me to Christmas time.


With only three ingredients, cinnamon, applesauce & ground cloves, the ornament dough is easy to make, though I will say that I’ve never measured out quite this much cinnamon for only one recipe before! The dough rolls out just like cookie dough (only cinnamon is used for dusting, not flour) and can be cut into whatever shapes desired. The dough does not spread at all, so the shape will stay true to whatever cookie cutter chosen.  And seriously, the smell while the ornaments are baking is quite fantastic.


Once baked until hard, the ornaments just need a hanger & they are ready to use. I, of course, am rather partial to baker's twine, but really any sort of string or wire would work.  It is best, though, to determine what kind of hanger will be used before the ornaments are baked (that way the opening for the hanger can be made into the appropriate size).


I did really intend to post this recipe earlier, but my computer hard drive had to be unexpectedly replaced this week and restoring my system ended up being a more complicated process than I originally anticipated.  Thankfully, with the help of the Genius Bar employees & Apple’s phone support, my computer is completely restored & running smoothly! Even if the tree decorating is already done for this season, these ornaments would also make lovely additions to embellish wrapped packages or hostess gifts. Or, remember this craft for next year :)


Cinnamon Applesauce Ornaments
Adapted from Katy Elliott 
Note, since these ornaments aren’t actually eaten, I went for the cheapest ingredients I could find--this is not the time for fancy applesauce or spices! 

1 cup (244 g) Applesauce
1 1/2 c Cinnamon (divided into 1c and 1/2 c) 
2 Tbl ground cloves
additional cinnamon for sprinkling

  1. Preheat the oven to 225 F. Line a couple baking sheets with parchment paper or a Silpat. 
  2. In a bowl, stir together the apple sauce with 1 cup of the cinnamon.  Keep mixing, switching to using your hands if it is easier, until a wet dough is formed. 
  3. Sprinkle over the additional 1/2 c of cinnamon and the cloves.  Knead, with your hands, in the bowl until everything is the same consistency.  Be aggressive--you don’t want wet spots & dry spots.  If the dough remains super sticky, add a little extra cinnamon.  If the dough is excessively dry, add a spoonful of applesauce. Note: I didn’t have to add any additional cinnamon or applesauce.
  4. Sprinkle a clean board or counter with a little cinnamon (like you would flour for rolling out cookie dough). Use a rolling pin to roll the dough to between 1/4” and 1/8” and use cookie cutters to cut out your desired shapes.  Place the cutouts onto the parchment lined baking sheets.  Gather up the scraps, knead them well & repeat the rolling process until all the dough is used up.  Use a skewer/toothpick/small dowel to poke a hole where string (or another hanger) can be added after the baking process.
  5. Bake the ornaments at 225 F for 1 hour, though check to make sure they are not developing any browning on the edges.  Flip the ornaments over (they may have warped slightly) and bake for an additional 30 minutes.  Turn off the oven, flip the ornaments again & allow them to cool completely in the oven. They should be rock hard once done.  More baking time may be required for more humid climates.  
  6. Once cool, add a loop of string (I, of course, am partial to bakers’ twine) and hang them on the Christmas tree, or use them to decorate packages.
note: this post may contain affiliate links. 

Monday, December 9, 2013

Gingerbread Pound Cake (GF)


How did it get to be December 9th already?!? I’m a bit behind on holiday prep this year, but maybe this gingerbread pound cake will help me get into holiday overdrive.  


Most gingerbread recipes produce cake that is fairly light and delicate, but in this case, I wanted a sturdier cake while still retaining the warm spice & molasses flavor of a traditional gingerbread.


And a loaf-shaped cake somehow feels a bit more relaxed, not to mention eating it on the go is easier (though perhaps that isn’t so much a good thing to mindlessly be eating cake while doing other things).


I’m sure it would be great with a glaze or an icing, but in the spirit of trying to keep things a bit lighter during the holiday season when indulging is inevitable, I decided to forgo any glaze.  It was just the right amount of sweet without any extras.


We enjoyed eating cold slices of the cake just on their own accompanied by piping hot cups of Holiday Tea. But to dress it up a bit for a dinner party with friends, I added a scoop of eggnog ice cream & a drizzle of orange sauce (from this post) --absolutely delicious!


Gingerbread Pound Cake (GF) 
adapted from Channeling Contessa via The Every Girl
Yields one 9x5 inch loaf

8.5 oz / 2c Jeanne’s Gluten Free AP Flour Mix (or substitute cake/AP flour if not GF)
1 tbl Ground Ginger
2 tsp Cinnamon
1/2 tsp Cloves
1/2 tsp Nutmeg
1/2 tsp Cardamom 
1 tsp Baking Powder
3/4 tsp Salt
6 oz / 12 tbl (1.5 sticks) Unsalted Butter, softened
8 oz / 1 brick Cream Cheese, softened
3.5 oz / 1/2 c Granulated Sugar
5.6 oz / 3/4 c packed dark brown sugar
4 oz / 1/3 c Molasses
4 eggs, room temperature
2 tsp Vanilla Extract
  1. Preheat the oven to 325 F.  Grease a 9x5 loaf pan with pan spray (or additional softened butter).  Line with parchment and grease the parchment too. 
  2. In a medium mixing bowl, add the flour, spices, baking powder, and salt. Whisk to combine. Set aside.
  3. Place the softened butter & cream cheese into the bowl of an electric mixer fitted with the paddle attachment. Cream on medium speed until smooth & completely combined. Scrape down the sides.
  4. Add the sugars & continue mixing on medium speed until light and fluffy.  Add the molasses & beat until smooth.  Scrape down the sides.  
  5. Add the eggs, one at a time, as well as the vanilla, & mix until completely combined. 
  6. On low speed, stir in the dry ingredients.  Mix until just combined. Remove the bowl from the mixer & use a spatula to finish mixing by hand.  
  7. Pour the batter into the prepared pan & place into the preheated oven. Bake for 1 hr and 25 minutes (or until a toothpick inserted into the center of the cake comes out clean). 
  8. Cool for 30 minutes in the pan, then remove from the pan.  
  9. Allow to cool completely before slicing. Store any leftovers, well wrapped, at room temperature or in the refrigerator. Loaf may also be frozen for longevity. 

Note: this post may contain affiliate links.