Friday, January 31, 2014

Salted Caramel Millet Squares (GF) and a snow walk


Greetings from the Atlanta airport! This week has been an interesting one, to say the least.  Last Thursday, I flew out to the Atlanta area to drive to Birmingham, with my friend Tami, the following day for the conference Food Blog South. The conference was excellent and I’m still digesting all that I learned… A recap post will be coming soon.


Following the conference, we headed back to Tami’s in Georgia & I planned to fly back home to Texas on Tuesday. Well, the weather (specifically winter storm “Leon”) had other plans.... Instead of heading home, I found myself stuck at Tami’s house, due to the inclement weather.

Mingus, wearing his sweater & ready to go on a snow walk. 


But honestly, I can’t think of a better place to be stuck!  Tami & Mike are so kind and hospitable! Even with our snow/ice adventures, propane shortages, and cats lost/stuck in unacessible portions of the attic, it was a fantastic stay! I loved having time to relax, catch up on some computer things, cuddle with Mingus and the kitties, and spending time with good friends.


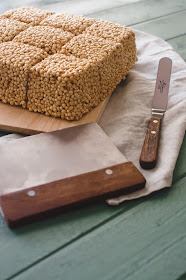
So now today, I’m trying to head back.  Fingers crossed that I’ll actually make it!  But in the mean time, while I’m chilling in the airport, I thought I’d share something I made last week before the trip: Salted Caramel Millet Squares, which I perhaps should have named “mile high salted caramel puffed millet squares.”  They are a little on the tall side...


After making copycat KIND bars last fall, I found myself with a good amount puffed millet. I thought about making a a variation on rice krispy treats, only gluten free, since the particular brand of Puffed Millet Cereal I found is gluten free, and regular crispy rice cereal is not gluten free.  (yes, I know you can get gluten free rice krispies, but my local grocery store doesn’t stock them).  My one complaint is that my millet had got a little stale and was not quite as crunchy as I would have liked, but fresh cereal shouldn’t have that problem.


Regular old rice krispy treats are great, my browned butter version is even better, and now adding salted caramel adds a whole extra flavor dimension.  These squares aren’t quite as easy--you do have to make both the caramel sauce & brown the butter. But the taste, in my opinion, is completely worth it!  And they might make an easy Super Bowl snack? If you can’t get puffed millet, feel free to substitute an equal amount of crispy rice cereal.


Salted Caramel Millet Squares
yields 9 very generous servings 

Salted Caramel Sauce (recipe follows)
4 oz / 1 stick / 8 Tbl Butter
8 oz Marshmallows
5.6 oz Puffed Millet Cereal (or substitute crispy rice cereal, though it may not be GF! Check the ingredients)

  1. Prepare an 8x8 baking pan by spraying it liberally with non stick spray (alternately, use a 9x13 if using the millet & you do not want quite as tall squares). Set aside. 
  2. Make the salted caramel sauce (recipe follows), and reserve. 
  3. In a tall, heavy stock pot, brown the butter.  Heat the butter over medium high heat. Once it melts, it will become a bit bubbly or foamy.  Keep cooking, gently swirling the pan occasionally, until the bubbles or foam dissipate, and the milk solids begin to brown in the bottom of the pan. Once the solids reach a rich golden brown color, remove the pot from the burner.  
  4. Add the marshmallows and stir with a heat tempered spatula until the marshmallows all melt completely. If the residual heat in the pot does not completely melt the marshmallows, return the pot to the burner briefly. Once the marshmallows have completely melted, stir in the salted caramel sauce. 
  5. Pour the puffed millet into the butter/marshmallow/caramel mixture. Quickly stir until all the cereal is well coated.  
  6. Transfer the mixture to the prepared pan and press to compact.  Allow to cool completely before cutting into squares. Store any leftovers, covered, at room temperature.  

Salted Caramel Sauce
200g / 7 oz / 1c Granulated Sugar 
3 Tbl Water
2 oz Heavy Cream
2 tsp Fine Grain Sea Salt
  1.  In a 3 qt sauce pan, mix together the granulated sugar and water until the two resemble wet sand. 
  2. Place the pan over medium high heat and cook, without stirring, until the mixture turns a medium/medium dark caramel color. Swirl the pan occasionally, if the browning is uneven.  
  3. Remove the pan from the heat and whisk in the cream. Warning, the mixture will bubble violently when the cream is added, so be careful!
  4. Finish by stirring in the salt. Use as directed above.  
This post contains affiliate links. 

Saturday, January 18, 2014

Waffle Weekend: Gluten Free Chocolate Waffles


This week has been full of changes.  We decided spur-of-the-moment that I should attend Food Blog South next weekend!  I designed new business cards to take with me to FBS (because my old ones were three years old & full outdated information).


After submitting my new business card designs to the printer, I suddenly panicked because my new card design didn’t match my blog site design. Thus, the blog also received a slight facelift, with some design changes and an updated "About Me & FAQs" page.  And I created a Sweet Treats Facebook page! (I should have made one *years* ago...) I In less than a week, there have been over 230 likes!!  If you haven’t already, please venture over there and “like” the page :)


But there have also been some bittersweet changes too.  We said “see you later” to some very dear friends who are moving from Texas to Washington for a job transfer. We’re excited about this new adventure they’ll have, but we’re also really sad to lose them...


So this weekend, in celebration and in consolation, I made Gluten Free Chocolate Waffles and topped them chocolate sauce, vanilla ice cream and raspberries.  They made a great breakfast in bed while binge watching "Veronica Mars" :)


Gluten Free Chocolate Waffles
adapted from Gale Gand via Waffelizer 
Yields approximately 6 waffles, depending on waffle iron size 

5.3 oz / 1 1/4 c Gluten Free Flour (I used Jeanne’s GF AP Mix, or use AP if not gluten free)
1.5 oz / 3 Tbl Brown Sugar
2 tsp Baking Powder
3/4 tsp Sea Salt
0.75 oz / 1/4 c Cocoa Powder (I used Hershey’s Special Dark)

2 eggs, separated
1 1/2 c Whole Milk (room temp, if possible)
1 oz / 2 Tbl Unsalted Butter, melted
1 oz / 2 Tbl Vegetable Oil, plus additional for greasing the waffle iron

Chocolate sauce, optional, for serving (recipe follows)
Vanilla Ice Cream, optional, for serving
Raspberries, optional, for serving

  1. In a large bowl, whisk together the flour, sugar, baking powder and sea salt. Sift in the cocoa powder & stir to combine. 
  2. In a separate smaller bowl, whisk together the egg yolks (reserve the whites), milk, unsalted butter, and vegetable oil.  
  3. Add the wet ingredients to the dry ingredients and whisk until just combined. 
  4. Preheat the waffle iron. Whip the egg whites to medium stiff peaks, using a handheld mixer (or just a whisk if you’re in need of a good arm workout). Fold the egg whites into the waffle batter. 
  5. Cook on the preheated waffle iron, greasing with additional vegetable oil if necessary (we did need to grease ours). Hold finished waffles in a 200 F oven until all the waffles are cooked. 
  6. Serve the waffles drizzled with chocolate sauce, topped with a scoop of vanilla ice cream & a sprinkling of raspberries. Store any leftover waffles in the refrigerator or freezer. 

Chocolate Sauce
3 oz semisweet or dark chocolate, broken or chopped into small pieces
3 oz Heavy Cream

  1. Place the chocolate into a small/medium bowl.  
  2. In a small sauce pan, heat the cream until just before the boiling point (small bubbles around the edges of the pan as well as steam should be visible. 
  3. Pour the hot cream over the chocolate. Let stand for a minute, then whisk until all the chocolate pieces are melted. 
  4. Serve drizzled over the waffles. Store any leftovers covered in the refrigerator. 

Sunday, January 12, 2014

GF Oatmeal Creme Pies


The beginning of a new year is “supposed” to be about renewal, setting new goals & starting fresh. But here I am, bringing a recipe for homemade oatmeal creme pies, which doesn’t exactly fit into the “eating healthier” goal many people set at the start of a new year.  Sorry, not sorry :)


By making your own, at least you have complete control over the ingredients go into (or are left out of) your version? These homemade oatmeal creme pies may not have the same shelf life as their pre-packaged Little Debbie predecessors, but these particular ones are gluten free, yet very tasty. In fact, I may need to send the remaining oatmeal creme pies with my husband to work because I can’t seem to stop eating them!


Because I attended a private elementary/middle school that didn’t have a hot lunch program, we had to bring a packed lunch from home. Bless my poor mother for packing lunches for myself and my sisters for 12 years!  On very special occasions, we were allowed a treat, like Little Debbie oatmeal creme pies, in our lunch box.  Sometimes there were zebra cakes or star crunch, but I think the oatmeal creme pie was my favorite :)


It has been years since I’ve had a Little Debbie oatmeal creme pie.... Especially now that I eat a mostly gluten free lifestyle, many of my favorite childhood lunchbox items are out of the question.  Instead, I’m experimenting with making my own versions to fit my changing dietary needs.


I looked at many recipes online for homemade oatmeal creme pies before settling on the one I used. Many images showed the cookies much puffier than my memories of  the prepackaged version.  Some used a straight frosting as the filling, while I wanted something more marshmallow-y.


The cookie dough for these pies is much more sticky than traditional dough. And it really spreads in the oven during the baking process. In fact, during the baking process for my first test pan, I did have serious doubts about whether the recipe would work! Thankfully, it did.


Instead of sandwiching the cookies with a frosting or meringue, I turned to one of my favorite marshmallow recipes (the one I used for homemade peeps and adapted to top chocolate stout cupcakes) and used that recipe for the filling. I do have a serious love for homemade marshmallows :)


Stay tuned, there may be more Little Debbie copycat recipes in the future!


Note: If you’re following a gluten free lifestyle, please make sure the oats you use are certified gluten free.  While traditional oats themselves do not contain gluten, they are often processed on equipment shared with gluten products, thus resulting in cross-contamination.  Or the oat fields are cross-pollinated with glutinous grains, again resulting in cross-contamination. I personally have had good luck with Trader Joe's Gluten Free Rolled Oats and Bob's Red Mill Gluten Free Rolled Oats but everyone is different. Also, some people who cannot tolerate the proteins that make gluten also cannot tolerate the proteins in oats, so check with your doctor before consuming.

Oatmeal Creme Pies
Yields approximately 60 cookies or 30 sandwiches. 

Cookie Base
adapted from Babble 
8 oz / 2 stick unsalted butter, room temp
5.6 oz / 3/4 c Light brown Sugar
3.5 oz / 1/2 c Sugar
2 large eggs
1 Tbl Honey
1 tsp vanilla
7.45 oz / 1.75 c GF Flour (I used Jeanne’s Gluten Free AP mix or substitute AP if not GF)
1 t Baking Soda
1/8 tsp cinnamon
1/4 tsp salt
4.7 oz / 1 1/2 c GF Oats (I used Trader Joe's version or substitute regular if not GF)

Marshmallow Filling 
note: do not make until ready to assemble or else the gelatin will set in the bowl not on the cookies!) 
2/3 c Cold Water
0.5 oz / 2 packets Granulated Gelatin
14 oz / 2 c Granulated Sugar
1/2 c Water
2 tsp Vanilla

  1. To make the cookies: Line 4 baking sheets with parchment paper
  2. In the bowl of an electric mixer fitted with the paddle attachment, cream together on medium speed the butter and sugars until the mixture has completely combined, and is lighter in color and fluffy in texture. Scrape down the sides of the bowl. 
  3. Add the eggs, honey and vanilla and mix on low until combined. Scrape down the sides of the bowl. 
  4. Meanwhile, whisk together the flour, soda, cinnamon and salt in a separate bowl. Set aside. Pulse the oats in a food processor or clean coffee grinder until coarsely chopped. Mix the oats in with the dry ingredients. 
  5. Add the dry to the mixer bowl and mix on low speed until just combined. Scrape down the sides of the bowl. 
  6. Use a small 1 Tbl scoop to drop batter onto the prepared baking sheets. Pan the cookies 3 rows by 4 rows. Always start by portioning the outer edges (see photo below) & then filling in with the remaining rows. 
  7. Chill the cookies in the refrigerator for 15 minutes.  Preheat oven to 350 F.
  8. Bake the cookies for 10 to 12 minutes, or until the edges are light brown.  Rotate the pans halfway through baking. 
  9. Remove from the oven and cool on the baking sheets. 
  10. To make the filling (do so just before assembly): Bloom gelatin in cold water in bowl of a 6 qt stand mixer. Attach the bowl (during the blooming process) & whisk attachment to the mixer.
  11.  In a 3 qt saucepan, combine the sugar & water. Stir just until the mixture resembles wet sand. Heat the pan over medium high heat to 238 F (softball stage). Do not stir during the heating process. 
  12.  With mixer running on low, pour syrup over gelatin.  Increase speed to medium for 3 minutes. Put on the splash guard as a precaution against burns.  Increase speed to high & beat for 3 additional minutes.
  13. Add the vanilla extract. Beat on high for an additional 7 minutes (splash guard is not necessary). 
  14.  While the marshmallow is whipping, prepare a large piping bag by fitting it with a large round tip (I used an Ateco 804).  Prepare the cookies by matching like sizes & flipping over the bottom cookies for piping. Also gather a back up baking sheet with sprayed parchment for the extra filling. 
  15. Once the marshmallow is very thick & holds its shape/a stiff peak, use a portion scoop to scoop it into the prepared piping bag.
  16. Pipe the marshmallow in a spiral pattern onto the bottom of one cookie & top with another cookie to make a sandwich. Press slightly to adhere. Repeat with the remaining cookies. Work quickly so that the marshmallow does not set up in the mixing bowl or in the piping bag.  
  17. Pipe any remaining marshmallow (there will be extra) into sprayed, parchment paper. 
  18. Allow the sandwiched cookies to set at room temperature. 
  19. Store any leftovers in an airtight container at room temperature. Eat within a few days, though they really do taste best have the best texture the day they are made. 
panning example from step 6