Friday, May 30, 2014

Strawberry Rhubarb Compote (AIP)


In some ways, this detox has forced me to re-think a lot of what I do in the kitchen. I consider myself to be pretty resourceful in the kitchen.  Take away an ingredient and I’m usually able to find a suitable substitution.  No gluten? I’ll replace flour with a gluten free version. No grains at all? I’ll use a nut flour. No sugar? Find a more natural sweetener (never the artificial stuff). No dairy? there are plenty of alternative milks available. No eggs? I’ll use pumpkin puree or applesauce or a banana or flax seed. But take grains, eggs, dairy, nuts/seeds, AND sugar? I might be a little stumped to concoct a dessert. It isn’t impossible--my creativity just must be stretched even further.


I have had to think outside of traditional “baked goods” and move more into the category of frozen desserts & custards that can be made with coconut milk and without eggs & fruity desserts--things that more heavily rely on the refrigerator/freezer and the stove top. The longer I go without sugar, the less my body craves it & the more my tastebuds recognize the tiniest bit of sweetness from fruit.


When it comes to rhubarb, I’m quite often a purist. The rhubarb pie and rhubarb sauce I grew up eating didn’t fall into the strawberry rhubarb category. When I found organic rhubarb in the store, I really wanted to create a rhubarb dessert that is friendly to my detox guidelines, however, since rhubarb is seriously tart, a sugar free just rhubarb dessert was not going to be successful (i.e. edible).


Ripe strawberries have an excellent naturally sweet flavor & they do pair well with rhubarb.  Organic Unfiltered Apple Juice makes up the remaining sweetness.  I combined the three ingredients, cooked them together until the fruit broke down, much of the liquid evaporated & the flavors intensified.


The amounts I give in the recipe are more like guidelines--there isn’t as much science to this recipe as there is to a cake. I use roughly 1 part sliced rhubarb to 2 parts hulled very ripe strawberries to 1 part unfiltered apple juice, but it can certainly be adapted to personal preferences. Do note that this compote will (most likely) taste tart to someone who is eating sugar on a daily basis...


On a more everyday basis, I spoon compote over some unsweetened coconut yogurt, but as a treat, it’s also a great topping to coconut ice cream.


Strawberry Rhubarb compote 

3.4 oz Organic Rhubarb, sliced
6.75 oz Organic Strawberries, sliced
4 oz Organic unfiltered Apple Juice, plus more if necessary

  1. Combine in a small sauce pan. Heat over medium heat for 35 minutes min. Stir occasionally, but increase stirring amount towards the end of cooking. 
  2. Remove from heat & taste a small amount. If the compote isn’t sweet enough, add a couple more oz of apple juice. Cook until the liquid has reduced, stirring occasionally. 
  3. Remove the pan from the heat & transfer the compote to a separate container. Cool completely. 
  4. Store in the refrigerator until ready to serve. 
  5. To serve, spoon over coconut yogurt or coconut ice cream. 

Monday, May 19, 2014

Coconut Whipped Cream (AIP)


I have a love/hate relationship with coconut whipped cream.  Ideally, one is supposed to be able to refrigerate a can of coconut milk overnight, open the can, scoop off the solids & whip them into amazing “whipped cream.” This is NOT always the case.


As you can see in this picture I posted on Instagram a couple weeks ago, I’ve had my fair share of coconut whipped cream failures... I asked others what they did to ensure that the coconut milk would actually whip into usable cream & I received some good tips. Two pieces of advice that I took to heart were 1) to use Trader Joe’s Coconut Cream (which is *still* unsweetened) and 2) to open the can from the bottom, after the refrigeration process.


Using those words of wisdom, I made a successful batch of Coconut Whipped Cream that fit with my detox specifications and felt like a decadent treat, when spooned on top of berries. I found my berries were sweet enough that I left my “cream” unsweetened (whether through stevia, or, if you’re not on a detox diet, powdered sugar).


Coconut Whipped Cream 

1 can of Trader Joe’s Coconut Cream
1 tsp Vanilla Bean Paste/extract (omit for AIP)

optional: sweetener of choice, such as honey or maple syrup

  1. Chill the can of Trader Joe’s Coconut Cream in the refrigerator overnight.  
  2. The following day, flip the can upside down & open the can from the bottom.  Drain out any liquid & use it in something else (like add it to a smoothie). Scoop the remaining solids into a bowl. 
  3. Using a hand-held mixer, whip the solids for a couple minutes, or until the cream forms soft peaks. 
  4. Add the Vanilla Bean Paste & optional sweeteners & mix to combine. If a more firm texture is desired, re-refrigerate for 10 minutes before serving. 
  5. Use as you would use regular whipped cream--here, I spooned it over some berries. 
  6. Store leftovers in an airtight container in the refrigerator for a couple of days, though re-whipping may be required. 

Monday, May 12, 2014

Pear Blueberry Smoothie (AIP)


Detox. It usually isn’t a “fun” word. Customarily, it means giving something up--often an unhealthy something--to make life a little better (dare I say “healthier”) in the future. I usually follow the Julia Child quote  “Everything in moderation… including moderation.” But sometimes our bodies have different plans...

I haven’t written in great detail about my current personal health struggles. If you know me in real life, chances are I’ve mentioned them to you (and if for some reason I haven’t, please feel free to ask). I’m just not certain I’m ready to write about it... Joy the Baker has an excellent post that references qualms with sharing personal information online.  Those who have been readers of “Sweet Treats” for a while have probably noticed many of my recipes are now gluten free, mostly because I find that I feel better on a GF diet. But now I’m taking things even further and doing a major food/lifestyle detox under the supervision of a doctor.

Not just no gluten, but no grains at all either. Also, no sugars/sweeteners. No dairy. No eggs. No corn. No nuts/seeds. No pork. What am I eating, you may ask? Basically, I’m eating an extreme paleo diet of meat, certain fruits & veggies, coconut, and olive oil, plus supplements. Lots of supplements.  And this detox will last 3 to 6 weeks at minimum.


Sounds pretty radical, right? It is, especially for a pastry person like I am.  But really, you get tired of shuttling from one specialist to the next & STILL not feeling well, even though your prescription list is a mile long. You get to a point where you’re willing to try anything to feel better.

I’m not going to say this detox journey has been easy--I’m a little more than 2 weeks in at this point. Some days are hard (especially at the beginning), but more days are less hard. This detox does require time, both in planning & the prep of meals & snacks. Trust me, you don’t ever want to find your self hangry (hungry + angry) because you forgot to plan a snack.....

Having the support of my husband & family & friends has been key too. They’ve gone along with my new plan & had the discipline not to eat things in front of me that I can’t eat. They’ve encouraged me when I felt like giving up.


Some of these lifestyle & dietary changes may become permanent (which is still a very scary concept), but I guess we’ll see how my body reacts once this detox process ends.  Really, one of my top goals is to help my body heal itself through nutrition. I’m happy to say that I’m already starting to feel better!

In the mean time, this blog will also be following my detox plan, which may result in some rather unusual items. I understand that not all readers may be a fan, but my first loyalty has to be to myself and my health. I’m afraid that if I deviate from my detox, even just for a blog post, I’ll be too tempted to make further exceptions that won’t make the detox as successful. My limited list of “allowed” foods has forced me to stretch my recipe writing creativity, and I’m not disappointed with the results.

So welcome to this new chapter of Sweet Treats. I’m excited to see where it goes!


Note: I am not a doctor, nor a healthcare professional. I do not suggest you follow these extreme dietary measures unless your doctor tells you to (and gives you the proper supplements). If you’re interested in doing a free, less-intense diet-based detox, I suggest you check out Whole30.

Pear Blueberry Smoothie
Serves 1; This smoothie is designed to fit in the Ninja Professional Blender single-serve cups. The recipe could be doubled (or tripled) for a larger blender. 

Pre-detox, I was really a cereal-for-breakfast sort of a girl. Now I’m totally hooked on smoothies instead! Many smoothies include bananas, but tropical fruits (i.e. high glycemic) are not on my allowed list. So I’ve found that a very ripe pear makes a lovely stand-in. Smoothies really aren’t rocket science, so don’t fret too much over the ingredient amounts--they’re really more like guidelines than anything. Just make sure you don’t overfill the blender cup :)

1 medium to large very ripe Pear, organic, if possible, cored--mine weighed approximately 6.5 oz AFTER coring
2/3 c (approximately 3.4 oz) frozen Blueberries, organic, if possible,
2/3 c (approximately 6.3 oz) Unsweetened Coconut Milk (organic if possible) 
1 scoop Vanilla Protein Powder (optional), or substitute Collagen Hydrolysate (if AIP) 
  1. Cut the organic pear in half & remove the seeds/stem/blossom. place each pear half cut side down & slice pear into small cubes. Place cubes into the blender cup & mash down a little to ensure more fruit will fit. 
  2. Add frozen blueberries on top of pears, making sure not to add anything above the “Max Fill” line. 
  3. Pour over the unsweetened coconut milk, also making sure not to exceed the “Max Fill” line.  Optional: pour in the protein powder. 
  4. Screw on the bladed top & tighten. Flip the cup upside down, and fit into the blender base. 
  5. Pulse a few times, or until the smoothie is well blended. 
  6. Remove the blade top (rinse immediately). Add a straw & enjoy immediately. 
 Note:
  • Many varieties of pears will work. I usually use whatever kind of organic pear is the cheapest. The riper the pear, the sweeter the smoothie will be. 
  • As much as I love wild blueberries in other applications, I do not recommend them here because they make a much pulpier smoothie. They work in a pinch, but will drastically change the texture. 

This post contains affiliate links. Though, Ninja has never heard of me--I just like their blender. 

Monday, May 5, 2014

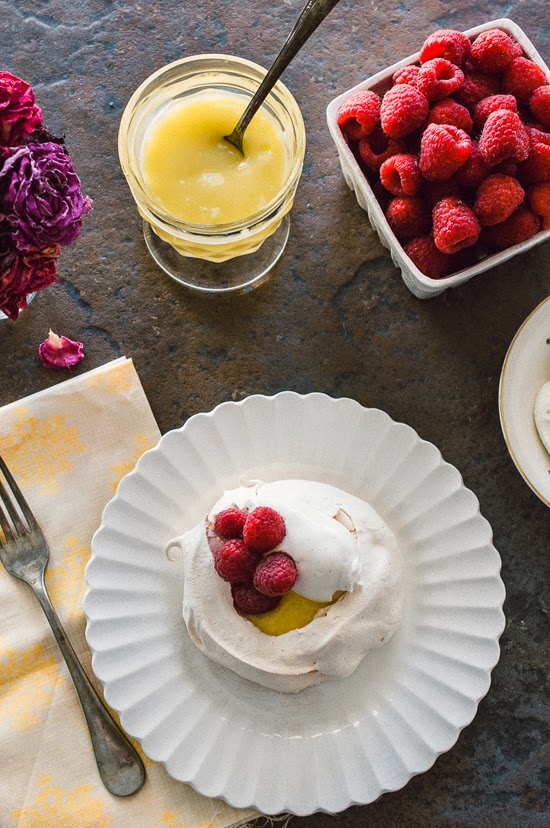
Lemon Raspberry Pavlova (GF)


Forgive my unexpected time lapse between posts.  By now, I ought to know that when I’m taking a trip back to North Dakota (which is where I've been the past two weeks), I really won’t have time to finish a post, even if I have the best intentions of doing so, haha.  I’m also sorry for not sharing this lemon raspberry pavlova with you sooner! It’s a keeper. 


Every time I make a pavlova for dessert, I wonder why I don’t make it more often. It’s very easy to make & naturally gluten free, not to mention super tasty. Luckily, I’ve gotten a couple friends hooked on it, and they remind me to make it :) When one of those aforementioned friends celebrated her birthday a few weeks ago, I knew it was the perfect time to test out a pavlova variation that has been rolling around my head for quite a while.....


 Most often, when I’m making pavlova, I make a version of the Berry Pavlova I posted last July; however, this time, I switched things up. I don’t know if there’s a way to make a pavlova more elegant than it already is, but somehow crafting it into individual portions seems to do the trick. Plus, they’re easier to serve at a dinner party (which is where I served these). And using tart lemon curd as the filling pared wonderfully with the sweet meringue shell. Top little whipped cream and a few raspberries & you’re set with a spectacular dessert.


Pavlova Shells
Yields 4 servings 

2 ea Whites
3.5 oz / 1/2 c Granulated Sugar
Vanilla Bean Paste/Vanilla Extract (optional, I forgot to add it to mine & they still tasted great!) 
1 tsp Cornstarch

  1. Preheat oven to 250 F. 
  2. Line a baking sheet with parchment paper & spray with cooking spray .  
  3. In the very clean bowl of a stand mixer fitted with the whisk attachment, add the egg whites.  Mix on medium-low speed until they become foamy.  Gradually add the sugar, a couple tablespoons at a time. 
  4. Once all the sugar is added, increase the mixer speed to high & whip until the mixture holds stiff peaks and becomes very thick & glossy.  
  5. Scrape down the sides of the bowl & add a splash of the vanilla bean paste/extract. Mix on high speed one additional minute.  
  6. Remove the bowl from the mixer & sift the cornstarch over the meringue.  Use a silicone spatula to gently fold in the cornstarch, taking care not to deflate the meringue.  
  7. Use a large portion scoop to portion the meringue into 4 small mounds on the prepared parchment. Use a small offset spatula to hollow out the center slightly to make room for the filling & fruit that will be added after baking.  
  8. Place the pan into the oven & immediately drop the oven temperature to 225 F. 
  9. Bake the pavlovas for 30 minutes, rotate the pan & bake for 15 to 30 additional minutes.  When done, the outside will be dry & firm to the touch, but the interior will be soft & marshmallow-y Ideally, the pavlovas should remain very pale cream in color. If they begin to brown, reduce the oven temperature, or even turn the oven off & allow the residual heat to finish the baking process. 
  10. Cool completely before assembly. If not planning to assemble & serve the pavlovas immediately, tightly wrapped the completely cooled meringue shell & store at room temperature so that it retains it’s crispy shell. 

Lemon Curd
sorry, I do not have a volume measurement for this recipe. If you run out of time to make your own curd, you could substitute store bought :)

80 g Egg Yolks
126 g Granulated Sugar
100 g Lemon Juice
25 g Heavy Cream
65 g Butter
  1. In a small stainless steel saucepan, whisk together yolks, sugar, juice, cream, and butter and cook over moderately low heat, whisking constantly, 5 to 7 minutes, or until mixture just reaches a boil (do not let boil). 
  2. Strain curd through a fine sieve into a bowl. 
  3. Cool curd with its surface covered with plastic wrap (pressed into the curd, so that it doesn’t develop a skin), and chill. Alternately, chill over an ice bath (with plastic pressed into the curd). 
  4. Curd may be refrigerated for up to 2 days. 
Assembly
Assemble just before serving

Cooled Pavlova Shells
Chilled Lemon Curd
Whipped Cream
Fresh Raspberries
Mint (optional garnish--my grocery store was completely out, so I couldn’t use any...) 
  1. Gently press the center of the pavlova shell to indent it a little further. 
  2. Spoon a little lemon curd into the indentation.
  3. Top with a quenelle (or dollop) of whipped cream & sprinkle with a few raspberries. Optional: garnish with a few sprigs of fresh mint. 
  4. Serve immediately!