Tuesday, April 26, 2011

Recap: Advanced Bakeshop, Spring 2011

My life has been pretty busy lately.  Busier than I'd like, but I love my job and my life, so I'm not complaining too much.  The only thing is that I haven't had any time to blog... and that makes me sad!  So, I'd like to show my dwindling readership exactly what has been keeping me busy... Starting with Advanced Bakeshop, which concluded tonight.

 Hazelnut Dacquoise

 Chocolate Macaron Disaster Experiment
Turns out, it does matter in macarons if you're using dutched cocoa powder or natural... 

 Macaron Assembly 

 Lemon Macarons for the Vintners' Dinner

 Grand Marnier Souffles 

 Saucing the Souffles

 Raspberry Fruit Mousse Torte

Petits Fours Week
sorry for the poor quality... used my phone for this one. 

 Tiramisu Ice Cream Sandwiches Assembly

 Tiramisu, classical style 

 Raspberry White Chocolate Passion Fruit Torte 
Pate Sucree, Raspberry Jam, Raspberry Sponge, White Chocolate Mousse, 
Passion Fruit Gelee, Jaconde with red decor paste, Raspberry Gelee

 Marjolaine Gateau 

 Marjolaine Gateau, the following day, plated for 181 Palmer Restaurant 
(best lunch deal in Charleston!) 

 Making-meringue-surprise-bonus-quiz 

  Making-meringue-surprise-bonus-quiz 
Carol, pictured on the right, writes a blog called "Live Well, Eat Often, Snack Much"
about her adventures in culinary school.  


 Tempering chocolate & practicing chocolate cigarettes

 The William
Almond Dacquoise, Nougatine, White Wine Poached Pears, Creme Chiboust 

 Open Skills: French Macarons 

 Practical Final: Giant Strawberry Macaron Entremet
Macaron shell, Chocolate Mousse, Creme Diplomat, Fresh Strawberries, 
Chocolate Cigarettes, Confectioners' Sugar & Mint
 
  Practical Final: Giant Strawberry Macaron Entremet
Macaron shell, Chocolate Mousse, Creme Diplomat, Fresh Strawberries, 
Chocolate Cigarettes, Confectioners' Sugar & Mint
And so you have now seen a pictorial representation of how I've spent the past 16 Tuesdays from 3pm to 9:10pm.   This class has been great and very dedicated to their learning, even throughout hardships and unexpected circumstances that always come with culinary school.  Many did back-to-back classes, meaning they had two 6.5 hour classes with very little break!  Talk about exhaustion at the end of the day?  Yes.

Stay tuned for more re-caps as classes conclude for the semester!

Sunday, February 27, 2011

Daring Bakers' February 2011: Panna Cotta

***Edit: the link to my 365 photo project has been fixed!***

The February 2011 Daring Bakers’ challenge was hosted by Mallory from A Sofa in the Kitchen. She chose to challenge everyone to make Panna Cotta from a Giada De Laurentiis recipe and Nestle Florentine Cookies.

Vanilla Bean Fromage Blanc Panna, Chocolate Crumble, 
Chocolate Shortbread Tuile, Blackberr Coulis & Fresh Blackberry

Many apologies for my absence these past months. I hoping to not make such a hiatus again, at least not for the time being!  Lots of exciting (and challenging) things have been happening and I look forward to sharing them!  FYI, If you want to see my newest 365 photo project, and keep up with what's going on in my life on a day-to-day basis, visit here. 


This month also marks my return to Daring Bakers' challenges, also after a several month hiatus.  However, I do feel the need to get one thing off my chest: I followed the challenge inspiration, but not the given recipes.  I had planned for  my Petit Fours & Mini Pastries class to make a panna cotta in the near future and decided to practice that recipe instead! 


One thing that often surprises people is that I am a pastry chef who really doesn't particularly care for cheesecake (feel free to gasp... I know, I'm unusual).  I often find it too heavy/rich and frankly, not sweet enough for my insatiable sweet tooth!  This Vanilla Bean Fromage Blanc panna cotta, inspired by a recipe from Dessert Fourplay by Johnny Iuzzini, comes very close to cheesecake-y flavors without being too rich. 


Fromage Blanc, for those who are not familiar with it, is a zero-fat, French-style, fresh cheese that has similar flavor tones as yogurt.  I like to think of it this way: if Greek yogurt and cream cheese got married and had a baby, it would taste like Fromage Blanc, haha!


Some may remember from a previous post, that I am a big fan of panna cotta.  It's relatively easy and doesn't require an oven!  It can be very sweet and very rich, so I've made a petit-four size dessert with garnishes.  After tasting the combination, I do wish I'd made them a little larger because they are so tasty!  Instead I've compensated by eating several :) 

If you're not a cheesecake or a panna cotta fan, I still urge you to make this dessert.  It may turn you into a believer!

Fromage Blanc Panna Cotta 
adapted from Dessert Fourplay by Johnny Iuzzini


4 g Gelatin Sheets (reduce gelatin if you do not plan to unmold the panna cotta)
112 g  Heavy Cream
50 g Granulated Sugar
pinch of fine Sea Salt 
2 tsp Vanilla Bean Paste
225 g Fromage Blanc, room temp

1.  Bloom the gelatin sheets in ice water until soft, approximately 10 minutes. 
2.  Combine the cream, sugar & sea salt in a sauce pan.  Bring to a simmer.  Add the bloomed gelatin and whisk to combine.  Cool slightly.  Add Vanilla Bean Paste.  Cool until just warm.
3.  Whisk the cooled cream mixture into the Fromage Blanc (the cream mixture must be just barely warm, or else it may cause the fromage blanc to sepearate) and strain into a vessel with a spout (a spout will help the ease of portioning)
4.  Portion the mixture into the desired molds and chill until set.
5.  Once set, unmold, if desired, and garnish with Blackberry Coulis, Chocolate Shortbread Tuiles, & Chocolate crumble.
6.  Enjoy!

Final humorous note....  
Here's what happens when you decide to photograph on your balcony and the wind blows over your foam core while you're back inside grabbing one final garnish.... hahahaha.  I'm laughing, but it was rather expensive mishap since the foam core is ruined (one covered in blackberry coulis, one in speckles from the butter in the crumble)...  Thankfully, though, I did have enough product to plate a second set up!

Tuesday, November 30, 2010

Daring Bakers November 10: Pistachio Pear Crostada/Galette

The 2010 November Daring Bakers’ challenge was hosted by Simona of briciole. She chose to challenge Daring Bakers’ to make pasta frolla for a crostata. She used her own experience as a source, as well as information from Pellegrino Artusi’s Science in the Kitchen and the Art of Eating Well.


This post is a bit late, but better late than never!  I completed the challenge on time, but then got sick in the middle of Thanksgiving break, and so my pictures and this post suffered a bit.  My apologies!

Mom holding one of my new business cards with dessert at L.I.M.E

For this challenge, I "recycled" one of the desserts I created for L.I.M.E. earlier this month: a Pistachio Frangipan tart/crostada/galette with spiced red wine poached pears & pate sucree crust.  When I plated it for L.I.M.E., I also included poaching liquid reduction, vanilla bean ice cream, pistachio lace tuile & pistachio garnish.


unbaked crostada/galette 

I have always been taught that a "crostada" or "galette" is a freeform tart, made without a tart pan.  While I used a tart pan for L.I.M.E., I decided to make free form-style tarts with dough left over from the event.   The small ones were happily consumed before the photoshoot, but  I did get a shot before they were eaten.  


I went a bit too "frangipan happy" and overfilled the crust, though they did taste delicious anyway. If you've never had frangipan before, you're missing out!  Usually, it's made with almonds (ground, paste, flour etc), but I have a particular fondness for pistachios and so I ground some of the raw pistachios I bought in France for the filling instead.  


My pistachios had a wonderfully brilliant green color that contrasted beautifully with the red wine poached pears.  I like to leave the pears in the poaching liquid at least 48 hrs before slicing so the pears retain a beautiful red color. 


I hope this challenge inspires you to make a free-form tart sometime this holiday season!  

THE RECIPES
Note: these are the recipes I used for L.I.M.E. and so the amounts may be a bit high....  

SHORT CRUST DOUGH WITH ALMONDS
Ingredients
250 g Flour
150 g Butter
173 g Icing Sugar
32 g Almond Flour
pinch  Fine Salt
55 g Eggs

In an electric mixer fitted with the paddle, mix the butter and flour until you get a sandy mass.  Add the other ingredients and knead only until incorporated.  

Wrap and refrigerate at least 24 hours before using.  

RED WINE POACHED PEARS
3 pears, peeled just before use.  
3c red wine
1.5c granulated sugar
peel of 1/2 orange
juice of 1 lemon
1 cinnamon stick
2 whole cloves

boil 5 minutes, simmer 20 minutes or until pears are tender.  Cool on ice bath.  Chill pears in poaching liquid at least 48 hours before use.

PISTACHIO FRANGIPAN
100 grams organic unsalted butter, softened
100 grams sugar
1 organic egg
30 grams unbleached all purpose flour
100 grams raw pistachios, ground to a fine meal
1 tsp Almond Extract

Cream the butter and the sugar together. Add the egg. Scrape and mix well. Add the flour and the ground pistachios and mix until all ingredients are well incorporated.

Place the frangipane in a pastry bag and pipe onto the rolled out crust.  


Thursday, November 25, 2010

Pumpkin Panna Cotta & Happy Thanksgiving


Happy Thanksgiving!  I hope this has been a blessed day filled with family, friends & good food.


...And once again, too much time has lapsed since my last post.  I've hardly had time to even think about Thanksgiving, that's how busy this last month has gone.  Between teaching regular classes, and then teaching two back-to-back months of Continuing Education, and then getting ready for the November L.I.M.E. event, it's a wonder I've even gotten any sleep!  (p.s. I do have a LIME post in the works as well....)

But, in preparation for the "Advanced Pastry Boot Camp" Continuing Education course I've been teaching, I tested two delicious panna cotta recipes: Pumpkin Panna Cotta & Nutella Panna Cotta.  They weren't so delicious the first time around, but with some tweeking, they're fabulous now!


Panna Cotta, Italian for "cooked cream," is an item that I had seldom made before this fall.  For whatever reason, I simply hadn't given it enough of a chance.  I am now a believer!  For those who maybe haven't had panna cotta before, it's an egg-less custard that is thickened with gelatin, essentially a "milk jello" but much more delicious than that sounds.  It's a cinch to prepare (like 5 to 10 minutes tops) and it doesn't require an oven (though you do need enough refrigerator space).   Some people use a higher ratio of gelatin, which then allows the custard to be unmolded once firm.  I, however, do not like that much gelatin in my panna cotta (I'd rather lean towards a custard-y texture than a jello-y texture), so mine must be served in their chilling vessels.


I'm especially pleased with the Nutella panna cotta that I got to use the adorable Nutella glasses I brought back from France (with the assistance of my friend Kelli).  Did you know that in France, the small jar of Nutella becomes the most adorable little glass vessel once all the Nutella has been consumed?  While Kelli was in France, she happily consumed several of these jars; and then once I visited, I helped consume more.  Kelli wasn't going to keep the adorable glasses, but I rescued them and carried them in my travel pack for the rest of the trip.  I knew they would one day serve a special purpose :)


If you don't have adorable Nutella glasses, 4 oz mason jars work well too.  I had some left from various canning adventures and they were the perfect size. Anything larger and you won't be able to finish the rich custard in one sitting (or at least I couldn't and I've got an insatiable sweet tooth).  I really like serving panna cotta in vessels which allow one to see the contents inside.   Plus, with the jars, you've got ready-made lids as well!


Another option is to use plastic cups.  I searched high and low for little, clear cups, and alas, none could be found....  But I did find some cute little white ones that worked instead. The nice thing about using plastic cups is that they can be very easily brought to an event and there's no worry about misplacing any of the dishes afterwards.  And there's no dishes to wash!  :)

Perhaps there's some leftover pumpkin puree from Thanksgiving festivities or a spare jar of Nutella that you can use to make one (or both) of these recipes.  


NUTELLA PANNA COTTA

Ingredients
1.5 oz Cold Water
16 oz Heavy Whipping Cream (you may substitute milk or half-and-half if you find cream to be too rich)
5.25 oz Granulated Sugar
2.5 oz Nutella
0.25 oz Pure Vanilla Extract
¼ oz Granulated Gelatin (1 Packet)


Instructions
1.  Into a medium size bowl, add cold water and sprinkle the gelatin package on top of water. Do not stir; set aside.

2.  Place your cream and sugar into a sauce pan over medium heat. Stirring frequently with a wooden spoon until well combined, continue cooking until it nears boiling.

3.  Melt your Nutella for about 30 seconds in the microwave and then add to the cream mixture. Whisk together to combine well.

4.  Remove from heat, add vanilla extract.  Melt the bloomed gelatin in the microwave for 20 seconds. Slowly pour the melted gelatin mixture into the cream mixture and whisk together until well-combined.

5.  Equally divide the mixture into your prepared custard cups. Place in the refrigerator to set up for a minimum of 2 hours or until firm.


PUMPKIN PANNA COTTA

Ingredients
43 g Water, cold
¼ oz         Gelatin (1 package)
342 g Half-and-Half (171 g Cream; 171 g milk)
40 g         Maple Syrup
85 g         Brown Sugar
228 g Pureed Pumpkin (Canned is fine)
7 g         Cinnamon
2 g         Ginger
pinch Nutmeg
pinch Salt
to taste Vanilla

Instructions
1.  Place the water in a small bowl and sprinkle the gelatin over it. Leave for 5 minutes to soften.

2.  Combine the half-and-half in a small saucepan with the syrup, sugar  and pumpkin, and heat until the mixture just reaches the scalding point but does not boil, whisking often. Remove from the heat and whisk in the spices.

3.  Melt bloomed gelatin in the microwave for 20 seconds. Whisk the gelatin mixture into the hot dairy mixture until smooth.

4.  Divide the mixture into 4 glasses or ramekins and refrigerate.

Wednesday, October 27, 2010

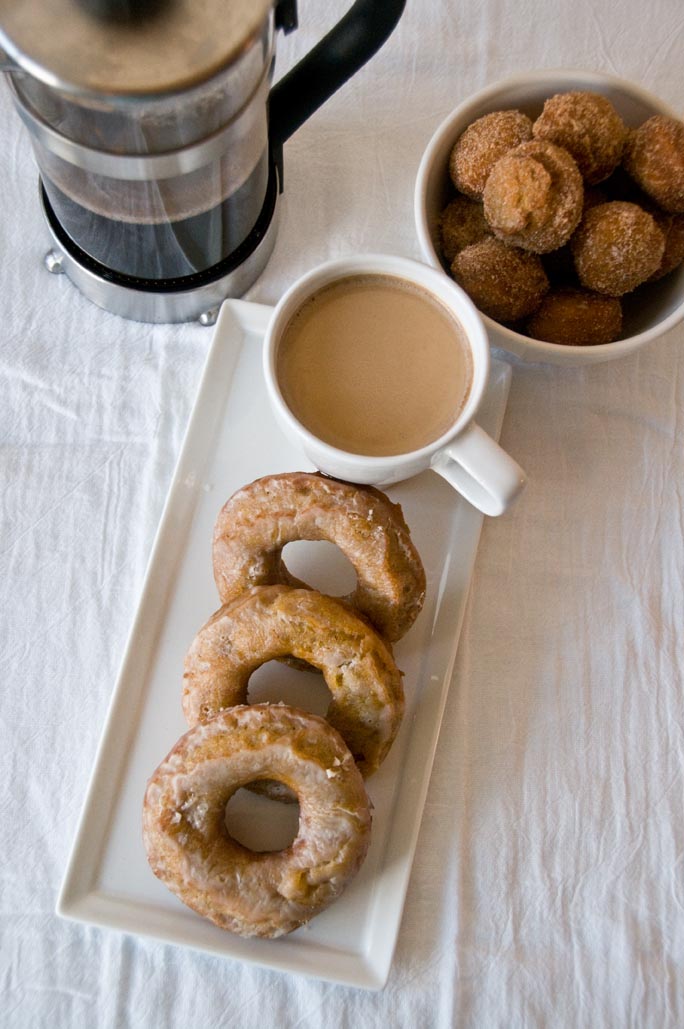
Daring Bakers October 10: Doughnuts

The October 2010 Daring Bakers challenge was hosted by Lori of Butter Me Up. Lori chose to challenge DBers to make doughnuts. She used several sources for her recipes including Alton Brown, Nancy Silverton, Kate Neumann and Epicurious.


What a fantastic challenge this has been!  It's probably one of my most favorite DB challenge to date.  But it wasn't without difficulties..... 

I've had this fear.  A fear of deep frying.  Not a fear of eating fried foods, but of actually, physically frying them.  I was going to attempt to conquer this fear last November with the Daring Baker's Cannoli Challenge, but I chickened out.... and ran out of time.  


I was concerned about all the hot oil and it's ability to seriously burn people.  Seeing as I don't a have roommates, what would I do if I seriously burned/hurt myself?  Who could take me to the ER? I'm really good at over-analyzing things, if you couldn't already tell.  Yes, I am the person who if you don't call me when I expect to hear from you, I suddenly worry that you're dead in a ditch somewhere.  I'm trying to get over this.    

Plus, it just seemed really inconvenient.  What do do with the oil after I was done frying...  Having my apartment smell like a fast food restaurant...  Standing over a hot, oily stove frying doughnuts for hours....  And the list goes on.


But, I decided to conquer the fear.  I decided to challenge myself, after all, that is part of what the Daring Bakers is all about.  So, I got a jug of vegetable oil.  I set aside a Saturday afternoon after teaching Advanced Bakeshop. I dusted off  my trusty candy thermometer.   I kept my phone (and a bowl of ice water) at arms length, just in case of any mishaps.  I bought & lit a lovely scented candle and opened my patio door to try to keep the oil smell from inundating my apartment. And I began heating the oil.

I carefully monitored the temperature of the oil.  And when it finally reached the correct temperature range (350 F to 375F) I reached for my first doughnut hole to test.  But, when I looked down into the oil, I saw these funny red blobs.  That is when I realized that my candy thermometer must have somehow developed a crack.  My perfectly heated vegetable oil was contaminated with mercury (and really I feel we have enough mercury in our diets as it is).  So sad.  Especially sad, since I had used all my oil in attempt #1.  So though I was tired from teaching and really had just planned on staying in the rest of the day, I grabbed my keys and wallet and drove to the grocery store to get more oil. 


I found a second pot, though not as ideal as the first, and my second candy thermometer and went to work heating a second batch of oil for "deep frying attempt #2."  Just as I was, once again, getting ready to test the first doughnut hole, I gazed into the bottom of the second batch of oil.  What did I see?  MORE MERCURY BUBBLES!  ARGH! Thankfully, I had bought a larger jug of oil the second time around "just in case."  I decided that if "deep frying attempt #3" was not successful, then I clearly wasn't meant to deep fry anything. Ever. Period. 

However, "deep frying attempt #3" was successful! Though, by that point both my candy thermometer were broken and I had to settle for testing every few minutes with my instant read thermometer instead. 


Originally, I had planned to make yeast raised doughnuts.  Specifically, I wanted to make spiced pumpkin yeast raised doughnuts.  After much searching of the internet with no results for yeasted pumpkin doughnuts, I settled on making cake doughnuts.  I like yeast doughnuts better (Krispy Kreme trumps Dunkin Doughnuts anyday, in my book) and I do have enough yeast product knowledge to develope a recipe on my own.  But alas, I only had the few precious Saturday hours and I figured it would not be enough time to be a successful venture.  Perhaps in the future I'll develop a yeasted pumpkin doughnut? 

I've been seeing a pleathora of doughnut recipes in the blogosphere lately, partially due to the recent release of Lara Ferroni's Doughnut cookbook (she's a blogger whose blog I follow via my Google Reader accound).  I guess that if there's now a doughnut cookbook, it means that the "low-carb" "Atkins" movement is finally over.  Hurray! 


I decided that if I was going to conquer the fear of deepfrying, I might as well really conquer it and make two kinds of doughnuts: Pumpkin Doughnuts (to which I added a maple glaze or cinnamon sugar after frying), and then one of Lara's recipes I found on another fantastic blog (use real butter) for Apple Cider Doughnuts (to which I added an Apple Cider Glaze to bring out the "apple-y-ness" or cinnamon sugar after frying).

The results from "deep frying attempt #3" were fantastic!  I've never ever tasted cake doughnuts as good as these ones were.  Seriously.  I may be a convert, both to deep frying at home (now that my fear has been conquered) and to the cake doughnut (though only if made at home). 


I can see many more doughnut adventures in my future.  Plus, the looks on peoples' faces when you offer them a freshly fried homemade doughnut is an amazingly satisfying experience.  People are in such shock and awe that you've actually made them yourself.   I try to give away most of the product of my baking adventures (usually to people at church).... I find it's better for my waistline to do so, plus I really enjoy making peoples' day a little brighter by giving them a homemade item.  It just gives me warm fuzzies inside. 

I encourage everyone to try making doughnuts. They're SO WORTH IT!   Thanks to Lori for such a great challenge!  


THE RECIPES
Note: a couple changes I made (or would make in the future)
  • Like Jen of "use real butter" , I reduced my apple cider slightly to try to concentrate the flavor.  But in the end, after frying, I still didn't detect a huge "apple" flavor.  So I added the apple glaze (just apple cider and powdered sugar).  But in the future when I make these again, I think I'd add some actual apple pieces to the dough... perhaps just dicing them small or even grating them into the dough.  I think it would make a lovely addition. 
  • I think the pumpkin doughnuts could use some extra spice.  Maybe it's just because I've grown up eating pumpkin products with lots of spice... but I think in the future, I would double the amount of cinnamon, nutmeg, and ginger. I didn't add the cloves because I didn't have any. I also found that the pumpkin doughnuts seemed to develop better flavor by sitting a little while.  I made mine on a Saturday, but didn't serve them until the following morning.  And, unusually, they tasted better with a little melding time (unusual because fried things usually taste best while they're still warm from the frying process).  
  • I also made a maple glaze for the pumpkin doughnuts.  I just added pure maple syrup (none of the immitation crap) to my confectioners sugar and then added enough cream to make the consistancy I wanted.

Bon Appétit | October 2004

Spiced sugar
1 cup sugar
4 teaspoons ground cinnamon
2 teaspoons ground nutmeg

Doughnuts
3 1/2 cups all purpose flour
4 teaspoons baking powder
1 teaspoon salt
1 teaspoon ground cinnamon
1/2 teaspoon ground ginger
1/2 teaspoon baking soda
1/4 teaspoon ground nutmeg
1/8 teaspoon ground cloves
1 cup sugar
3 tablespoons unsalted butter, room temperature
1 large egg
2 large egg yolks
1 teaspoon vanilla extract
1/2 cup plus 1 tablespoon buttermilk
1 cup canned pure pumpkin
Canola oil (for deep-frying)

Powdered Sugar Glaze
2 cups powdered sugar
LV addition: Maple Syrup  (just enough to flavor and add liquid)

Whipping cream

PREPARATION
For spiced sugar:
Whisk all ingredients in medium bowl to blend.

For doughnuts:
Whisk first 8 ingredients in medium bowl to blend. Using electric mixer, beat sugar and butter in large bowl until blended (mixture will be grainy). Beat in egg, then yolks and vanilla. Gradually beat in buttermilk; beat in pumpkin in 4 additions. Using rubber spatula, fold in dry ingredients in 4 additions, blending gently after each addition. Cover with plastic; chill 3 hours.

Sprinkle 2 rimmed baking sheets lightly with flour. Press out 1/3 of dough on floured surface to 1/2- to 2/3-inch thickness. Using 2 1/2-inch-diameter round cutter, cut out dough rounds. Arrange on sheets. Repeat with remaining dough in 2 more batches. Gather dough scraps. Press out dough and cut out more dough rounds until all dough is used.

Using 1-inch-diameter round cutter, cut out center of each dough round to make doughnuts and doughnut holes.

Line 2 baking sheets with several layers of paper towels. Pour oil into large deep skillet to depth of 1 1/2 inches. Attach deep-fry thermometer and heat oil to 365°F to 370°F. Fry doughnut holes in 2 batches until golden brown, turning occasionally, about 2 minutes. Using slotted spoon, transfer to paper towels to drain. Fry doughnuts, 3 or 4 at a time, until golden brown, adjusting heat to maintain temperature, about 1 minute per side. Using slotted spoon, transfer doughnuts to paper towels to drain. Cool completely.

For powdered sugar glaze:
Whisk powdered sugar (plus maple syrup) and whipping cream to blend. Whisk in additional cream, 1 teaspoon at a time, to form medium thick glaze. Can be made up to 3 hours ahead. Add doughnut holes to bowl of spiced sugar and toss to coat. Spread doughnuts on 1 side with Powdered Sugar Glaze. Arrange doughnuts, glazed side up, on racks. Let stand until glaze sets, at least 30 minutes.

Apple Cider Doughnuts 

taken from the blog "use real butter." Jen includes high altitude instructions as well. She reproduced with permission from Doughnuts by Lara Ferroni

1 3/4 cups (240g) all-purpose flour
1/4 cup (30g) graham flour (or sub all-purpose flour)
2 tsps cinnamon
2 tsps baking powder
1 tsp baking soda
1/2 tsp salt
2 tbsps (1 oz) unsalted butter or vegetable shortening
1/2 cup (120 g) superfine sugar
2 egg yolks
1 tsp vanilla extract
1/4 cup apple cider (used 1 cup apple cider, simmered down to 1/4 cup apple cider concentrate)
1/4 cup buttermilk
vegetable oil for frying

PREPARATION
Whisk together the flours, cinnamon, baking powder, baking soda, and salt. Set aside.

In the bowl of a stand mixer fitted with the paddle attachment, cream the butter and sguar together. Add the egg yolks and beat until the mixture is fluffy and pale yellow. Use a wooden spoon to stir in the vanilla, cider, and buttermilk.

Add the dry ingredients and stir just until the mixture comes together in a soft, slightly sticky dough. Cover and refrigerate for 15 to 20 minutes.

Roll out the dough on a lightly floured surface to about 1/2-inch thick. Cut the doughnuts out with a 2 1/2 inch-diameter cutter. You can re-roll any scrap dough.

Heat at least 2 inches of oil in a heavy-bottomed pot until a deep-fat thermometer registers 360°F (335°F @8500 ft.). With a metal spatula, carefully place the doughnuts in the oil. Fry in small batches, taking care not to overcrowd the pot. Cook until a rich golden brown, about 1 minute on each side (a little longer @8500 ft.).

Remove with a slotted spoon and drain on a paper towel. Let cool to the touch before glazing and eating. You can also bake these doughnuts in a doughnut pan in a 350°F oven for 5 to 10 minutes, but they won’t achieve the same rich golden color.

Friday, October 15, 2010

"L" is for "Laminated Dough"

Where has October gone?  In fact, where has the Fall semester gone?  I've been so busy with teaching (and loving it) that I haven't done as much personal recipe testing.  Well, I have been doing some, but it's for a very special surprise....  I'm the featured chef November chef for a new Charleston underground supperclub: L.I.M.E.  Everything I'm doing for L.I.M.E. is a secret (for now), but I will reveal more as the date gets closer.

In the mean time, I have been very privileged to observe and assist in the "Laminated Doughs & Breakfast Pastries" course this semester.  Laminated doughs and viennoisserie are probably my favorite area study, probably due to the fact that it is the meeting between baking and pastry.  It requires a great deal of time, patience and attention to detail.  Currently, I'm slated to teach the course next semester!  Hurray!  So, here are a few images of things done in class as I observe in preparation for next semester.

Some of the product has been made by Chef Jeff Alexander, some by the students, and a bit done by yours truly as well! It's been a fun change to have time to concentrate on setting up great shots in class, instead of hurriedly snapping photos in between presenting product and hurrying to clean up the classroom.  Thanks to Chef Jeff and all the talented students for allowing me be a part of their class and to photograph their product. 

Napoleon
Puff Pastry, Diplomat Cream, Glaze with chocolate striping.  
Product by Chef Jeff Alexander


Blueberry Chaussons
Puff pastry, blueberry filling
Product by Chef Jeff Alexander


Tart Tatin
Puff Pastry, Caramel, & Apples
Product by Chef Jeff Alexander


Pain au Chocolat
Croissant Dough, chocolate batons, chocolate striping, confectioner's sugar. 
Product by Chef Jeff Alexander

Just look at the gorgeous lamination! Every layer is visible!


Student piping work on Pain au chocolat
Product by D

Loooove the piping!


Apricot Raisin Scrolls (top) Banana Coconut Cream (middle) Pistachio Cherry (bottom)
Product by various students.
All delicious, but I do have a particular fondness for Apricot Raisin Scrolls.... 

A happy accident done by "k." She forgot to add the garnish prior to baking, so we added a stripe of pistachio flour in lieu of an actual pistachio.  Beautiful variation! 

Sourdough Rye Croissant
Sourdough Rye starter, rye flour, carroway seeds, plugra
by Me!

These were a side project that I concocted with the assistance of Chef Jeff.  Wow! They are tasty!


I may never be able to re-produce them, due to the nature of the starter, but they are mighty delicious.  I think they'd make a really killer hot ruben sandwich.


Or they're also good all by themselves!


Stay tuned for more images from my classes and for more LIME sneak peeks!