Showing posts with label Nuts. Show all posts

Thursday, February 27, 2014

Mickey Mouse Macarons & Disney Princess Macarons (GF)


I only hope that we don’t lose sight of one thing -
 that it was all started by a mouse. 
-Walt Disney

This past weekend, I had the pleasure of visiting Walt Disney World with my sisters. Our trip had three main purposes... First, to have an awesome sisters weekend! Second, to cheer and support my sister Jennifer as she ran the 2014 Disney Princess Half Marathon. And third, to experience actual Walt Disney World for the first time!  

right photo credit: Disney World Photographer as part of the Memory Maker program


Yes, we twenty-something ladies had never before been to Disney World! And I had never attended a race anything remotely like the Disney Princess Half Marathon. 25,000-ish runners!  Wow!  So inspirational to see all the runners, many in costume, complete such an impressive feat! 


photo credit: Jennifer Vein


It only made sense to also concentrate on doing as many princess-y things as possible during the trip, since the race was princess themed, and after all we are ladies who grew up watching princess movies.  We may have looked a little silly as adults with no children standing in lines to meet & take photographs with the princesses, but seriously, you only get to experience your first Disney visit once (even if you are a grown up).


I also wanted to take along a special Disney-themed treat for the three of us to eat while in FL... Something that was gluten free, since a couple of us have been watching our gluten intake. I settled on one of my favorites: French Macarons, but not just plain ones….


I created 5 special macaron styles: Mickey Mouse shaped and 4 varieties inspired by our favorite Disney princesses. Unintentionally, we happened to take pictures with these 4 favorite princesses during the trip too!

Cinderella-inspired Macarons: blue shells with spiced pumpkin filling
Inspired by Cinderella's carriage turning into a pumpkin at midnight! 


right photo credit: Disney World Photographer as part of the Memory Maker program

Beauty and the Beast-inspired Macarons: yellow shells with chocolate ganache
Inspired by Belle's party dress

left photo credit: Disney World Photographer as part of the Memory Maker program

Mulan-inspired Macarons: green shells with cherry almond filling
Inspired by Mulan's touching conversation with her father in a cherry blossom orchard following her humiliation at the matchmakers. 


 right photo credit: Disney World Photographer as part of the Memory Maker program

Sleeping Beauty-inspired Macarons: pink shells with raspberry cheesecake filling
Inspired by Aurora's dress & her explorations in the forest (where she could have foraged for berries)

left photo credit: Disney World Photographer as part of the Memory Maker program

After photographing the macarons at home, I carefully packaged them in bubble wrap and a sturdy box & transported them in one of my carryon pieces of luggage. They made a great extra treat during our stay (and were also something that didn’t cost a fortune to buy within the parks).

photo credit: Disney World Photographer as part of the Memory Maker program

The trip itself was magical.  “Magical” is such a common cliche when referring to Disney, but honestly, I can’t think of a better, more applicable adjective. 


We knew the time would be short and that marathon activities (as well as preparations before and recovery afterwards) would take precedent. With less than three days of active park time, there was no possible way to see everything, so we concentrated on the Magic Kingdom (the quintessential Disney experience) and Epcot.  


I cannot say enough good things about MyDisneyExperience (which also is an app for your phone!!) and the new FastPass+ system/Magic Bands. Through MyDisneyExperience, we pre-scheduled a few FastPass+ options for the really popular things (i.e. Enchanted Tales with Belle, Peter Pan’s Flight, Under the Sea, Pirates of the Caribbean, Jungle Cruise, Big Thunder Mountain Railroad, Mission: Space, Maelstrom, etc...). Because we were a little late in trying to make dining reservations (oops!), we ended up winging it and doing more quick service/casual dining options instead. But winging it allowed us to share small items at many different places as we walked through the parks. Like Micky Mouse shaped cake pops and rice krispy treats :) My one food regret from the Magic Kingdom is not trying a Dole Whip--the line was too long.  


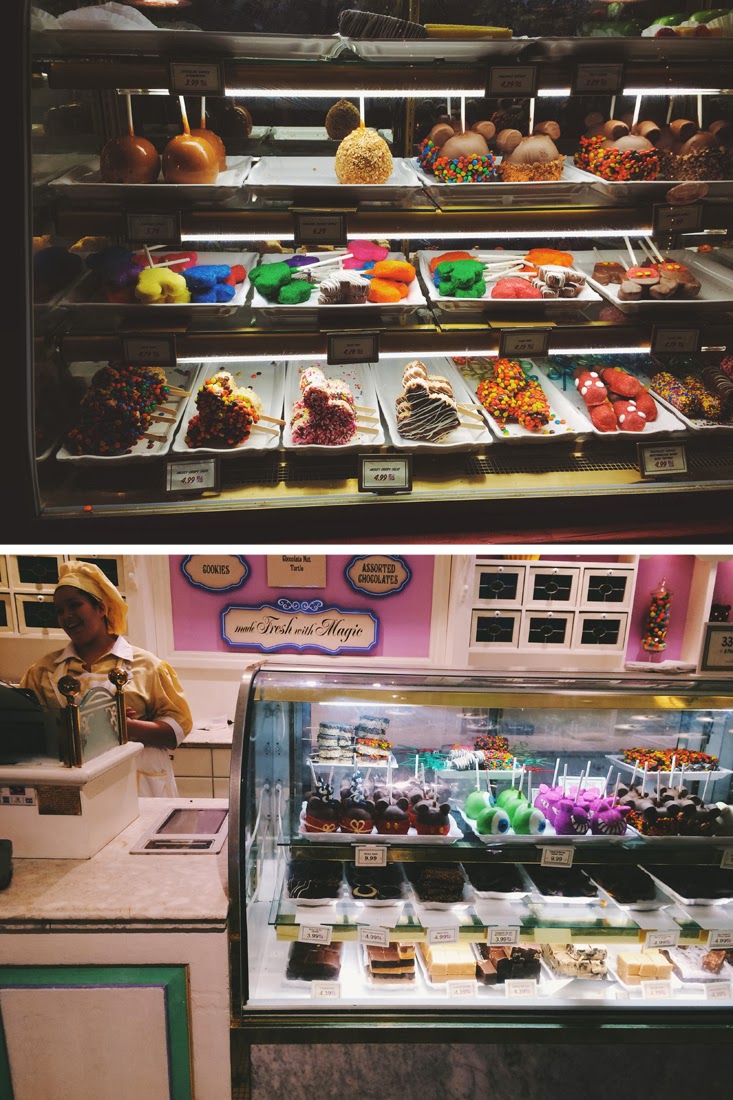
Throughout the Disney parks, there is no shortage of Mickey Mouse-shaped things, food included...


In several of the bakeries/gift shops we were able to watch cast members prepare some of the desserts, like dipping the cake pops and caramel apples.


My favorite non-Micky Mouse-shaped food experiences came in the World Showcase area of Epcot. We visited Epcot for a few hours on our last day before flying back to our respective cities. 


We only saw just an overview of all the countries, but we were able to take a few food breaks.  In the Morocco area, we stopped for some much needed caffeine and to share a tangerine sponge cake roll.  In the England area, we shared fish and chips for lunch. 


Just before leaving, I dashed back to the France area to pick up a few items from the Les Halles patisserie.   


 I couldn’t resist trying one of their raspberry macarons, (though I do think I preferred my macarons to theirs).


Sadly, all great things must come to an end, including this fantastic sisters trip. Already, I’m dreaming of going back... I’m hoping to participate in one of the in the next couple of years? Perhaps not the half marathon, but maybe the 5k or the 10k. I even bought a race shirt to help motivate me to train. And there are still parks left to explore (we didn’t even try to go to Hollywood Studios or the Animal Kingdom or any of the water parks). In addition to starting training, I’d better start scheming another Disney dessert for the future trip! Until next time, Disney World… You were truly magical and inspirational. 


Disclaimer: This post has absolutely no official affiliation with Disney.  All thoughts are purely my own. Photos taken by Disney were personally purchased through their Memory Maker program. No compensation was received for this post, other than the magical memories :) 
Macaron Base
Note: If you want to make all 4 colors, plan to make this recipe twice. Cut each batch in half and color each half of a batch one color. 

It is VERY IMPORTANT to have ALL YOUR MIS-EN-PLACE in place BEFORE beginning.... Ingredients measured, pastry bags/tips prepared, sheet pans lined (with printed out guides underneath the parchment paper, food coloring out, spatulas/bowls/scales handy etc....

180g Almond Flour
240 g Confectioners Sugar

3 g Meringue Powder
2 g Salt
80 g Sugar 
140 g Whites, room temperature 
1/2 tsp Vanilla Bean Paste (or other oil-free flavoring) 

Blue shells (Cinderella) 2 drops sky blue 
Green shells (Mulan) 7 drops lemon yellow, 2 drops leaf green 
Yellow shells (Belle) 5 drops lemon yellow
Pink shells Aurora) 2 drops deep pink 1 small drop ivory 
  1. Prepare sheet pans 5 half sheet pans (or 4 half sheet pans, plus two quarter sheet pans) by lining them with parchment paper. Place guides for 1) full Mickey heads, (print this file) 2) Regular macarons (print this file) underneath the parchment paper. 
  2. Prep 4 piping bags. Fit one with a large round tip (I used an Ateco 804) Note: I only have one 804 tip, so I had to wash it between colors. 
  3. Combine almond flour and confectioners sugar in food processor and pulse to combine & break up any larger almond particles. Divide the dry ingredients into two bowls, each weighing 210 g. 
  4. In a small bowl, combine the meringue powder, salt and sugar. Mix well to incorporate all the meringue powder. 
  5. Whip the egg whites in the bowl of a stand mixer fitted with the whisk attachment. Mix first on medium speed.  Once the whites begin to get foamy, gradually add the sugar/meringue powder/salt mixture, and then increase the mixer speed to high.  Mix until stiff peaks form. Add the vanilla bean paste & mix until just combined. 
  6. Remove the meringue from the mixer and divide into two bowls, each weighing around 112 g.
  7. Add the desired color to one meringue bowl and briefly swirl in with a spatula. Add one bowl of the divided dry ingredients at once and mix until everything is completely combined into a shiny mass & the mixture forms ribbons that will dissipate.  Remember, you can always add more folds later, but you cannot take them back!  
  8. Test the mixture by piping a test shape.  If the piped shape holds a peak (like a hershey's kiss) that will not dissipate after you bang the sheet pan on the counter, the mixture needs a little more folding before the rest of the shells are piped. 
  9. Pipe shells onto the appropriate sheet pans. Bang the pans of piped macarons on the counter. 
  10. Repeat steps 7 to 9 with the second bowl of bowl of meringue. Then, repeat the whole recipe again to make 2 more colors, if desired. 
  11. Allow the shells to dry 45 mins to 1 hr, depending on the humidity. The shells are ready to bake when they have developed a skin and are dry on top. 
  12. Preheat the oven to 350 F. Bake one pan at a time.  As soon as the pan is placed in the oven, drop the temp down to 300 F. Bake for 10 minutes, rotate the pan and bake another 8-10 minutes, depending on the size of the shells. The pans with the smaller ones will take less time than the pans with the full Mickey heads. 
  13. Allow the shells  to cool on the sheet pan. 
  14. Fill with appropriate filling (see recipes below) and refrigerate at least 24 hrs to allow flavors to meld. Macarons filled with the fillings below will keep over a week in an airtight container in the refrigerator. 

Filling Recipes
  • I had roughly 8 oz of Swiss Meringue Buttercream leftover from the Pistachio Raspberry Cake, but if you don't have leftover icing, I've included the recipe at the bottom.  
  • If you plan on making all fillings, I suggest making them in the order I've listed here. 
  • I created a fifth hybrid filling by mixing leftover Belle Ganache with leftover Aurora Raspberry filling. It was super delicious & I used it to fill the macarons that had different colored tops & bottoms you see in the below image. 

Mulan’s Cherry Almond Filling
4 oz Swiss Meringue Buttercream, room temperature
3 oz Cherry Preserves
1/4 tsp Almond Extract
2 drops Pink coloring (optional) 
  1. Mix all ingredients well. Transfer the mixture to the refrigerator and chill for 20 minutes. Mix. If the filling has thickened enough to pipe, place into a piping bag (or a ziplock bag with the corner cut off) and pipe a little onto the bottom of a green macaron. Top with a second macaron & press lightly to adhere. 
  2. Refrigerate for at least 24 hrs to allow flavors to develop before serving. Store leftover macarons in the refrigerator for up to one week.
Aurora's Raspberry Cheesecake Filling
2 oz Swiss Meringue Buttercream
2 oz Seedless Raspberry Jam
1/2 tsp Cream Cheese Emulsion
  1.  In a small microwave safe bowl, heat the buttercream and raspberry jam until melted. Stir until well combined. Add cream cheese emulsion.  
  2. Transfer the mixture to the refrigerator & chill for 20 minutes. Mix. Refrigerate 20 more minutes.  If the filling has thickened enough to pipe, place into a piping bag (or a ziplock bag with the corner cut off) and pipe a little onto the bottom of a green macaron. Top with a second macaron & press lightly to adhere. 
  3. Refrigerate for at least 24 hrs to allow flavors to develop before serving. Store leftover macarons in the refrigerator for up to one week.
  4. Mix leftover raspberry filling with leftover ganache for an amazing hybrid filling. 
Belle's Chocolate Ganache Filling
4 oz Heavy Cream 
4 oz Dark Chocolate, chopped {I used 60% chocolate} 
  1. In a small saucepan, heat the cream until it just simmers. 
  2. Pour the hot cream over the chocolate, let sit for a minute, then whisk until all the chocolate is melted & the mixture emulsifies into one mass. 
  3. Transfer the mixture to the refrigerator and chill for 20 minutes. Mix. If the ganache has thickened enough to pipe, place it into a a piping bag (or a ziplock bag with the corner cut off) and pipe a little onto the bottom of a yellow macaron. Top with a second macaron & press gently to adhere. If the ganache is still runny, refrigerate longer, stirring every 10 minutes. 
  4. Refrigerate the filled macarons for at least 24 hrs to allow flavors to develop before serving. Store leftover macarons in the refrigerator for up to one week.
  5. Mix leftover ganache with leftover raspberry filling for an amazing hybrid filling. 
Cinderella’s Spiced Pumpkin Filling
3 oz Swiss Meringue Buttercream, room temperature 
0.35 oz Brown Sugar
3 oz Canned Pumpkin Puree
1/4 tsp Cinnamon
1/8 tsp Nutmeg, freshly ground, if possible
1/8 tsp Ground Ginger
1/2 tsp Vanilla Bean Paste
  1. Mix all ingredients well. Place into a piping bag (or a ziplock bag with the corner cut off) and pipe a little onto the bottom of a blue macaron. Top with a second macaron & press gently to adhere. 
  2. Refrigerate for at least 24 hrs to allow flavors to develop before serving. Store leftovers in the refrigerator for up to one week. 
Swiss Meringue Buttercream
4 oz Egg Whites
8 oz Granulated Sugar
12 oz Unsalted Butter, softened to room temperature 
splash Vanilla Extract
  1.  In a very clean metal mixing bowl (preferably one that attaches to a stand mixer), whisk together the egg whites and granulated sugar. 
  2. Place the mixing bowl over a small sauce pan of simmering water to make a double boiler.  Continue whisking the whites and sugar until all the sugar has dissolved and the mixture reaches at least 140 F on an instant read thermometer.  
  3. Remove the top bowl (being careful not to burn yourself on the hot metal of the bowl or on any drips from the hot condensation on the bottom of the bowl) & attach to a stand mixer. Fit the mixer with the whisk attachment. Whip on high speed until a fluffy meringue forms & the bowl cools to room temperature. 
  4. Once the meringue cools completely, lower the speed of the mixer to medium and begin adding the butter, one tablespoon at a time. 
  5. After the butter has all been added, scrape down the sides of the bowl and add the vanilla. Mix on medium high speed just to ensure everything is combined. 
  6. Hold the icing at room temperature until ready to use. 

Wednesday, February 19, 2014

GF Pistachio Raspberry Cake & FBS 2014 Recap

“You can’t have your cake and eat it too”

Though I’m not exactly sure why, this post has been one of the hardest for me to write . But it must be the right thing for me to write, because it scares me a bit.....  And I’ve recently been learning that fear isn’t necessarily a bad thing. Writing this post has required much more personal reflection than I anticipated and a good deal of vulnerability...


It was a somewhat last minute decision when we decided I should attend Food Blog South 2014 in Birmingham, AL. I had been dreaming of attending a food blogging conference for years, but either the timing was off, or the conference just didn’t fit into the budget. Food Blog South had been well recommended by my friends Helene and Tami, and in the month prior to the conference date, I just couldn’t get the idea of attending out of my head.


I thought attending FBS could help me with some of the technical side of blogging and perhaps help me figure out how to monetize Sweet Treats. I don’t have advertisers or sponsors, so most of the time, everything seen on Sweet Treats is paid for out of my own pocket. I would love to generate some income from something I’m passionate about, like pastry and photography and teaching and documenting/telling stories....


So on a leap of faith, and a few prayers, I purchased my ticket for FBS, booked the hotel, and figured out my airline ticket.  Since Tami was also going to the conference (she and Helene were speaking at a couple sessions about food styling and photography), she graciously invited me to come to the Atlanta area before the conference and drive to and from Birmingham with her.  Little did we know that I would later get stuck in Georgia due to the snow storm, but I’ve already told that story.


I knew before the conference that I would be given a lot of of information all in one day, but I don’t think I quite understood just how huge that amount of info would really be.  So much information in one day!  By the end of it, I truly felt like my head may explode....  It felt like trying to drink from a firehose instead of a water fountain. 


Though I wish I could have attended multiple sessions at the same time, I decided to attend mostly “Technical Track” sessions. I took as many notes as possible & even live-tweeted a few of the sessions to help myself remember key points. But in the end, Food Blog South challenged me in ways I didn’t expect. I left with a lot of personal questions to contemplate and soul searching to do... Why do I blog in the first place? Who am I creating these posts for? Myself? Others? Potential advertisers/sponsors? I don’t have all the answers, even now that I’ve been actively pondering these questions for several weeks.


I realize now that my preconceived ideas about attending the conference were a bit naive. Of course there isn’t a magic button or a simple way to turn what I do into a business, if that’s even what I still want to do. And I realize that it was foolish to think I could keep Sweet Treats exactly the same as it has been & expect to turn it into a business.  Something would have to change, potentially quite drastically, and I’m not sure I’m quite ready to compromise what I’ve been building for over 4 years. That’s not to say that in the future there won’t be changes, I just know that I’m not ready now. I can’t have my cake and eat it too.


But one of the most profound, lasting effects of Food Blog South 2014 is that it has challenged me to think of myself, for the first time, as a writer. Even typing that sentence makes me a bit nervous. I’ve more often considered myself a pastry chef/photographer/educator, who happens to do a bit of writing on the side.... I’ve never considered myself good enough to be called a writer. But I’m realizing that the writing I do is just as important as the photos or the food.  My blog readership might not be large, but they are *readers* nonetheless.  FBS showed me that perhaps I need to explore this world of “writing” more than I have in the past. 


One final note, before I switch to cake..... I would be remiss if I didn’t mention Molly Wizenberg’s lovely keynote address at the end of Food Blog South. Her words were so inspiring and encouraging that I really feel they deserve their own recap in a future post.  In some ways, I think her talk helped me to have the courage to write this post. But, if you want a preview, author/writing coach/editor and FBS speaker Dianne Jacob transcribed a portion of Molly’s address, which you can read here.


As I’ve been trying to process my feelings and grapple with thinking of myself as a writer, my mind has continued to wander towards cake. I know, shocking, since I do have an insatiable sweet tooth.  I’ve been thinking about layer cakes & about how much I wanted to make one--also ironic, because layer cakes are usually more of a source of stress rather than joy. But there’s something almost meditative about the steps to make the cake, the icing and the assembly/decoration process. All the steps take time, giving a person a lot of time to think.


During the making and assembling of this delicious pistachio cake, the phrase “you can’t have your cake and eat it too” kept cycling through my head. It has been a good reminder to me and frankly a comfort too. I know the cake isn’t perfect (I’m a bit out of practice), but I appreciate it’s aesthetics, imperfections and all, and what the cake stands for.  And yes, I ate two slices :)  


Pistachio Cake with Raspberry Filling 
cake adapted from Epicurious.com
Design inspired by Seven Spoons 
Yields 2-6" cakes (approximately 8 to 10 servings)

I've been eyeing this cake design for several years. Though the original source sadly doesn't include the recipes (or any images of the cake interior), I found a suitable replacement on Epicurious. The pistachio cake just might be one of my new all-time favorite cakes!  

Pistachio Cake 
6 oz Raw Pistachios
4.25 oz / 1 cup Jeanne’s GF AP Flour Mix (or use regular AP if not GF)
2 teaspoons baking powder
1/4 teaspoon salt
4 fl oz / 1/2 cup whole milk
3/4 tsp vanilla extract
1/8 tsp Almond Extract
4 oz / 1/2 cup / 1 stick unsalted butter, softened
7 oz / 1 cup sugar
3 large eggs
  1. Preheat the oven to 350 F. Butter two 6-inch round cake pans. Line the bottoms with parchment paper & butter the parchment. Set aside. 
  2. Process the pistachios in a food processor until finely ground (but not so much that you create pistachio butter). 
  3. Whisk together the finely ground pistachios with the GF flour, baking powder and sea salt. Set aside.
  4. In a liquid measuring cup, combine the milk with the extracts. Set aside. 
  5. In the bowl of a stand mixer fitted with the paddle attachment, cream the butter and granulated sugar on low to medium speed until the ingredients have completely come together, have lightened in color and increased in volume.  Scrape down the sides of the bowl.
  6. Add the eggs in two additions, mixing on low speed after each addition.  
  7. Add the pistachio mixture alternately with the milk mixture, beginning and ending with the pistachio mixture. Mix on low speed. Scrape down the sides of the bowl, remove the bowl from the mixer & finish mixing by hand. 
  8. Divide the batter evenly between the two prepared pans. Smooth the tops well with a small offset spatula. 
  9. Bake the cakes in the preheated oven for 25-35 minutes, or until a toothpick inserted into the center of the cake comes out clean. 
  10. Cool the cake in the pan for 10 minutes, then invert the cakes onto a cooling wrack to cool completely. 
Note: I had a few mishaps when baking the cake layers. The original recipe makes a single 9" cake, but when I was adapting the recipe, I increased the amounts too much, overfilled my pans & ended up with overflowing cake batter in the oven during the baking process. Coincidentally, the lava-cake phenomenon caused the middles to sink more than they normally would.  I have adjusted the cake amounts so that you shouldn't have the overflowing mess I had and hopefully the sinking middle is fixed as well :) And if you're looking for volume amounts instead of weights, see the original recipe link. 

Swiss Meringue Buttercream
4 oz Egg Whites
8 oz Granulated Sugar
12 oz Unsalted Butter, softened to room temperature 
splash Vanilla Extract
  1. In a very clean metal mixing bowl (preferably one that attaches to a stand mixer), whisk together the egg whites and granulated sugar. 
  2. Place the mixing bowl over a small sauce pan of simmering water to make a double boiler.  Continue whisking the whites and sugar until all the sugar has dissolved and the mixture reaches at least 140 F on an instant read thermometer.  
  3. Remove the top bowl (being careful not to burn yourself on the hot metal of the bowl or on any drips from the hot condensation on the bottom of the bowl) & attach to a stand mixer. Fit the mixer with the whisk attachment. Whip on high speed until a fluffy meringue forms & the bowl cools to room temperature. 
  4. Once the meringue cools completely, lower the speed of the mixer to medium and begin adding the butter, one tablespoon at a time. 
  5. After the butter has all been added, scrape down the sides of the bowl and add the vanilla. Mix on medium high speed just to ensure everything is combined. 
  6. Hold the icing at room temperature until ready to use. 
Assembly
Pistachio Cakes (cooled)
6-ish Tbl Seedless Raspberry Preserves
Swiss Meringue Buttercream
Fresh Raspberries & chopped pistachios for garnish 
  1. Use a long serrated knife to level each cake layer and torte it into two separate layers. Set aside. I use a revolving cake stand to decorate. It isn’t necessary, but it does make the process much easier! 
  2. Place approximately 1/4 of the icing into a piping bag, either fitted with a large plain tip or simply cut off the tip of the piping bag.
  3. Place one cake layer onto a cake board. Use a small offset spatula to spread 1.5 Tbl to 2 Tbl of seedless raspberry preserves onto the top of the first layer, leaving the outside 1/2” free from jam. Use the icing in the piping bag to pipe a “dam” in the jam free edge. Top with a second cake layer press lightly to adhere. Repeat the process until all the last layer is placed on top. 
  4. Crumb coat the cake, if desired, by spreading a very thin layer of icing over the top and sides of the cake, just to seal in any crumbs.  Refrigerate for 20 minutes. 
  5. After the optional crumb coat has chilled, give the cake a second, thicker layer of icing. Center the cake on the revolving cake stand, and add a generous dollop of icing to the top of the cake. Use a large offset spatula to spread a thick layer of icing over the top of the cake and down the sides.  Add additional icing to the side of the cake, if necessary.  Use a bench scraper (or the same large offset spatula) to remove the excess icing & smooth the sides (this process should also push the icing up to heights greater than the top of the cake).  Once the sides are smoothed, use the back side of a clean offset spatula to smooth the top of the cake. Come at the cake from a 45 degree angle & pass the back edge of the spatula over the top of the cake--this process should smooth the top and remove excess icing. 
  6. Once the cake has been iced, decorate with chopped pistachios and fresh raspberries. 
  7. Refrigerate the cake for a couple of hours to allow the flavors to meld, but allow to sit at room temperature for at least 20 minutes before serving for best flavor and texture. 
  8. Cover any exposed cake edges (after serving) and store the leftovers in the refrigerator for up to a week.  Or freeze, well wrapped, for longevity.  
Note: If you’re new to cake assembly or would like to see techniques very similar to the ones I use to to ice cakes, visit Zoe Bakes or Sweetapolita for their instructional videos.  

Note: this post contains affiliate links

Friday, November 22, 2013

Pecan Pie (GF)


Sometimes, we do not fully realize a person’s influence on us until they are no longer with us. Case in point, my friend Chef John Michael Lerma, who sadly, at the age of 52, passed away earlier this month.


John Michael, or JML as he is often referred to, was a native of my home state of North Dakota & also attended my alma mater, the University of North Dakota, though in the past years, he resided in the Twin Cities area of Minnesota.  In addition to being a noted food writer, cookbook author, and competitor in culinary competitions, he also taught in various demonstration kitchens, was a representative for Emile Henry bakeware, and he lead culinary vacations (!!) to both Italy & Mexico.


While I was working at the University of North Dakota Wellness Center, both in the marketing department and as an instructor for the Culinary Corner Demo Kitchen, John Michael did several guest demonstrations. He also cooked for us demo kitchen employees a few times & just talked to us about life and experiences.  He had such a big heart & truly loved food (and people). I was so saddened to hear of his passing.


When I met John Michael, I was in an interesting place in life... I knew I would be moving to South Carolina the following year to fulfill my dream of attending culinary school, but I didn’t really know what life would bring beyond that. Having also earned an art degree in graphic design/photography and also having worked in a marketing department, I really appreciated an atmosphere of collaboration & helping your fellow artists become the best they could be. But it seemed to me as though kitchens were often more competitive than collaborative. John Michael really embodied the spirit of collaboration I found was lacking in many kitchens. It was easy to tell from conversations with him one-on-one and from seeing him teach a room full of eager pie fans how excited he was about sharing his knowledge with others. He genuinely cared about his audience & wanted them to be as successful as possible in their kitchen endeavors. He was genuine, not at all afraid to reveal his own tricks & tips.


John Michael was famous for many food items (I still love to make his pizza dough & this amazing creamed mushroom dish I saw him demo once), but pies were one of his specialties.  He won seven (!) national pie competitions & his second cookbook is entirely pie themed.  I thought the best tribute to him was to make a pie in his memory. And to make that pie in the pink Emile Henry pie dish he graciously gave to me (and autographed) on one of his visits.  With Thanksgiving around the corner, making his pecan pie recipe, adapted to be gluten free, seemed the most appropriate.


In preparation to make this pie & write this post, I reflected on my experiences with John Michael Lerma. I like to think that perhaps his genuine, caring manner has influenced my own style, both when I was teaching in a culinary classroom, and now as I “teach” through blogging. I hope that I can portray even a fraction of his passion for food & for others. I will also forever remember him as the person who introduced me to the wonderful world of Vanilla Bean Paste(which truly is one of my favorite baking ingredients).


John Michael, you will be missed!  But your legacy will live on in your cookbooks & in the many lives you touched!

Pecan Pie (GF) 
adapted from Garden County Pie
yields 8 servings 

1 recipe GF Pate Brisee 
tapioca starch for dusting 

FILLING
4 large eggs, room temperature, well beaten
5.25 oz / 3/4 c Granulated Sugar
2.65 / 1/3 c melted unsalted butter
3.65 oz / 1/3 c pure maple syrup (NOT pancake syrup)
5.5 oz / 1/2 c light corn syrup
5.5 oz / 1/2 c dark corn syrup )i only had 4 oz, so i added an additional 1.5 oz of light) 
2 tsp vanilla bean paste
1 tsp Bourbon (optional) 
1/4 tsp sea salt
1 1/2 c pecans, broken, plus additional for decorating the top of the pie (for me it was 3.9 oz +2 oz inside) 

Whipped Cream for serving, optional 
  1. Make the pie dough & allow it to rest in the refrigerator at least 2 hours (overnight is even better. 
  2. When ready to assemble the pie, remove the dough from the refrigerator & place it on a surface that has been well dusted with tapioca starch. Dust the top of the dough & the rolling pin with additional tapioca starch.  
  3. Quickly roll out the dough, keeping it as circular as possible, until it is a little larger than a 9” pie pan.  Move the dough around on the counter/board to make sure it isn’t sticking.  
  4. Gently fold the dough in half & place it into the center of the pie pan.  Unfold the dough & press it lightly with your finger tips & knuckles until it is formed to the pan.  Use a knife or kitchen sheers to cut off any excess.  Place the pan into the refrigerator while the rest of the filling is made.
  5. Preheat the oven to 375 F. 
  6. In a large bowl, whisk together the eggs, granulated sugar, melted butter, pure maple syrup, corn syrups, vanilla bean paste, bourbon and sea salt. Add the pecans & stir to combine.
  7. Remove the prepared crust from the refrigerator & set on top of a rimmed sheet pan. Optional, use the edges of a spoon to make the scalloped pattern by gently rolling the tip of the spoon (I used an ice tea spoon) over the edge of the dough. Add a divot inside each scallop.  
  8. Pour the prepared filling into the crust.  Place additional pecan halves around the edge of the pie, if desired.
  9. Bake for 20 minutes at 375 F, then reduce the oven to 350 and bake for an additional 40 to 50 minutes.  Check the pie often in the end stages & cover the edges of the pie with foil if they become too dark.  When the pie is done, the edges should be set & the center will be just a little wobbly.
  10. Remove the pie from the oven & allow to cool completely. Refrigerate, if possible, a couple hours before serving--this will make cutting the pie easier. 
  11. Cut into pieces & serve with whipped cream, if desired. The crust will be very crumbly, but delicious. Leftovers can be stored room temperature in a covered container, but the pie is easier to cut and serve when refrigerated. 
This post contains affiliate links.