Showing posts with label Bread. Show all posts

Wednesday, March 15, 2017

Irish Soda Bread (AIP & Paleo), with video

Irish Soda Bread (AIP & Paleo)

My husband loves to make (and eat) corned beef and cabbage, with carrots & potatoes for St. Patrick’s Day. Once we got married, I started making gluten-free Irish soda bread to contribute to the festivities—we quite often host friends for this epic meal :) Last year, I experimented last minute with making a paleo Irish soda bread that only needed eggs as an AIP reintroduction. It was OK, but not as tasty and I’d liked and it was really really crumbly… Plus, I really wanted to figure out a version that people still in the elimination phase of AIP could enjoy too. This year, I went completely back to the drawing board and came up with this recipe I’m sharing today.

Irish Soda Bread (AIP & Paleo)

Now, as with pretty much all AIP versions of baked goods, keep an open mind when trying this recipe… By keeping this recipe elimination phase compliant, I’ve worked with some pretty strict ingredient limitations, and to be honest, it has been a couple years since I’ve had “real” Irish soda bread to compare my version to. But I have come up with what I consider to be a pretty delicious, fairly close to the real deal option.

Irish Soda Bread (AIP & Paleo)

This AIP Irish soda bread tastes the best & has the best texture the day it’s baked. However, since I also don’t recommend eating an entire loaf in one day by yourself, it does make some pretty epic toast slathered in fruit-sweetened jam (like the St. Dalfour apricot in these photos) the following day…. Just make sure to toast it in a gluten-free toaster/toaster oven or under the broiler.

Irish Soda Bread (AIP & Paleo)

Also, since I know AIP baking can be more challenging than regular baking, I’ve created my first recipe-tutorial video detailing how I make this Irish Soda Bread. Check it out below, or on YouTube. Happy baking!


Irish Soda Bread (AIP & Paleo) 

8 fl oz (1 cup), plus 1-2 additional teaspoons coconut milk 
1 teaspoon apple cider vinegar  
75 g (2/3 cup) coconut flour  
80 g (2/3 cup) tapioca starch  
85 g (2/3 cup) arrowroot  
1 tablespoon gelatin  
1 tablespoon coconut sugar 
1 teaspoon AIP baking powder (see recipe below) 
1 teaspoon baking soda  
1/2 teaspoon sea salt  
48 g (4 tablespoons) palm shortening  
80 g (1/2 c) zante currants
  1. Preheat the oven to 375 F. Line a baking sheet with a piece of parchment paper—I used a quarter sheet
  2. Measure the coconut milk into a liquid measuring cup. Add the apple cider vinegar. Set aside to make faux “buttermilk.”  
  3. In a large mixing bowl, whisk together the coconut flour, tapioca starch, arrowroot, gelatin, coconut sugar, AIP baking powder, baking soda, and salt until evenly combined. 
  4. Add the palm shortening to the mixing bowl. Use a fork or pastry blender to work the shortening in to the dry ingredients. Continue until the ingredients resemble coarse meal. 
  5. Pour in the coconut milk/vinegar. Stir with a silicone spatula or wooden spoon. Once mostly combined, switch to hand kneading until the dough can be squeezed together to form a ball. If needed, add additional coconut milk 1 tablespoon at a time (adding a maximum of 2 tablespoons). The finished bread will have the best texture with the least amount of coconut milk added, but the dough does need to be able to form into a ball that doesn’t completely break apart. 
  6. Form the dough into a disc & place on the prepared baking sheet. Use a serrated knife (I have this one) to cut an X in the center of the dough—the X allows heat to better penetrate to the center of the bread as it bakes. 
  7. Place the pan in the pre-heated oven & bake for 30 minutes. After 30 minutes, rotate the pan and bake for another 10 to 15 minutes, or until the center X is dry & the bread is golden. 
  8. Remove the finished bread from the oven & allow to cool completely before slicing. This bread has the best texture the day it is made, but it also makes excellent toast the following day. Store any leftovers, wrapped, at room temperature.
AIP/Paleo Baking Powder
81 grams (1/2 cup) cream of tartar 
55 grams (1/4 cup) baking soda
30 grams (1/4 cup) arrowroot or tapioca 
  1. Sift together the cream of tartar, baking soda, and arrowroot/tapioca.
  2. Store in an airtight jar. Use wherever baking powder is used.
Irish Soda Bread (AIP & Paleo) 
    This post contains affiliate links, meaning Sweet Treats makes a small commission off items purchased 
    after an Amazon link is clicked with no additional cost to you. Thanks for your support.

Thursday, September 18, 2014

Zucchini Bread (Paleo & Nut-free)


At the end of summer each year, it seems as though zucchini recipes & zucchini things are everywhere as people are trying to either savor one of the flavors of summer, or they’re trying to figure out how to use up the crazy amount of zucchini their garden produced. We’ve eaten a fair amount of zucchini this summer, but most all of it was purchased from a store. Someday, it’ll be nice to grow our own & join the group of people with overloads of zucchini.


Most of our zucchini consumption has been savory: Sautéed with shallots & bacon, roasted in the oven, sliced into stir-fry/hash, grated raw on salads & the ever amazing zucchini noodles (aka “zoodles”)... I did make this zucchini bread a couple of times after successfully reintroducing whole eggs. Even the non-paleo people remarked that they enjoyed it, though it isn’t as sweet as most zucchini bread recipes.  One night back in ND, I served it more like a pound cake than a quick bread, by topping slices with a little coconut whipped cream and an extra drizzle of local honey.


Often times, paleo baked goods rely heavily on the use of almond flour & other nut flours. One of the things I like about this particular recipe is that it uses coconut flour instead of almond flour. For me, and many other people who are in the reintroduction stages of the autoimmune protocol (aka AIP and/or autoimmune paleo), keeping my nut consumption on a limited level helps me to feel the best. Coconut flour is still a bit of a mystery to me, because it acts so different than regular wheat flours & other gluten free flours. This zucchini bread isn’t quite as tall as others may be, and the coconut flour does give it more of a spongy texture, but nevertheless, it is very, very tasty!  


I even have to be a little careful about how often I make this recipe. It’s taken a lot of conscious effort (and time) to subdue my sweet tooth and the part of me that craves treats... Lately, eating a couple bites of fruit is enough to satisfy me (and I’ve even been working to reduce my fruit consumption, because even excess sugars from fruit are not good for me). When I have this zucchini bread around, I find myself constantly eating tiny slices of it! I should be continuing in the mindset that sweets, even ones made with safe-to-me, paleo compliant ingredients, are still to be enjoyed sparingly.  Pairing some of the leftover zucchini bread with chicken sausages & a homemade paleo-ified bulletproof pumpkin spice latte was a special treat. 


Zucchini Bread (Paleo & Nut-free) 
adapted from Small Footprint Family

Note: this recipe is *close* to AIP, but still includes eggs (which I have successfully reintroduced in small quantities). If you’re following strict AIP, you could try the gelatin egg replacer (see this post); however, I have not tested that substitution yet....  

1 Zucchini, grated (around 5.7 oz)
56 g / 1/2 c Coconut Flour (I use Bob's Red Mill Organic Coconut Flour)
3/4 tsp Baking Soda
1/2 tsp Sea Salt
2 Tbl Cinnamon
4 large pastured eggs, room temperature
64 g / 3 Tbl Raw Honey
13 g (1 Tbl) Coconut Oil, room temperature, plus additional for the pan
1 ripe banana, mashed

  1. Using the large openings on a box grater, grate the zucchini into a bowl. Allow to sit while measuring the rest of the ingredients. 
  2. Preheat the oven to 350 F. Line a loaf pan with parchment paper & brush the paper with coconut oil. Set aside. 
  3. In a small bowl, mix together the coconut flour, baking soda, salt and cinnamon. 
  4. In a separate medium sized bowl, whisk the eggs, honey & coconut oil. Mix in the mashed banana. Add the dry ingredients & whisk thoroughly until there aren’t any lumps. 
  5. Squeeze as much liquid as possible from the grated zucchini (I do this by dividing the zucchini into a couple handfuls & squeeze it as hard as I can) & add it to the batter. Pour into the prepared loaf pan & bake for 45 to 50 minutes (or until a toothpick inserted into the center comes out clean). 
  6. Cool for a few minutes in the pan, then remove, using the parchment liner to assist. 
  7. Once completely cooled, store in an airtight container at room temperature. Slice just before serving. This zucchini bread is not extremely sweet, so you may wish to serve it with an extra drizzle of honey, if you’re not following a low sugar diet. 
This post contains affiliate links.

Monday, December 9, 2013

Gingerbread Pound Cake (GF)


How did it get to be December 9th already?!? I’m a bit behind on holiday prep this year, but maybe this gingerbread pound cake will help me get into holiday overdrive.  


Most gingerbread recipes produce cake that is fairly light and delicate, but in this case, I wanted a sturdier cake while still retaining the warm spice & molasses flavor of a traditional gingerbread.


And a loaf-shaped cake somehow feels a bit more relaxed, not to mention eating it on the go is easier (though perhaps that isn’t so much a good thing to mindlessly be eating cake while doing other things).


I’m sure it would be great with a glaze or an icing, but in the spirit of trying to keep things a bit lighter during the holiday season when indulging is inevitable, I decided to forgo any glaze.  It was just the right amount of sweet without any extras.


We enjoyed eating cold slices of the cake just on their own accompanied by piping hot cups of Holiday Tea. But to dress it up a bit for a dinner party with friends, I added a scoop of eggnog ice cream & a drizzle of orange sauce (from this post) --absolutely delicious!


Gingerbread Pound Cake (GF) 
adapted from Channeling Contessa via The Every Girl
Yields one 9x5 inch loaf

8.5 oz / 2c Jeanne’s Gluten Free AP Flour Mix (or substitute cake/AP flour if not GF)
1 tbl Ground Ginger
2 tsp Cinnamon
1/2 tsp Cloves
1/2 tsp Nutmeg
1/2 tsp Cardamom 
1 tsp Baking Powder
3/4 tsp Salt
6 oz / 12 tbl (1.5 sticks) Unsalted Butter, softened
8 oz / 1 brick Cream Cheese, softened
3.5 oz / 1/2 c Granulated Sugar
5.6 oz / 3/4 c packed dark brown sugar
4 oz / 1/3 c Molasses
4 eggs, room temperature
2 tsp Vanilla Extract
  1. Preheat the oven to 325 F.  Grease a 9x5 loaf pan with pan spray (or additional softened butter).  Line with parchment and grease the parchment too. 
  2. In a medium mixing bowl, add the flour, spices, baking powder, and salt. Whisk to combine. Set aside.
  3. Place the softened butter & cream cheese into the bowl of an electric mixer fitted with the paddle attachment. Cream on medium speed until smooth & completely combined. Scrape down the sides.
  4. Add the sugars & continue mixing on medium speed until light and fluffy.  Add the molasses & beat until smooth.  Scrape down the sides.  
  5. Add the eggs, one at a time, as well as the vanilla, & mix until completely combined. 
  6. On low speed, stir in the dry ingredients.  Mix until just combined. Remove the bowl from the mixer & use a spatula to finish mixing by hand.  
  7. Pour the batter into the prepared pan & place into the preheated oven. Bake for 1 hr and 25 minutes (or until a toothpick inserted into the center of the cake comes out clean). 
  8. Cool for 30 minutes in the pan, then remove from the pan.  
  9. Allow to cool completely before slicing. Store any leftovers, well wrapped, at room temperature or in the refrigerator. Loaf may also be frozen for longevity. 

Note: this post may contain affiliate links. 

Tuesday, November 26, 2013

Cinnamon Chip Scones (GF)


No matter whether it was Thanksgiving, Christmas or Easter, I grew up with the tradition of having a special holiday breakfast.  My mom would make an egg casserole (which we called “egg bake” in the upper midwest) and cinnamon rolls, and there would also be fruit & juice. Mom would set the table with a festive tablecloth, the crystal juice glasses that otherwise lived in the china cabinet, sometimes the fine china, but always with holiday napkins. After my dad said the blessing, we would clink glasses, toast to whatever holiday it happened to be, and then, of course, eat!


With my insatiable sweet tooth, my personal favorite part was the Pillsbury cinnamon rolls that Mom would bake in a round cake pan. As most siblings do, my sisters and I would all try to vie for the middle roll which usually had the most frosting. I still have a particular fondness, even to this day, for freshly baked Pillsbury cinnamon rolls.


As a somewhat newly married couple, my husband and I are still developing our own traditions. One of the the traditions I’m trying to pass into our “micro-family” is the holiday breakfast concept. Of course there are a few adaptations my husband and I like to make (coffee is a must and sometimes we mix a little bubbly with the juice), but I still dearly wish to include my beloved cinnamon rolls.  Once I started living mostly gluten free, though, suddenly the options changed.  There are very few gluten free options in our small-ish town, unless you want to make things yourself.


I’ve done a fair amount of gluten free baking & cooking these days, but yeasted products still are a bit of a mystery to me. I’m well versed in how bread flour works in artisan breads & I just haven’t mastered how to mimic those items in gluten free versions. Last weekend, I attempted to adapt a cinnamon roll recipe to be gluten free, but the results were not good. The texture was all off & so was the flavor.... I guess it may take a lot more testing before I am confident in adapted gluten filled yeast products to be gluten free.


Luckily, scones ARE easily adapted to be gluten free.  This particular cinnamon chip variation tastes surprisingly a lot like my favorite pillsbury cinnamon rolls.  I added a bit of leftover pumpkin puree to the dough.  Rather than tasting “pumpkin-y,” the puree just adds a bit of extra moisture & helps deepen the complexity of the flavors.  Once the glaze is added they became a perfect substitution--in fact, I couldn’t stop eating my test batch! I had to put the leftovers in the freezer to curb myself.  Since scones fit in the non-yeasted “quickbread” category of baking, they don’t require rising time! I love recipes that save time during busy holidays. These scones absolutely will be making an appearance on this year’s Thanksgiving brunch table.


I hope that wherever you are this Thanksgiving and holiday season, you are able to spend time laughing and giving thanks with friends & family, and that you take time to make & eat good food. Perhaps you can start your own holiday breakfast tradition.


Cinnamon Chip Scones (GF) 
yields 12 to 16 scones, depending on the size

Scones
4 oz / 1 stick Unsalted butter, cold
2/3 c Whole Milk + 1 tsp Lemon Juice (or substitute Buttermilk )
8.5 oz / 2 c Jeanne’s Gluten Free AP Flour Mix (or substitute regular AP flour, if not gluten free) {LINK} 
1.85 oz / 1/4 c Brown Sugar
1/2 tsp Baking Soda
2 tsp Baking Powder
1/2 tsp Salt
1 tsp Cinnamon
120 g / 1/2 c Cinnamon Chips
122 g / 1/2 c Pumpkin Puree 
Tapioca Starch, for dusting

Glaze
Confectioners’ Sugar
Milk 

  1. Grate the cold butter, using the large grate part of a box grater, onto a piece of plastic wrap or parchment paper. Place the grated butter into the freezer while measuring & preparing the remaining ingredients. If not using buttermilk, mix the whole milk with the lemon juice & let stand at room temp. 
  2. Measure the remaining ingredients. Preheat the oven to 400 F. Line 2 baking sheets with parchment paper & set aside. 
  3. In a large bowl, whisk together the flour, sugar, soda, powder, salt & cinnamon.  Add the frozen butter pieces & toss quickly with your hands to combine.  Break up any large clumps.  Add the cinnamon chips & briefly toss to combine. 
  4. In a liquid measuring cup, whisk together the buttermilk with the pumpkin puree. Add the liquid to the dry ingredients & quickly mix with your hands until the dry ingredients are just incorporated. Be careful not to overwork the dough or let the heat from your hands melt all the butter.  
  5. Dust the clean counter or board with additional tapioca starch (or AP flour, if not gluten free).  Pat the dough out, adding tapioca starch on top of the dough & onto your hands, until the dough is approximately an inch tall.  Use a small round cutter (or any shape you like) to cut out scones.  Place the cut scones onto the prepared baking sheets. Carefully gather the scraps & re-pat them out, repeating the process until the dough is all used.  (Note: re-rolling works well with the gluten free dough, but if regular flour is used, the re-rolled scones may be a bit tougher.) Alternately, you can use a large cookie scoop to make drop scones by scooping the scone dough out of the bowl & portioning it directly onto the sheet pan. 
  6. Use a try pastry brush to brush off any excess tapioca starch.  Bake both pans in the preheated oven for 15 minutes, rotating the pans & swapping the top and bottom pans halfway through.  The scones are done when they are lightly brown & the cinnamon chips begin to caramelize.  
  7. Remove the pans from the oven & allow to cool slightly while the glaze is made.    
  8. In a separate bowl, sift a little confectioners’ sugar to remove any lumps. Add a splash of milk & whisk until combined. Adjust the amount of milk & confectioners sugar until you achieve a thick glaze. Either stripe the glaze across the slightly warm scones, using either a cornet paper piping bag, a zip-top bag with a corner cut off, or a pastry bag.  Alternately, dip the slightly warm scones into the glaze.  Allow the glaze to set & serve. 
  9. Store any leftover scones at room temperature in a covered container for up to 2 days, or freeze for longer.  

Note: As far as cinnamon chips go, I usually use Hershey’s brand.  However, they can be a bit difficult to find sometimes...   In some areas, like I discovered in South Carolina, they are only available during the holiday season, so I recommend stocking up.  Or, King Arthur has they available to order from their website (as does Amazon. ).  

This post contains affiliate links.

Friday, March 15, 2013

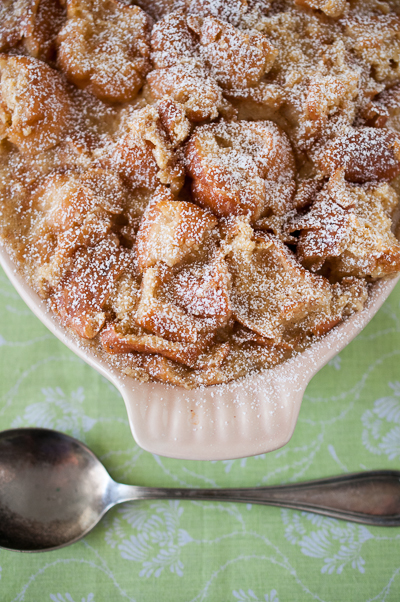
Glazed Doughnut Bread Pudding


We are finally moved into our new apartment!  There are still boxes to unpack & rooms to organize, but we’re getting there.  At least we have internet again after nearly a week.


We really, really love this new apartment. And I don’t care to move again for at least a year--I think moving twice in the last 10 months allows me at least that luxury.


We thought this move would be easy. HA! Going from a 3rd floor apartment to another 3rd floor apartment is no picnic....  Were it not for the help of our amazing friends, I’m not sure I would have survived.  I don’t think I’ve ever been so sore in my entire life....


Moving or not, I never want anyone who comes to our home to feel hungry. So we had a good amount of food & snacks available for our friends who helped us move.  I even bought a large box of glazed yeast-raised doughnuts.


Well, I was apparently a little over zealous in my food buying because we ended up with leftover doughnuts.  Even though I can’t eat them, I couldn’t bear to throw the stale doughnuts away.


Instead, I turned them to bread pudding.  We’ve invited those same friends over for a housewarming party this weekend & I think doughnut bread pudding will be the perfect dessert to serve.  If it lasts until then :)


GLAZED DOUGHNUT BREAD PUDDING

Butter, for greasing the baking dish
8 ea      Large Glazed doughnuts, day old
4 ea      Eggs
3.5 oz (1/2 c) Granulated Sugar
1/4 tsp   Salt
1/2 tsp   Cinnamon
1 c      Heavy Cream
1 c      Milk {I used 2%}
2 tsp     Vanilla Extract
Confectioners Sugar, for serving
  1. Preheat the oven to 350 F. Butter a medium sized gratin dish (I used an oval Le Creuset gratin dish)
  2. Cut the doughnuts into eighths & place into a large bowl. 
  3. In a medium bowl, whisk together the eggs, sugar, salt & cinnamon until well combined. Add the heavy cream, milk & vanilla.  
  4. Pour the custard mixture over the doughnut pieces.  Allow to soak a few minutes, then toss to combine.  
  5. Transfer the mixture to the prepared baking dish.  Place the baking dish into a larger pan with sides.  Slide the pan into the oven, then pour hot water into the  larger pan to make a water bath. 
  6. Bake until crusty on top & set, approximately 35 minutes.  Remove from the oven. Cool slightly.  
  7. Dust the top with confectioners sugar & serve.  
This post contains affiliate links, meaning Sweet Treats makes a small commission off items purchased 
after an Amazon link is clicked with no additional cost to you. Thanks for your support.

Friday, October 19, 2012

Monkey Bread


I’m a little bit homesick.  Homesick for Charleston.  Homesick for teaching. Homesick for working with dough on an almost daily basis. Homesick for the amazing monkey bread we made out of leftover croissant and danish dough in my Laminated Doughs class.


Although I’m headed to Charleston in a short time to work for the always amazing Helene Dujardin & Clare Barboza while they teach two fabulous workshops, I still needed some monkey bread now!  This has been a week filled with Murphy’s Law moments and sometimes the only remedy is baking.  Eating those baked items doesn’t hurt either.   


I seriously considered making & laminated a batch of croissant dough, just to make it into monkey bread, but my lack of butter & a perpetually hot apartment stopped me.  That, and remembering how much Murphy’s Law loves me lately....  Instead, I turned to one of my favorite baking textbooks for a sweet yeast dough recipe. I made enough dough to fill 1 regular bunt pan & 4 mini bundts with monkey bread.


Yeast dough (or biscuit dough, if you’re short on time), cinnamon sugar & butter are really all you need to make monkey bread, but like I said, I’ve been spoiled on monkey bread made with croissant dough....  I upped the wow factor on my version by pouring a brown sugar/butter syrup over the dough before it had it’s final proof and baking time.  And I didn’t feel like the mini monkey breads received quite enough of the syrup, so I added a brown sugar glaze as well.


Even though this baking adventure required me to wash all the dishes in the bathtub because my sink has unexpectedly started leaking water everywhere, the process and finished product have helped squelch that Charleston homesickness. For the time being :)


Sweet Dough
(adapted from Advanced Bread & Pastry)
7.5 oz Water
0.7g oz Dry Active Yeast
0.95 oz Powdered Milk
15 oz Bread Flour, plus additional for dusting
3 oz Cake Flour
3.75 oz Granulated Sugar
0.3 oz Fine Grain Sea Salt
2 ea Eggs
5.65 oz Unsalted butter, softened 

 Heat the water to 115 F.  Pour the yeast into the warm water.  Stir to combine and completely dissolve the yeast  Let sit for a few minutes while you scale your remaining ingredients.

Add the yeast/water to the bowl of a stand mixer fitted with the dough hook attachment.  Lightly stir the powdered milk into the liquid.  Add the remaining ingredients, in the order they are listed, to the mixing bowl.

Turn the mixer on to low speed (speed 2, if you’re using a KitchenAid mixer) and mix for 3 minutes.  Scrape the sides well.  Turn the mixer up to medium speed (speed 4, if you’re using a KitchenAid mixer) and mix for 2 additional minutes.  Scrape again.  The dough will be quite sticky.

Liberally dust your work surface with bread flour.  Transfer the dough from the mixer bowl to the floured work surface.  Knead slightly & round into a tight, wrinkle-free, ball.

Place the rounded dough into a large bowl that has been greased with non-stick spray.  Cover the bowl with plastic and allow to sit in a warm place for 45 minutes.

After 45 minutes, re-flour your workspace.  Gently pat the dough out into a rectangular shape.  Give the dough a “stretch and fold,” meaning fold the dough in thirds horizontally, then rotate it & fold it in thirds again.  If you’ve never done a stretch and fold, this video is a great resources for the technique!
Place the dough back into the bowl, re-cover it & allow it to rise for 45 more minutes.
After the second 45 minute time, repeat the stretch and fold technique.  Place the dough back into the bowl, cover it & place it into the refrigerator to chill for 2 hours.

Assembly
7 oz Granulated Sugar
1 to 2 Tbl Ground cinnamon
1 tsp Pumpkin Pie Spice (optional) 
4 oz Butter
1/4 c Brown Sugar 

When the dough is nearly finished chilling, prepare the cinnamon sugar by whisking, in a medium sized bowl, the granulated sugar with the cinnamon and the optional pumpkin pie spice.

Lightly flour your workspace again, just enough to barely keep the dough from sticking. Pat out the dough into a rectangular shape.  Use a bench cutter/knife/pizza wheel/kitchen sheers to cut the dough into long strips. Cut the strips into small pieces, about the size of marbles.  Toss the small pieces of dough in the cinnamon sugar mixture.

Once the pieces are well coated, add them to a sprayed, non-stick pan(s).  Fill the pan only about 3/4 of the way.  Remember, things with yeast in them grow!  I used a regular bundt pan (filled with approximately 25 oz of dough), as well as 4 mini bundt pans (filled with 4.25 oz of dough in each cavity).

In a heavy duty sauce pan, heat the butter and brown sugar until the butter has melted & the sugar dissolves. spoon 2 tablespoons of the syrup over the mini budts & pour the remaining syrup over the larger bundt pan.

Cover the pans & allow to rise for 45 minutes, or until the monkey bread has nearly doubled in size.

Preheat the oven to 350.  Place the pans on a larger sheet pan (just in case there are any drips) and bake in the preheated oven until the bread is done.  The small ones took approximately 20 minutes and the larger one took 30 to 35 minutes.  To tell when the monkey bread is done, gently tap the top surface.  If it stays firm and the tapping sound is hollow, the bread is done.

Cool slightly and remove from the pans.  Glaze, if desired, while the monkey bread is still a little warm.

Optional Glaze 
Adapted from Food52

2 oz Butter
1/2 c  Packed Light Brown Sugar
1/3 c  Almond Milk (or substitute heavy cream.... I just was out at the time!)
1/4 tsp Sea Salt
3/4 c  Confectioners Sugar, sifted

In a heavy sauce pan, combine the butter, brown sugar, almond milk.  Heat over medium heat, whisking constantly, until the mixture boils.  Boil for 1 minute & remove from the heat.

Whisk in the sifted confectioners sugar.

Pour the warm glaze over the warm monkey bread.  Let the glaze set slightly before serving.


Wednesday, August 8, 2012

Biscuits with Blueberry Honey Compound Butter


Biscuits.  Not something I grew up eating (unless you count the biscuits at KFC we would get on a rare occasion, which I did not usually eat).  I'm really more of a scone or a croissant girl.  But I am trying to make peace with biscuits.


Before I left Charleston, one of the items on my "Charleston Bucket List" was to eat at Hominy Grill.  My bucket list didn't fair very well (most was still not completed when I moved) but thankfully, I did make it to Hominy for brunch with a couple friends one Sunday. Hominy is very well-known for their biscuits, particularly "Big Nasty," one of their famous biscuits topped with fried chicken, sausage gravy, and cheddar cheese.  Since I was still  trying to acquaint myself with just the biscuit portion, I decided the "Big Nasty" was not for me.  Instead, I tried a plain biscuit topped with some butter and jam.


The Hominy version really changed my perception on the matter of biscuits.  Here was one that was genuinely light and fluffy and tasty!  Not one that was dense, greasy & not tasty.  I determined that if I was going to eat biscuits ever again, I wanted them to taste similar to the Hominy biscuits.


This week I am spending some time with family back in North Dakota.  Before I left my husband for the week (sniff, sniff), I filled the freezer and refrigerator with some things for him to eat, like these biscuits.  While these biscuits are not quite as good as Hominy's biscuits, they're definitely a step in the right direction!   My husband grew up in the South, so he enjoys a good biscuit. The flavor of these biscuits is excellent, but I'd like to tweak the recipe in the future to make them a bit "fluffier."


I also made some honey blueberry compound butter to go along with the biscuits.  We had some not so sweet, slightly disappointing blueberries left in the fridge.  I could have made jam, but there weren't quite enough blueberries for a batch of jam, and I've already made numerous other batches of jams & preserves for an exciting project I hope to be announcing later in August.  If you don't have blueberries, other berries could work nicely too.


While I'm gone, he can defrost the biscuits and eat them with the honey blueberry butter.  Or he can fill them with eggs/cheese/meat for breakfast, or just eat them on their own as a supplement to the main course at dinner.  Very versatile, these biscuits are.


Basic Biscuits
adapted from Baking Artisan Bread & Pastries by Ciril Hitz
Yields approx 12 biscuits 

Butter, cold 140 g 10 Tbl (1 stick, plus 2 Tbl) 
BF           400 g 3 1/4 c
Salt         8 g         1 tsp
G sug 23 g         2 Tbl
BP         24 g         2 Tbl
Milk, cold 230 g 1 c
Egg Wash as needed

  1.  Grate the butter on a box grater onto a plastic-wrap lined plate.  Place in the freezer until the butter “grates” are frozen.  
  2. Measure out remaining ingredients. Line a baking sheet with parchment paper
  3. Whisk together the flour, salt, sugar, & baking powder.  Toss in  the frozen butter pieces and evenly distribute throughout the dry ingredients.  
  4. Make a well in the center of the ingredients & pour the milk in. 
  5. Work the milk into the ingredients by using a bowl scraper or spatula.  Work the outside dry ingredients into the center using a folding pattern.  Mix until nearly combined.   
  6. Turn the dough out onto a floured surface & gently fold by hand until the ingredients  completely come together.  Work quickly so that the heat of your hands does not melt the butter!  
  7. Pat or roll the dough out to  approximately 1.5” thick.  Use a 3” round cutter to cut out the biscuits.  Cut straight down without a twisting motion
  8. Stack the scraps on top of each other (do not knead or squish together), gently pat to a 1.5” thickness and cut out additional biscuits. 
  9. Place the biscuits on the parchment lined baking sheet.  Let the biscuits rest for 30 minutes.  Preheat oven to 350 F while the biscuits are resting.  
  10.  After the resting time, brush just the tops of the biscuits with egg wash. 
  11. Bake until the biscuit tops are light golden brown (approximately 15 to 18 minutes).  Cool & serve!  

Blueberry Honey Compound Butter

Unsalted Butter, softened 1 stick
Honey (I used almond blossom) 1 Tbl
Blueberries         1/3 cup 

  1.  Cream the softened butter until light and fluffy.  
  2. Add honey & stir to combine.  
  3. Add blueberries & mix briefly--just to incorporate berries & break them up slightly
  4. Serve immediately, if you prefer a soft consistency.  Or, spoon mixture onto a piece of plastic wrap, roll into a log shape, twist ends, wrap in aluminum foil & freeze until ready to serve.