Showing posts with label Croissant/Danish. Show all posts

Thursday, July 18, 2013

Pistachio Raspberry Napoleon


In high school, I had the privilege of traveling to France (and Monaco) for 17 days with my French class.  I did not so much enjoy high school, but I really, really loved that trip! We started in Paris & then traveled via motor-coach in a giant circle around the rest of the country.


For most of the trip, we ate lunch on our own in whatever city we happened to be visiting that day.   Even in high school, I knew that someday I wanted to study pastry.  I am not at all ashamed to say that most every lunch included dessert.  Sometimes, dessert was the only food group!  Luckily, the friends I made during the trip agreed with dessert for lunch :)


One day, towards the tail end of the trip when we were in the norther part of France, along the cost, I bought a “Mille-Feuille” (also known as a “Napoleon”) for lunch.  It was a beautiful pastry, layered with cream & strawberries, and topped with a healthy dusting of confectioners‘ sugar.  Somewhere in my boxes of France mementos at my parents’ house is a photo I took of the pastry...


While the napoleon may have looked exquisite & delicious, it only took one bite for me to realize that the pastry was burned.  Badly burnt.  Sadly, I ended up throwing out the pastry layers and just eating the cream & strawberries.  Even though this first napoleon experience was not-so-great, I knew that someday I would eat a better one.


That trip to France did really help further my palate, & it exposed me to new things within the culinary world . Pistachio, in particular, remains one of my all time favorite flavors.  As does red currant.  And, of course, I fell in love with croissants, pain au chocolat, jam & nutella for breakfast.


Fast forward just a few years (ha!) to my time in culinary school.  Laminated Doughs & Breakfast Pastries quickly became my favorite class.  We made our own puff pastry, laminated it with European butter, and one week we turned some of the finished puff pastry into amazingly delicious, yet challenging Napoleons.  Finally, I tasted a real napoleon that wasn’t burned!


Classical napoleons, topped with poured fondant & chocolate stripes, aren’t an easy task.  They require lots of work & also require the person making/assembling them to be on top of their “mis-en-place,” meaning that everything must be completely ready & in place before the assembly process begins.  I struggled with the napoleon as a student & while my pastry was delicious, it wasn’t nearly as beautiful as it should have been (or as beautiful as Chef Jeff’s was).  When I became an instructor & taught the Laminated Doughs class, I still was a little nervous on napoleon day when I had to demo this challenging item to 16 eager students (and then grade them on their results)....


While I love the classical napoleon, both for it’s flavor and for the skill it requires one to possess to execute flawlessly, I experimented with alternate presentations for the same components.  The squares were pre-cut to their serving size.  The vanilla diplomat cream filling was decoratively piped.  Fruit could be added.  The fondant & chocolate topping was exchanged for a pattern of powdered sugar.


I have a terrible habit of hoarding ingredients I deem “special.”  As I was brainstorming future posts & looking through my cabinets & freezer, I remembered the remaining piece of gluten free blitz puff pastry that needed to be used before it developed freezer burn.  And in the dark, back corner of the pantry, I discovered an even bigger gem: pistachio paste!  Ironically, I brought the pistachio paste back from my second trip to France .  I’ve been saving it for a special occasion, but really, that just means it’s just hiding in my pantry.  My aformentioned love of pistachio drove me to buy the paste three years ago, but allowing it to just sit in the back of the pantry really does no one any favors.  So, I cracked the can open, inhaling the wonderful fragrance of pistachios &  was inspired to make a pistachio napoleon with raspberries.  Not only are pistachios and raspberries visually pretty together, their flavors also are a great compliment.


I knew there wasn’t enough leftover blitz puff pastry to make very many napoleons, so in lieu of just eating the pistachio diplomat cream with a spoon (which it IS delicious enough to do), I bought a box of commercial puff pastry.  I used the regular puff pastry to make a couple napoleons to give as thank-you gifts.


In one bite of the napoleon, I’m transported both back to my trips to France, and also to my days as a culinary student & instructor.  Good memories :)


PISTACHIO RASPBERRY NAPOLEONS 

  • In the above images, the larger napoleon was made with commercial, store-bought puff pastry. The smaller, individual size napoleon was made with gluten free blitz puff pastry.  
  • The batch of pastry cream & diplomat cream will make enough to fill two sheets of regular puff pastry and all the gluten free pastry rectangles as well. 


Baking Commercial Puff Pastry Sheets (large Napoleons) 
  1. Allow the puff pastry to thaw at room temperature for approximately an hour.  Preheat the oven to 400 F. 
  2. Open the package & separate the two pieces of puff pastry.  Save the second piece for later (or hold it in the refrigerator until the first pieces is done & then repeat the steps.) Gently open the folds of the pastry.  
  3. Using a pastry wheel & a ruler (I like to use my quilter’s ruler), cut off the edges of the puff pastry pieces, just to expose the lamination.  Cut each piece into three equal pieces approximately 3 inches wide.  
  4. Place the 3” wide pieces onto a parchment-lined baking sheet.  Use a fork to dock the dough (make little holes in it) all over the surface of the dough.  Top with a second piece of parchment & a second sheet pan.  The puff pastry should now be sandwiched between the parchment & the pans.  Add a heavy, oven-safe weight to the top pan--I like to use my cast iron skillet.  
  5. Bake the skillet-topped pans for 30 minutes. Remove from the oven & remove the cast iron skillet (DON’T FORGET THAT THE PANS ARE HOT!!) Flip the pans with the pastry over & remove the top pan (which was previously the bottom) and the top layer of parchment.  Return the pan to the oven (the bottom pan will be upside down, but that’s OK). and continue baking until the pastry is golden.  Rotate as needed to promote even browning.  The finished pastry should be quite brown, but not burned. Mine took approximately 7 additional minutes to bake.  Allow the baked pastry to cool at room temperature.  
  6. After the rectangles have trim with a small, sharp paring knife until all the pieces are the same size & the edges have been re-exposed. Save any scrap pieces to eat with leftover diplomat cream :)  Some of the rectangles may break, but just use those for the bottom or inside layers when assembling. Decide which piece is the prettiest & reserve that one for the top.  Set aside until ready to assemble.

Baking Gluten Free Blitz Puff Pastry (individual Napoleons)
  1.  Allow the frozen blitz puff pastry to thaw at room temperature for approximately 10 minutes (for a flat sheet)
  2. Use a ruler & pastry wheel to cut the dough into 2x4 inch rectangles.  
  3. Place the rectangles onto a parchment lined baking sheet.  Return to the freezer for 10 minutes. 
  4. Preheat the oven to 400 F. 
  5. Bake the rectangles for 25 minutes (or until lightly golden).  Remove the pan from the oven.  With an offset spatula, very carefully flip each piece over.  They do tend to ooze a bit of butter & that hot butter will burn!  
  6. Return the pan to the oven and bake for 5 to 10 more minutes, or until the pastry is golden.  
  7. Remove from the oven & cool to room temperature.  
Pastry Cream
Note: Cut the batch in half if you aren’t planning on assembling more than 1 napoleon (i.e. using more than 1 sheet of commercial puff pastry).  I bought my pistachio paste in France, but you can find several kinds here.  Alternately, unsalted pistachios can be steeped in milk & then pureed, but the flavor will not be as strong & the texture will be much more grainy.   

9.75 oz  Milk
1.5 oz  Pistachio Paste (similar here)
1 fl oz  cold Water
0.15 oz  Granulated Gelatin (approximately half a packet)
2 oz Egg Yolks (approximately 4 yolks, don’t worry if it goes a little over)
4 oz  Granulated Sugar
0.85 oz  Cornstarch
0.55 oz  Butter
  1. In a medium sized stainless steel sauce pan, combine the milk and pistachio paste.  Heat over medium heat until it simmers, whisking often.  Remove from the heat, cover & allow to steep 10 minutes or so while the other ingredients are prepared. 
  2. In a microwave safe small bowl, add the cold water.  Sprinkle the gelatin over the cold water.  Stir lightly to ensure all the granules are moistened.  Set aside to bloom.  
  3. Separate the cold eggs.  Reserve the whites for a different use. 
  4. In a medium sized heat-proof bowl (glass, metal, etc.), Whisk together the granulated sugar & cornstarch.  
  5. Return the pistachio milk to the stove top & heat over medium high heat until it begins to steam.  Meanwhile, whisk the egg yolks into the granulated sugar/cornstarch mixture.  Place a damp towel or a silicone pot holder underneath the bowl if it moves around too much.  Do not allow this mixture to sit or the sugar may cause the egg mixture to chemically cook & create lumps in the final cream. 
  6. Slowly temper the hot pistachio liquid into the egg mixture, while whisking constantly.  Once all the two are combined, return them to the sauce pan and heat over medium high heat, whisking constantly. 
  7. Continue cooking & mixing until the custard boils.  Allow to boil for a minimum of 15 seconds (count slowly), then remove from the heat.  Whisk in the butter
  8. Place the bloomed gelatin into the microwave & heat on high for 10 seconds (or until liquid).  Whisk the melted gelatin into the custard.  Pour the custard into a separate bowl & cover with plastic wrap touching the surface.  Refrigerate until ready to make the diplomat cream, just before assembly. 

Diplomat Cream 
Wait to make the diplomat cream until just before assembly! It won’t pipe as well if made earlier. Cut the batch in half if you aren’t planning on assembling more than 1 napoleon (i.e. using more than 1 sheet of commercial puff pastry)

16 oz Pastry Cream (with the gelatin added) 
16 oz Whipping Cream
1 tsp Vanilla Bean Paste (or substitute extract) 
  1. Approximately 30 minutes before making the diplomat cream, remove the pastry cream from the refrigerator & allow to come to room temperature. 
  2. In the bowl of a stand mixer fitted with the whisk attachment, whip the cream until medium peaks form. Beat in the vanilla bean paste. 
  3. Whisk the room temperature pastry cream to break it up a bit.  Add half of the whipped cream to the pastry cream & whisk to combine.  Pour the pastry cream/whipped cream back into the bowl of whipped cream & gently fold to combine.  
  4. Refrigerate for 10 minutes.  
  5. Fill a pastry bag fitted with a large round tip (I used an Ateco #808). Reserve any leftovers in the refrigerator in an airtight container for up to 3 days.  

Tri-layer Assembly
Baked Puff pastry pieces, trimmed (regular, not gluten free ones)
Diplomat Cream
1/2 to 1 pint Raspberries, unwashed 
Confectioners sugar 
Pistachios, finely chopped (optional garnish) 
  1. Build the napoleon on a parchment lined sheet pan.  Pick through the raspberries & decide which ones are prettiest for the outside edges and which ones are not as beautiful that may be hidden on the inside.  Set aside a couple of extra pretty garnish berries, if desired. Lay out the raspberries on some paper towel.  Do NOT wash them. Due to their fragile nature, the raspberries may not hold up as well if they are washed & they risk bleeding into the pastry cream.  
  2. On the base layer, pipe three large dots/rounds with the diplomat cream along the short side of the baked puff pastry.  Next to the dots, snuggly place 4 raspberries (or however many fit best), remembering to put the prettiest ones towards the outside where they will be seen.  Repeat the cream dots & raspberry rows throughout the remaining width of the pastry.  Top with a second piece of puff pastry & gently press to adhere, but not so hard that the cream and berries are squashed.  
  3. Repeat the cream and berry layer process on the second tier of pastry.  Top with the prettiest piece of pastry. Lightly press. 
  4. Place the pan into the refrigerator to chill the napoleon for at least 1 hour and up to 4 hours. 
  5. Just before serving, cut parchment paper into equal strips. Lay the strips diagonally across the top of the pastry.  Liberally sift powdered sugar over the top.  Gently remove the strips, being careful not to disrupt the sugar pattern.  On one corner, lay an extra line of chopped pistachios. Top with a couple additional fresh raspberries. 
  6. Serve immediately.  Use a hot, but dry, serrated knife to cut the napoleon into pieces.  Because pastry will begin to get soggy, this dessert is best consumed within 24 hours of assembly.  Store any leftovers in an airtight container (or well wrapped) in the refrigerator.  Leftovers will become soggy, but will still still taste delicious.  
Individual variation (Gluten Free) 
  1. Follow the same steps as before, only make the individual napoleons two layers instead of three.  
This post contains affiliate links, meaning Sweet Treats makes a small commission off items purchased 
after an Amazon link is clicked with no additional cost to you. Thanks for your support.

Wednesday, June 19, 2013

Gluten Free Blitz Puff Pastry


This post is a little out of the normal for me. I usually like to show the pretty end product, rather than the process of getting to that end product. But today I'm going back to my teaching roots on a subject I dearly love: laminated dough.

Puff Pastry, Croissant Dough, Danish Dough... these are the three great categories of laminated doughs. They begin with two components: dough & fat (European-style butter is best, in my opinion).  The dough is wrapped around the butter & the lamination process begins.  Think about how paper is laminated: the paper is sandwiched between two layers of plastic. Laminated dough is similar, only butter & dough are used instead of paper & plastic.

Once the butter is encased in the dough, the whole thing is rolled out & folded many times until there are hundreds or thousands of alternating layers of dough & butter...and dough and butter...and dough and butter, etc.  Those layers are what causes the product to puff in the oven.

Regular laminated doughs, made with wheat flour, are a bit challenging & rather time consuming. They're a topic that I really have not been willing to attempt to make gluten free, partially because of the time they take to make.  But lately, I've been working on a couple of batches of regular wheat, gluten-filled croissant dough (for an upcoming baby shower I'm helping to host), and I was inspired to finally attempt a gluten free laminated dough.

For my first foray into gluten free laminated dough, I cheated a little bit... Instead of attempting a classical puff pastry, I went with a "blitz" version instead, which may also be known as "fast" or "rough."

Instead of making the two distinct components of dough & butter, you simply start with a dough full of large butter pieces.  That dough is rolled out & folded a series of times, similar to puff pastry. Blitz puff also will not rise quite as much as classical puff pastry, but it still has more rise than a regular pastry crust.

Baking gluten free requires me to really think about the classical baking processes & make some adjustments.  For instance, gluten free doughs are often more crumbly, partially because they do not have the strength of gluten to help hold them together & aid in elasticity.  So, I needed to anticipate & expect some cracking.  Also, because gluten free doughs are not as elastic, they cannot be rolled out under as cold conditions as I would roll out a regular laminated dough.  Usually, I store my dough in the freezer between folds, but for the gluten free dough, I used the refrigerator.

Here's how I made my version of Gluten Free Blitz Puff Pastry.  In the next post, I'll show a recipe for how to use the finished dough.  

One initial note, make sure your kitchen is not hot during this whole process. Butter melts at 80˚ F, so your kitchen needs to be below 80˚ F for the dough to be successful.  Otherwise, the butter might melt (or fuze with the layers) and all your hard work is for nothing!

Gluten Free Blitz Puff Pastry Process: 

Start by taking two sticks of butter (8 oz) and cutting them into small cubes.  I started by cutting each stick into 4 pieces, length wise, then chopping the four pieces into small squares.  Break up the chopped butter into individual pieces & place them onto a plastic-wrap lined plate.  Set the plate into the freezer while you prepare the rest of your ingredients and equipment.  


While the butter is chilling,  Prepare the rest of the ingredients and equipment. Scale into the metal bowl of a stand mixer: 8 oz of gluten free flour  (Jeanne's AP Gluten Free Mix, or another mix that contains xanthan gum), 1 Tablespoon of granulated sugar, and 1 teaspoon of fine grain sea salt. Fit the mixer with the paddle attachment & turn on the mixer to the "stir" function for approximately 10 seconds to just combine the ingredients.  Scale  5 oz of water into a liquid measuring cup & set it into the fridge to stay cold.  Finally, line a baking sheet with parchment paper & setting it off to the side.

Once the butter had been freezing for approximately 15 minutes, remove the butter from the freezer. With the mixer running on stir, begin dropping the cubes of cold butter into the dry ingredients. Paddle the butter with the dry ingredients for a total of 60 seconds, just to begin the incorporation of the butter into the flour mixture.

Next, remove the measured water from the refrigerator, turned the machine back on to stir, & gradually drizzled in the water.  Continue mixing on stir for approximately 60 seconds, or until the dough just begins to form, but very large butter pieces were still visible.


Dump the prepared dough onto the parchment-lined baking sheet.


Pat the dough into a rectangular shape.


Cover the dough  with some plastic wrap & placed into the refrigerator to chill for 30 minutes.

After the 30 minute chill, remove the dough from the refrigerator & place onto a tapioca-floured surface.  Dust the top of the dough & the rolling pin with additional tapioca flour.


Gently roll the dough out, keeping the rectangular shape, until the dough is approximately 11"x13" and about 1 cm thick. The dough may crack, especially around the edges.  Make sure the top of the dough & counter stay well floured. 


Move the dough around periodically to ensure that the dough is not sticking at all!  Especially take note to flour any large spots of butter.  


Once the dough has reached the size of 11"x13", use a dry pastry brush to brush off any excess flour from the top of the dough.  Use a second brush to lightly brush the top of the dough with a little water--not enough water to form puddles or drown the dough, but just enough to act as glue during the folding process.


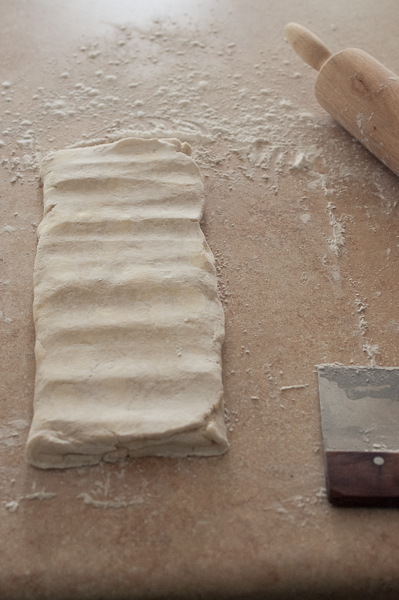
Visualize dividing the dough into three pieces, like you would a piece of paper for a letter.  Fold the bottom up & press lightly to adhere.


On the flap that was just folded up, brush off any additional flour, then fold the top down over. 


Turn the dough 90˚ so that the fold line is on the left & the open ends (not folded ends) are at the top & bottom. Re-flour the counter slightly, if the dough is sticking.  Use the rolling pin to tap down the dough to ensure the fold is secure.


Place the dough back onto the parchment lined sheet pan. Cover the dough with plastic wrap & chill again for 30 minutes.  Make a notation on the parchment that the first fold is complete (so that you don't forget how many folds have been done).


After the dough has had a 30 minute "nap," remove the dough from the refrigerator & place it back onto the floured counter.  Make sure that the fold is to the left and that the open ends are at the top and bottom.  Gently roll out the dough, rolling only in the direction of the open ends.  Do NOT roll across the fold. The dough will be much longer and skinnier this time, but that is ok.


Also, the edges may continue to crack (regular gluten dough does not do this), but do not be alarmed! Roll the dough until it is approximately 1/4" to 1/8" thick (don't worry about the length of the dough).   Dust off the flour & lightly brush with water.  Fold into thirds again.


Turn the dough 90˚ again & press lightly with the rolling pin to adhere.


Place the dough back onto the parchment lined baking pan, cover again with plastic & chill for 30 minutes in the refrigerator.  Make a notation that the second fold is complete.

After 30 minutes, repeat the whole process a third time, making sure to roll only with the open ends. When the third fold is completed, chill the dough in the refrigerator for an additional 30 minutes.

At this point, the folds are all done & the dough is ready to be rolled out to it's final thickness, which does depend on how you plan to use the dough.  I rolled mine out to approximately 12"x15" and a thickness of 4mm.  I did have one section that cracked a little, but I just used some water to help patch it back together.


I cut mine into two pieces (using a pastry wheel/pizza cutter) & stacked them on a flat sheet pan with parchment paper between the two pieces.  Wrap the sheet well & place into the freezer.  Be careful  with moving the finished puff to the sheet pan--it is rather fragile! (and you don't want to break all your hard work!)


Even if you plan to use the finished pastry very soon after it is finished, it still needs to freeze for at least 30 minutes (an hour would be even better) before use.

In the next post, I'll be showing some tarts made from this blitz puff pastry :)


Here's a more condensed recipe, but use the above pictures to reference, especially if you are not accustomed to laminating dough.  

Gluten Free Blitz Puff Pastry 

Equipment needed

  • A Timer 
  • Baking Sheet
  • Parchment Paper
  • Plastic Wrap
  • Pastry Brush (two, if possible)
  • Rolling Pin
  • Bench Cutter/Bench Scraper 
  • Ruler 
  • A small dish of water 
  • A small dish of tapioca flour for dusting 
  • Pastry Wheel or Pizza Cutter

Ingredients
8 oz Unsalted Butter, cold, cut into small cubes
8 oz Gluten Free Flour (I used Jeanne's GF AP Flour mix
1 Tbl Granulated Sugar
1 tsp Fine Grain Sea Salt
5 oz cold water {NOTE: if you live in a humid climate, you may only need 4 oz of water!}
additional tapioca flour for dusting
additional water for brushing 

  1. Cut each stick of butter into small cubes. Place the small cubes onto a plastic-wrap-lined plate & freeze for 15 minutes while you prepare the rest of your ingredients.  
  2. Into the bowl a of a stand mixer, scale the flour, sugar & salt.  Fit the mixer with the paddle attachment & turn the machine on to "stir" for approximately 10 seconds to combine the dry ingredients. Scale the water into a liquid measuring cup & hold in the refrigerator until ready to use. Line a baking sheet with parchment paper. 
  3. Once the butter is cold, turn the mixer back on to "stir" & begin adding the butter cubes to the dry ingredients. Mix approximately 60 seconds, or until the butter is just beginning to be incorporated into the dry ingredients.  
  4. Remove the water from the refrigerator, and with the mixer running on "stir" begin drizzling the water in to the flour/butter mixture.  Mix approximately 60 additional seconds, or until the ingredients just begin to form a dough, but there are still very large butter pieces visible.  
  5. Dump the prepared dough onto the parchment-lined baking sheet. Pat the dough into a rectangular shape. Cover the dough  with some plastic wrap & placed into the refrigerator to chill for 30 minutes.  
  6. After the 30 minute chill, remove the dough from the refrigerator & place onto a tapioca-floured surface.  Dust the top of the dough & the rolling pin with additional tapioca flour. 
  7. Gently roll the dough out, keeping the rectangular shape, until the dough is approximately 11"x13". The dough may crack, especially around the edges.  Make sure the top of the dough & counter stay well floured. Move the dough around periodically to ensure that the dough is not sticking at all!  Especially take note to flour any large spots of butter.  
  8. Once the dough has reached the size of 11"x13", use a dry pastry brush to brush off any excess flour from the top of the dough.  Use a second brush to lightly brush the top of the dough with a little water--not enough water to form puddles or drown the dough, but just enough to act as glue during the folding process.  
  9. Visualize dividing the dough into three pieces, like you would a piece of paper for a letter.  Fold the bottom up & press lightly to adhere.  On the flap that was just folded up, brush off any additional flour, then fold the top down over. 
  10. Turn the dough 90˚ so that the fold line is on the left & the open ends (not folded ends) are at the top & bottom. Re-flour the counter slightly, if the dough is sticking.  Use the rolling pin to tap down the dough to ensure the fold is secure.  
  11. Place the dough back onto the parchment lined sheet pan. Cover the dough with plastic wrap & chill again for 30 minutes.  Make a notation on the parchment that the first fold is complete (so that you don't forget how many folds have been done). 
  12. After the dough has had a 30 minute "nap," remove the dough from the refrigerator & place it back onto the floured counter.  Make sure that the fold is to the left and that the open ends are at the top and bottom.  Gently roll out the dough, rolling only in the direction of the open ends.  Do NOT roll across the fold. The dough will be much longer and skinnier this time, but that is ok.  Also, the edges may continue to crack (regular gluten dough does not do this), but do not be alarmed! Roll the dough until it is approximately 1/4" to 1/8" thick (don't worry about the length of the dough).   Brush the flour off & lightly brush with water & fold into thirds again.  
  13. Turn the dough 90˚ again & press lightly with the rolling pin to adhere.  Place the dough back onto the parchment lined baking pan, cover again with plastic & chill for 30 minutes in the refrigerator.  Make a notation that the second fold is complete.  
  14. After 30 minutes, repeat the whole process a third time, making sure to roll only with the open ends. When the third fold is completed, chill the dough in the refrigerator for an additional 30 minutes.  
  15. At this point, the folds are all done & the dough is ready to be rolled out to it's final thickness, which does depend on how you plan to use the dough.  I rolled mine out to approximately 12"x15" and a thickness of 4mm. I cut mine into two pieces (using a pastry wheel/pizza cutter) & stacked them on a flat sheet pan with parchment paper between the two pieces.  Wrap the sheet well & place into the freezer.  Be careful  with moving the finished puff to the sheet pan--it is rather fragile! 
  16. Even if you plan to use the finished pastry very soon after it is finished, it still needs to freeze for at least 30 minutes (an hour would be even better) before use.  
  17. The frozen dough will keep, well wrapped, for several months in the freezer. Allow to thaw slightly before use. 
  18. When ready to bake, bake at a 400 F oven (or higher) to ensure optimal puff.  


Inspired by "Art of Gluten Free Baking" & by my teaching materials from the Culinary Institute of Charleston

Friday, March 15, 2013

Glazed Doughnut Bread Pudding


We are finally moved into our new apartment!  There are still boxes to unpack & rooms to organize, but we’re getting there.  At least we have internet again after nearly a week.


We really, really love this new apartment. And I don’t care to move again for at least a year--I think moving twice in the last 10 months allows me at least that luxury.


We thought this move would be easy. HA! Going from a 3rd floor apartment to another 3rd floor apartment is no picnic....  Were it not for the help of our amazing friends, I’m not sure I would have survived.  I don’t think I’ve ever been so sore in my entire life....


Moving or not, I never want anyone who comes to our home to feel hungry. So we had a good amount of food & snacks available for our friends who helped us move.  I even bought a large box of glazed yeast-raised doughnuts.


Well, I was apparently a little over zealous in my food buying because we ended up with leftover doughnuts.  Even though I can’t eat them, I couldn’t bear to throw the stale doughnuts away.


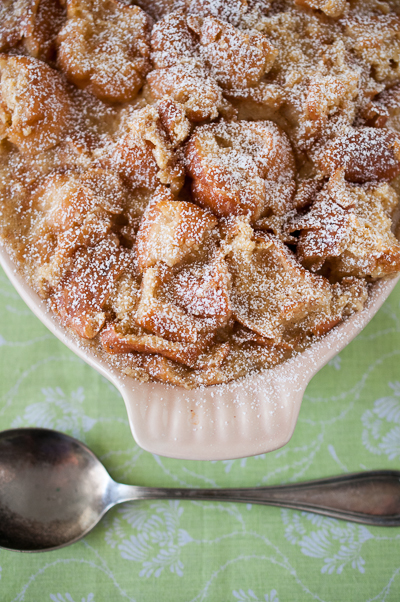
Instead, I turned them to bread pudding.  We’ve invited those same friends over for a housewarming party this weekend & I think doughnut bread pudding will be the perfect dessert to serve.  If it lasts until then :)


GLAZED DOUGHNUT BREAD PUDDING

Butter, for greasing the baking dish
8 ea      Large Glazed doughnuts, day old
4 ea      Eggs
3.5 oz (1/2 c) Granulated Sugar
1/4 tsp   Salt
1/2 tsp   Cinnamon
1 c      Heavy Cream
1 c      Milk {I used 2%}
2 tsp     Vanilla Extract
Confectioners Sugar, for serving
  1. Preheat the oven to 350 F. Butter a medium sized gratin dish (I used an oval Le Creuset gratin dish)
  2. Cut the doughnuts into eighths & place into a large bowl. 
  3. In a medium bowl, whisk together the eggs, sugar, salt & cinnamon until well combined. Add the heavy cream, milk & vanilla.  
  4. Pour the custard mixture over the doughnut pieces.  Allow to soak a few minutes, then toss to combine.  
  5. Transfer the mixture to the prepared baking dish.  Place the baking dish into a larger pan with sides.  Slide the pan into the oven, then pour hot water into the  larger pan to make a water bath. 
  6. Bake until crusty on top & set, approximately 35 minutes.  Remove from the oven. Cool slightly.  
  7. Dust the top with confectioners sugar & serve.  
This post contains affiliate links, meaning Sweet Treats makes a small commission off items purchased 
after an Amazon link is clicked with no additional cost to you. Thanks for your support.

Monday, January 11, 2010

Pain au Chocolat Adventure at Home

I am so fortunate and blessed that my school has such fabulous equipment!  I have been so spoiled by things like proof boxes, sheeters, convection ovens etc.


When I decided to tackle making croissant dough for pain au chocolat at my parents house while I was home over Christmas break, I somehow forgot that I would be making them sans proof box, sheeter, etc. Needless to say, my Pain au Chocolat adventure was much more adventurous than I expected!


One piece of equipment from school that I forgot I would have in North Dakota is an extremely large, cold walk in freezer (aka our screened in porch).  How wonderful! Any time I needed to have something chill rapidly, I'd just put it on the porch and chill rapidly it would (the temperature highs haven't even been above 0 F, so things are really, really cold).


Although they're not as great as the product made it school, I consider this adventure a success!  And I'm pretty sure my friends and family who "sampled" them agree too :)


Even my dog, Mollie, was curious, especially since the baking process filled the house with the scent of delicious European butter, and Mollie loves butter!  When she was a puppy, she somehow ended up eating a stick of butter (or maybe just a portion of one) and since then has been obsessed with the smell of butter.  At least she has good taste :)

Thursday, October 29, 2009

Sweet Place: Patrick's French Bakery

I traveled back home to Grand Forks recently for a long weekend trip. The trip was great, but the getting to Grand Forks part was not so great.... I ended up getting stuck in Minneapolis overnight (so close to home, yet so far away) and then my dad ended up just driving to get me instead of taking my final flight back.

While I was extremely upset about not getting back on time (and extremely might be an understatement), one good thing was that since my dad picked me up, I got to spend some extra time with him and we also stopped for lunch at one of my favorite Bakery/Cafe's in the world: Patrick's French Bakery.

We were going to just have a snack, but then realized how close it was to lunch (and that my stomach was still on Eastern time).

I ate a Bouchee a la Reine which is flaky puff pastry filled with chicken, chives, mushrooms and dumplings in a creamy sauce.

Absolutely Delicious!!

Then, for dessert, my dad and I split a Feullantine Pralinee Chocolate Cake which was also delicious. Very nice chocolate mousse with a cake layer on the bottom, entirely enrobed in chocolate ganache and garnished with gold leaf.


I've always really enjoyed just gazing at the beautiful pastries inside the case, but now, since I'm studying Baking and Pastry, I looked with new eyes....

Look at those delicious viennoissrie products!

I think I now have some ideas for new danish to try to make sometime back in Charleston....

I was a bit worried that after making such amazing product in my Laminated Doughs and Pastries class that I would be disappointed by Patrick's products.... But was I ever wrong! Everything was still as wonderful as ever.

We bought several things to take home for dessert that night (where I think I gave my grandparents one of the shocks of their lives because they didn't know I was coming). Patrick's Cheesecake, the Lemon Meringue Tarte and the Napoleon were eaten quite quickly :)

So, I guess getting stuck has its perks after all :)

Monday, October 26, 2009

Danish, Danish, Danish.....


I've had a danish filled week!

In Bakeshop Production, we had our only Laminated Dough week, which was both wonderful and sad all at the same time. I've been so spoiled in my dedicated Laminated Doughs class because we make everything entirely from scratch, where as in Bakeshop, due to time constriction, we worked entirely with commercially-made dough.

I really do understand that many restaurants and bakeshops have to rely on commercially-made dough, because the process of laminating is so long and laborous. But I love the laminating process and it seemed like the flavor was just not quite the same.....

So, we made turnovers with commercial puff pastry.

As I believe I’ve mentioned before, there are some really funny people in my class, so we’re continually laughing.


We were able to choose what shapes we wanted to do, as well as which fillings to use. I used entirely blueberry because it is one of my favorites.


The turnovers looked really beautiful before going in the oven. Unfortunately, the commercial puff pastry acts differently than the puff pastry we’ve made in Laminated Doughs..... It really puffed unevenly and failed to hold my designs I cut. Plus, several of my edge seams opened. And then I wasn’t completely thrilled with the flavor afterwards..... I’m afraid I’m getting really really spoiled by the products we’re making my dedicated Laminated Doughs class. I even forgot to take a picture of our final turnovers!


After the turnovers, we also made danish. Even though I’m in laminated doughs and pastries, we haven’t yet done much danish (later in the semester we will). So it was interesting to see how the different danish shapes are made.


We filled them with various pie fillings and then some cream cheese as well, if we wanted. Here’s how I chose to make- up my danish...


Then, after they were baked, Chef demonstrated glazing with an apricot glaze.


One especially fun thing about this class is that although we were working with commercially made dough, Chef did let me help demonstrate how a laminated dough is created. So, I made a half batch of our normal Croissant dough from Laminated Dough class and we mixed it, proofed it, and did a partial lamination in class.


Everyone in class thought the products we made were amazing. And yes, they did taste okay... probably better than things you might buy in a store... However, I’m getting spoiled and now would much rather not have to use commercial products, if I can help it, in the future.


So, after the Bakeshop laminated class, I was really happy to go to regular Laminated Doughs. And let me tell you, we made some AWESOME products this week.....


One extra help we had this week was that we had final laminated dough all ready to go, so we just had to concentrate on making fillings and cutting the dough into the correct shapes.


We made Apple Fontains, which have also been called “El Baños" by Chef Jeff’s previous classes. Hopefully I've spelled that right.... I'm a former French student, not Spanish...


The name “El Baños” comes from the shape of the dough, if it’s cut on the square and not on the diamond. See the above right and see if you can figure out the name :) They’re suppose to look like “fountains” hence the original name.


Then, we proofed the dough and made apple filling (by cooking apples in South Carolina Cotton Honey and a little cream) before filling the fontains. Delicious!


Here’s an image of one of my classmates adding some “Snow” garnish to her Fontains.


We also made a Streusel Danish with Sour Cream Pastry Cream, Apricots and a Cherry.


The apricots were torched a bit before baking to give them a nice caramelized effect.


I wasn’t quite sure what I would think of the sour cream pastry cream, but it was really delicious.... The sour cream just gave it a slightly lighter taste.


Then on top of the pastry cream, we added the caramelized apricot (with a cherry in its center) before baking them.


Next came the Cranberry Apricot Scrolls.


These were probably the easiest of the ones we made on Friday, but they also are one of my favorites (although it's very difficult to choose due to the fact that they were all extremely delicious!).


I’ve had a similar pastry before, only raisins were used in place of dried cranberries. I’m usually a big raisin fan, but I do admit that the cranberries were pretty delicious too....


And last, but not least, were the Banana Coconut Cream danish.


We made a delicious coconut cream mixture and piped it onto croissant dough, topped it with some banana slices, and proofed it.


After they had risen, we added some banana and coconut garnish on top before baking them.


Yummy too!


There simply is no comparison between the flavors of the commercial dough and the dough we make. Absolutely no comparison.


Is your mouth watering yet? :)