Tuesday, October 18, 2011

Tomato Leek Soup


I've been burning the candle at both ends.  Again.  And both-end-candle-burning can only occur for so long before you get burned.

With all the busyness of this semester coupled with wedding planning, I have not been taking very good care of myself.  My body has finally had enough and is voicing its protest through  yet another nasty cold.    I'm fighting the cold as best I can: lots of rest (when I can) and lots of soup!


Aside from making pastry, soup is my second favorite thing to make. I often make big batches of soup and freeze them in individual portions.  Since the weather has been so warm here this fall, I have not yet been in the mood for soup and do not have a stockpile in my freezer.  So this past weekend, I made a couple batches of soup to eat this coming week.


My favorite soup to make is Tomato Leek.  It's so easy and delicious (and I will never be able to go back to eating canned soup again).   Truly, you can make the entire soup in less than an hour, and most of that time in inactive prep time.  You can leave the soup chunky and full of texture, or you can puree it until it is smooth and velvety.

So, as the weather turns cooler, and the sickness slowly rears it's head again (hopefully not to you, though!), I hope this soup will be a comfort and an easy meal.  It's great all on its own, but I like mine best with a spoonful of creme fraiche and a sprinkle of cheese (such as parmesan). Crusty bread is optional :)


Recipe


2 Tbl Olive Oil
1 medium leek, chopped and rinsed well
2 14.5 oz cans Diced Tomatoes (organic, if you can)
3c. Vegetable Juice (like V8) 
1 tsp Salt
1/2 Tsp Pepper
3 Sprigs of Thyme
3 small dried Bay Leaves


1.  Heat the oil in a large pot and saute the rinsed leeks until translucent.  

2.  Add the diced tomatoes and vegetable juice and bring to a boil.  Reduce heat to a simmer.

3.  Add the spices and allow to gently simmer covered for at least 30 minutes (though can be much longer), stirring occasionally.  

4.  Puree before serving if you desire a smooth texture (but don't forget to fish out the bay leaf and thyme stems). Or leave as is for a chunky texture.  

5.  Serve with a dollop of creme fraiche & a sprinkle of cheese (like Parmesan or Comte).


Sunday, September 11, 2011

Silent Sunday: Sept 5-11

This past week (Sept 5-11), as seen through my iPhone.  
End of my Texas Trip, Petit Fours sections & a trip to Poe's on Sullivan's Island.  
Not pictured: me *dying* of a sinus infection.

Labor Day Brunch Remnants

Torching Orange Sections 

 Wed section Petit Fours Plating 

 Crispy Corkscrews dipped in dark chocolate (Wed section) 

 Vacherins with Blackberry & Mint (Wed Section) 

 Speculoos with maple cream & candied almonds (Wed Section) 

 Raspberry Pistachio Financiers (Fri Section)

 Speculoos with maple cream & candied almonds (Fri Section) 

Vacherins with Blackberry & Mint (Fri Section) 

Dinner at Poe's Tavern on Sullivans Island: Gold Bug Plus burger (with Pimento Cheese) and Edgar's Nachos


Monday, September 5, 2011

Heirloom Tomato Galette & an ode to summer 2011


Labor Day weekend usually signals the end of summer.  School has already begun. The weather has started getting cooler.  (Oh wait, wishful thinking, not so much in SC).  But hopefully there are still fresh tomatoes in your life, whether ones you have grown yourself, ones a friend has grown, or ones you find at the Farmers' Market.  


Essentially, summer has been over for several weeks for me.  School has started again, and this semester more than any previous semester is jam-packed-filled with hours teaching (37 in-the-classroom-teaching hours a week) and preparations for future classes (always have to work a couple weeks ahead to ensure we actually have food in classes).


I have some really fond memories from this past summer.  Teaching 134 kids how to bake.  Taking several trips to TX to see my love (and subsequently spending an entire night in the ATL airport).  Visiting family in ND and MN. Attending a wedding of some college friends. Seeing Josh Groban in concert from the 6th row! Finally meeting Helene Dujardin "in real life" after reading (and drooling over) her blog Tartelette for several years. She (and her husband, and doggies) are WONDERFUL!


Helene and her husband get a great majority of their weekly groceries from the downtown Charleston Farmers' Market.  Many times I have drooled over her posts and pictures of their farmers market finds.  I have been fortunate to accompany Helene, Bill, and "the square baby" (a rolling cart, of sorts) on their trips around the market. Having worked almost every Saturday last year, it has been so lovely to actually GO to the Farmers Market.  And it has been even more amazing to go with Helene and learn her "route" through to market.  After all, you have to make sure you get everything you want before the vendors run out and before the market is overrun with hordes of people (who potentially may be, to borrow the words of Helene and Bill, pushing a double-wide stroller AND walking a dog)!


I've challenged myself, on the weeks when I am in town on Saturday, to get the majority of my groceries from the Farmers' Market.  Some weeks, I went with Helene and Bill.  Some weeks alone.  I started getting eggs, bacon, fruit, veggies, pasta & other things on a weekly basis.


Specifically, there have been lots of tomatoes.  Not just any tomatoes, heirloom tomatoes.  Prior to moving to SC, I had never seen an heirloom tomato.  And I was a bit intimated by them initially.  Now that I have tried them (assisted by Helene in choosing the perfect one), I am hooked!  Each variety has a slightly different flavor and texture while still retaining a familiar "tomato-y-ness."  (Yes, I did make up that word).  They're delicious all on their own with a sprinkling of salt and pepper, great in tomato sandwiches (bacon optional, but Dukes mayonnaise not optional), tasty in pasta or with seared scallops (just to name a few of the ways I've enjoyed them this summer)


Another instructor at CIC mentioned a tomato galette one day, and the idea took root in my brain.  Finding a way to showcase the beautiful tomatoes in a delicious dish that could be served at lunch or dinner, and served warm, cold or at room temperature.  I chose 
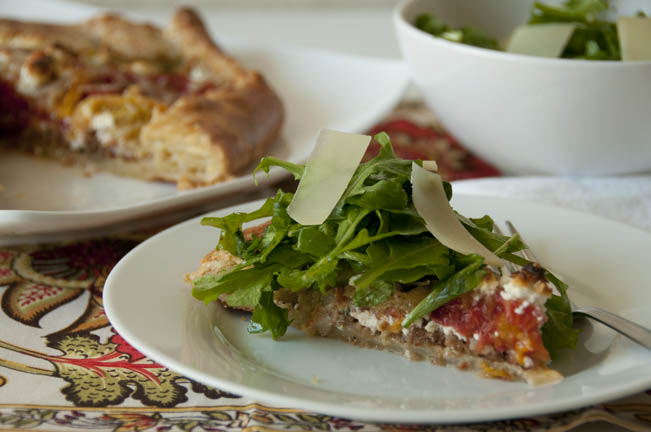
as many different varieties of heirloom tomatoes as possible, both contrast in color and texture and also in taste.  I paired the beautiful tomatoes with a cornmeal parmesan pastry dough, a light smearing of whole-grain mustard, some nice creamy goat cheese, a little thyme, and a sprinkle of parmesan cheese.


I love galettes for their more free-form, lazy nature.  Lots of wow without tons of effort (and without a tart pan to wash).  Just roll out the rested dough (resting is important) to a somewhat circular shape, add fillings, fold the edges up, egg wash, and bake!  Once baked, and topped with a spicy arugula salad, this galette is a perfect hot, sticky summer night supper or an elegant lunch.  And the leftovers are great too.


When I finished the main large galette, I had some leftover pastry dough and a few tomato slices, which I fashioned into mini tarts.  Waste not! Some of the mini tarts made it into my freezer to be packed in a future lunch.  Some of the tarts made it into my luggage for a somewhat impromptu trip to Washington DC to help my sister move.  I arrived in DCA a little before the rest of my family.  When they landed, everyone was ravenous, so I pulled out my mini tarts and we had a mock picnic at baggage claim.  One of my sisters said "Who brings food like this on an airplane?!?"  Well, I do :)


RECIPES 

Cornmeal Galette Dough (with Parmesan Cheese) 
Adapted from M. Kelly Wilson
makes enough for two large galettes

1 lb 6 oz    AP Flour
5.5 oz        Cornmeal
2 tsp          Salt
1 oz           Sugar
14 oz         Cold Butter, cubed
8 oz           Ice Water (without any ice pieces) 
8 oz           Sour Cream
handful      Good parmesan cheese, grated


1.  Combine the dry ingredients in a mixer fitted with the paddle attachment.  Add in butter and mix until the fat is the size of a hazelnut.  Alternately, cut the butter into the dry ingredients using a pastry blender or two forks.  

2.  Add the ice water, sour cream, and parmesan cheese and mix until just combined.  The dough should have a marbled appearance with pieces of fat visible throughout.  

3.  Divide into 2 pieces.  Wrap well.  Chill.  For best results, rest the dough over night to relax the gluten and allow the hydration to distribute throughout the entire dough.  


Heirloom Tomato Galette assembly

1/2 recipe of the cornmeal galette dough (quick secret: if you don't have time to make your own dough, grocery store dough works beautifully too!) 
2 Tbl        Dijon or Whole Grain Mustard
0.75 oz     Breadcrumbs
3 oz          Goat Cheese, divided
1.5 oz       Good Parmesan cheese, grated
to taste      Fresh thyme
as needed  Heirloom Tomatoes, thickly sliced
to taste      Salt & Pepper 
1 large      Egg, beaten 

1.  On a floured surface, roll out the galette dough into a roughly circular shape.  Make sure there is enough flour underneath that the dough can be picked up and moved around.  Transfer the  dough to a parchment lined sheet pan to build the galette.  

2.  Spread a thin layer of mustard over the dough, leaving a border around edges free of mustard.  Sprinkle breadcrumbs over the surface of the mustard (these will help soak up tomato juice and keep the dough from getting too soggy).  

3.  Crumble half the goat cheese and half of the parmesan over the bread crumbs.  Top with tomato slices arranged artfully (alternating colors and tomato varieties).  Dust tomatoes with salt and pepper and fresh thyme.  Watch how much salt you add, depending on how salty your cheese already is!  

4.  Top the seasoned tomato slices with the remaining goat cheese and parmesan.  

5.  Beat the egg well and use a pastry brush to paint the open edges of the galette dough.  Begin folding the edges up (egg wash will act  like glue) over the tomato slices and cheese.  Once folded, egg wash the visible surfaces of dough.  

6.  Bake at 400 F for 30 to 35 minutes, or until the galette is golden brown on the top and bottom.  Cool slightly.  

7.  Serve warm, room temp, or cold.  Top with an arugula salad (recipe follows) if desired.  


Arugula Salad with Lemon Mustard Vinaigrette
(note, you do not need to use all the vinaigrette at one time!) 

1.5 oz Olive Oil
1 Tbl whole grain mustard
0.75 oz Lemon Juice
Salt and Pepper, to taste
Fresh Arugula
Comte cheese (or other cheese of choice) 

1.  In a small jar, combine the olive oil, mustard, lemon juice and salt/pepper.  Top with a tightly fitting lid.  Shake until well combined.  

2.  Toss arugula lightly with the vinaigrette.  Shave comte cheese over the greens.  Serve atop or along side the heirloom tomato galette.  

3.  Store any remaining vinaigrette in the refrigerator and shake well before serving.  

Sunday, September 4, 2011

Silent Sunday: Tomato Galette Preview


Coming tomorrow!  

An heirloom tomato galette & an ode to Summer 2011 post.  


Saturday, August 27, 2011

Brown Rice Pudding with Maple Blueberries


Until I moved to South Carolina a little over 2 years ago, hurricanes & earthquakes had very little impact on my life.  Sure, I have family in North Carolina and family in California, and when I would hear about hurricanes, I would think of my family in North Carolina and pray for their safety.  The same would happen regarding earthquakes in California.  The past two years I have spent in Charleston have, thankfully, shown very little hurricane activity (and very little earthquake activity.  I have been hearing this year that the experts are anticipating an above average hurricane activity season, but to be completely honest, I still had not given it much thought until this past week, when a "little" storm named Irene formed and began moving her way towards the East Coast.  


I am grateful that Charleston saw only a small, small portion of Irene's furry.  Some rain, some wind, but not anywhere near the destruction NC and the northern part of the East Cost are seeing (and will see).  My heart goes out to everyone affected by the devastation of this enormous storm.  


Ironically, one of my sisters just moved to Washington DC two weeks ago.  Not only will she be experiencing her first hurricane (and experiencing it much more than I will be, even though I am directly on the coast), she also got to experience the earthquake of earlier this week that impacted the Virginia/D.C/East Coast!  

Another irony is the name of this hurricane.  Irene.  Irene was the name of my late great grandmother.  She was neither large nor destructive :)  but is someone I loved very dearly and someone who has directly influenced my career path.  How ironic is it that the first hurricane both my sister and I experience is named the same as our late great grandmother?  I find it funny.... 


Even though it's still summer, some days call for comfort food.  Yesterday was one of such days.  With the stormy weather as a result of Hurricane Irene, this craaaazy cold I cannot seem to shake, and the end of my first week of teaching for the fall semester (where I am teaching 5 college courses), I needed comfort food!  And I needed it to be something I could make with ingredients I already had on hand.


On the drive home from school yesterday, inspiration hit me: rice pudding.  Something that can be served warm, cold, or room temp.  Something I could put in a warm bowl (warm rice pudding is my preference) and wrap my hands around it while I hunkered down in front of the TV and watched Irene's developing path. 


I used brown rice for my rice pudding because I had it on hand.  I'm not a big rice eater... especially white rice.  I'm more of a potatoes girl.  But I do like the nutty flavor and the slightly crunchy texture of brown rice.  And I found frozen wild blueberries in my freezer and I decided that might make an unexpected change from the raisin accompaniment traditional to rice pudding.  

A great thing about a big batch of rice pudding is the leftovers!  Now, I've got breakfast for the next couple of days too :) 


R E C I P E S

Brown Rice Pudding

This particular pudding is a little on the "soupy" side, which I how I prefer it.  If you do not want it to be as loose, reduce the amount of milk and perhaps add an additional egg or two.  

2 cups of Water
1 cup of Brown Rice (I used organic Texmati Brown Rice)
2 cups of Milk (I had whole milk on hand)
60 g Brown Sugar
2 large eggs
1 tsp Vanilla Bean Paste
Freshly Grated Nutmeg, to taste
Splash of Bourbon (totally optional, but I think it adds to the depth of flavor of the pudding) 
1/4 c Real Maple Syrup 

1.  Combine the water and brown rice together in a heavy sauce pan.  Bring to a boil over high heat, stir, and reduce heat to low.  Simmer for 30 minutes.  (and take a nap during that 30 minutes, if you're me) 

2.  Add the milk (reducing the amount if you want a less soupy end product) and simmer for 15 minutes, stirring occasionally.  

3.  Whisk the brown sugar and egg together.  Temper some of the hot rice milk mixture into the sugar and egg.  Return everything to the pot and stir constantly until the mixture thickens.  If it coats the back of the spoon and holds a line when you run your finger over the back of the spoon, it is done!  Do not allow it to boil, or else the mixture may curdle.  Remove from the heat.

4.  Off the heat, stir in the vanilla bean paste, nutmeg, splash of bourbon, and maple syrup.  

5.  Serve immediately, or serve chilled or at room temperature.  Top with maple blueberries, if desired.  Store any leftovers, covered, in the fridge.  

Maple Blueberry topping

inspired by this recipe from 101 cookbooks.  The original recipe is one of my favorite pancake toppings! 

180 g Blueberries (I used frozen wild blueberries, because they were what I had on hand.) 
100 g Real Maple Syrup 
Freshly grated Nutmeg, to taste

1.  Combine the blueberries and maple syrup in a sauce pan.  Heat until hot and until the blueberries have begun giving off their juices.  

2.  Remove from heat and add freshly grated nutmeg, to taste.  Store any leftovers in the fridge. 


Wednesday, August 17, 2011

Zucchini Scones


Getting back to a normal routine since finishing Kids Camps hasn't been easy.  In some ways, I was a bit burned out on baking (gasp) but it turns out, I was just burned out on the same recipes I had been making all summer with the kiddos.


We had some leftover shredded zucchini after the last cake decorating class-we had used it to make a zucchini cake with white chocolate pastry cream & white chocolate cream cheese icing.  I knew I wanted to try another zucchini dessert without making a zucchini cake.  No offense to to zucchini cake... I just wanted a change.


Summer is always a great time for zucchini.  My grandparents always grow lots of it, and growing up, I ate lots of zucchini in both savory and sweet applications.  My grandma makes a great chocolate zucchini cake that has even been my birthday cake previously!  But, like I said, I wanted a zucchini baked good that wasn't a cake.


I love to make scones.  Love.  As in, I make them several weekends a month.  I have one basic recipe and I tweak it each time based on what "mix-in" ingredients I have on hand.  So, I give you zucchini scones!  A great, unexpected summer-time scone.  


They're wonderfully spicy.  And they've got beautiful streaks of green zucchini throughout.  People may give you a few funny looks when you explain what they are... And that they do contain vegetables.  But in the end, the scones still disappeared quickly!  


And disappearing baked goods is the best sign of a great baked good :)   Icing is optional on these, but my insatiable sweet tooth always gives in to icing.


Fresh zucchini is always best.  But if you find yourself with a huge amount of extra zucchini, grate it, squeeze as much liquid from it as possible, and freeze it.  Then, you can have summer-flavored baked goods all year long.


One last side note before the recipe.... On my last trip back from ND, I was given a couple plates and silverware that belonged to my late great grandma.  This shoot was the first time I was able to use them!  I thought their golden tones matched the zucchini scones quite well :)


ZUCCHINI SCONES
4 oz (1 stick) unsalted butter
2 c AP flour
1/4 c Granulated Sugar
2 tsp Baking Powder
1/2 tsp Baking Soda
1/2 tsp Salt
2 tsp Cinnamon
1/2 tsp to 1 tsp freshly grated Nutmeg
1 c buttermilk (plus additional, if necessary)
1 c grated zucchini, dried well
Flat Icing, as needed

1.  Grate the unsalted butter on a box grater. (Putting the box grater on a plastic-wrap-lined plate works well for me).  Throw the grated butter into the freezer for 10-15 minutes, or until the butter is hard.

2.  Preheat the oven to 400 F. In a large bowl, combine the flour, sugar, powder, soda, salt, cinnamon, and nutmeg (I use my hands).

3.  Once the butter is hard, toss it gently with the dry ingredients, being careful not to melt the butter with your body heat.

4.  Add the buttermilk and grated zucchini and mix quickly with your hands.  The mixture shouldn't be dry.  If it is, add an additional splash of buttermilk.

5.  Using a portion scoop, scoop mounds of scone dough onto a parchment lined sheet pan.  Leave enough space between mounds so that the scones can expand slightly as they bake.

6.  Bake at 400 F for about 15 minutes, or until golden brown.  Cool slightly.

7.  Make flat icing, using confectioners sugar and enough liquid (water... cream... milk) to make it fluid.  Drizzle or dip the slightly warm scones into the flat icing.  (Personally, I like to dip them.... more icing).  Allow the icing to harden and serve!  These scones are best enjoyed the day they are made.

Sunday, August 7, 2011

(almost) Silent Sunday: Kids' Camps

Want to know what's been keeping me busy all summer? 

134 KIDS (ages 8-16)!   I have a whole new respect for elementary/middle/high school teachers! 

Here's a pictoral representation of the 7 weeks of Kids' Camps I just finished teaching at Trident Technical College....  I look forward to no longer dreaming every night that 16 small voices are calling "Chef V!  Chef V!"

Pastry Boot Camp 

 June 6-10 class (ages 8-11)

 Banana Cream Pie

 Peach Bacon Pizza

Cinnamon Rolls

Cake Decorating
 
Rice Krispy Treat Cake

 Student Work

 
Rice Krispy Treat Cake 


Zucchini Cupcakes with White Chocolate Pastry Cream & White Chocolate Cream Cheese Icing

Zucchini cake bites with White Chocolate Pastry Cream, White Chocolate Cream Cheese Icing & Candied Zucchini

Strawberry Whipped Cream Torte

Red Velvet Cake with Cream Cheese Icing & Chocolate Decoration

Red Velvet Cake with Cream Cheese Icing & Chocolate Decoration

Devils' Food Cake with Swiss Meringue Icing 

 
Cake Truffles & Cake Pops: Devils Food, Red Velvet, Zucchini, Vanilla

 June 7-13 class (ages 8-11)

  July 18-22 class (ages 8-11)

 Aug 1-5 AM class (ages 8-11) 

 Aug 1-5 PM class (ages 12-16) 

The Art of Chocolate 
 Things dipped in chocolate (Pretzels, Oreos, Potato Chips, Strawberries...) 


Tuxedo Strawberries

Things dipped in chocolate (Strawberries, Pretzels, Potato Chips) 

Clusters (Cashew, Feuilletine, Frosted Flakes, Marshmallows) 

Apple Jack Clusters

Sweet & Salty Mix for clusters

Nutella Truffles

Raspberry Truffles (pink stripes) & Nutella Truffles (white stripes) 

Triple Chocolate cookies sandwiched with Chocolate Butter cream, 
dipped in dark chocolate & striped with white chocolate

Chocolate Cupcakes with Chocolate Ganache Icing & white chocolate striping 

Chocolate Cake Bites with Chocolate Icing & Piped Chocolate Garnish

 June 20-24 class (ages 8-11) 

 July 25-29 AM class (ages 12-16) 
 July 25-29 PM class (ages 8-11) 


Outtakes & Quotes

 
 What happens when kids crack eggs.... 

Quote (while I was demonstrating how to cut a pineapple): "NOOOOOOOO! Not Sponge Bob's house?!?" 

Quote (during a Cake Decorating week)
Student: When do we get to play with the fondu? 
Me: you mean Fondant? 
Student: Yeah, that stuff...

Quote (while showing a student how to get hardened chocolate off a table)
Me: "Just use a little elbow grease"
Student (very seriously): "Where do I get the elbow grease?"


Frequent Quote of all the weeks:  
"Chef V, can I lick the spoon?"
"Chef V, Can I eat it?"

Another Frequent Quote of all the weeks: 
"Chef V, are there any MORE dishes I can wash?" 
(they just loved the giant 3 compartment sinks)  

Quote (overheard during class): "This is the BEST WEEK OF MY LIFE!" 

And that about sums my summer up! Yes, it was a great challenge, but also greatly rewarding :) 

Finally, a BIG thank you to my assistants throughout the summer: Megan (who helped all summer, a great majority of my camps), Laura, Abby, Sonia, Georgia, Alexis, Sarah, Sandrea, Amber, Caroline & others....