Tuesday, January 29, 2013

Caramel Corn with Peanuts & Pecans


Pardon the iPhone pictures in this post....  Though I have made this caramel corn recipe several times in the past few months, none of the batches have lasted long enough for me to take proper pictures of them--that’s how good this caramel corn is.


This latest batch became a hostess gift when we visited friends at their ranch a little way from us.  They held a hunting excursion & after party.  Most often, people give a bottle of wine (or other beverage) as a hostess gift, but I like to do something a little different. Especially since I didn’t know what sort of wine would be best to give, I baked something instead.


I have had caramel corn on my mind for the past couple of months.  Yes, there are perfectly delicious store-bought versions (which we consumed large quantities of over the Christmas season), but I had homemade on my mind.


I have a distinct memory of homemade caramel corn, from an undetermined time in my childhood.  Perhaps it was a holiday? Or maybe just a weekend?  Regardless, I remember my mom making homemade caramel corn in our home.  I don’t remember the popping of the pop corn base, nor do I remember the making of the caramel itself.  What I do remember is the ETERNITY it seemed to take to bake in the oven.  And how delicious it was--better than any store-bought caramel corn.


While I don’t have the recipe my mom made many years ago, I did bookmark this caramel corn recipe from Molly Wizenberg of Orangette.  Her blog is one of my favorite’s to read, as is her book, A Homemade Life: Stories and Recipes from My Kitchen Table.


I made the slight adjustment of adding some pecans in with the peanuts.  While I love how the tasty the caramel-coated peanuts that are interspersed throughout the corn, I love the candied pecans even more!  I foresee many future batches of this caramel corn being made--I think it would make a great Super Bowl party snack too!  And perhaps one day a batch will last long enough for me to properly photograph :)


Caramel Corn
adapted from Orangette

3.5 oz/scant 1/2 cup Popcorn Kernels 
3 Tbl Vegetable Oil

2 Tbl Water
1/4 tsp Salt
7.5 oz/1c Brown Sugar
2.75 oz/1/4 c Corn Syrup (light or dark or a mix of the two) 
3 oz/6T Butter

1/2 t Baking Soda
2 t Vanilla Extract

3/4 c Lightly Salted Peanuts
3/4 c Pecan Pieces 

Cooking spray, for the bowl {or other oil} 


  1.  Begin by popping the popcorn: In a large, lidded pot, heat the oil over medium high heat.  Drop three kernels into the oil & watch until they pop.  Once they have popped, add the remaining popcorn.  Top the pot with it’s lid & shake the pot back and forth/up and down (while wearing oven mitts) to pop the pop corn.  Every so often, tilt the lid away from you to vent the steam.  Continue until the popping sound is nearly finished & you no longer hear un-popped kernels when you shake the pot.  Remove from the heat to cool slightly.  
  2. Preheat the oven to 250 F. 
  3. In a separate small pot, fitted with a candy thermometer, combine the water, salt, brown sugar, corn syrup & butter.  Heat to 245 F on the candy thermometer.  Gently swirl the pot to combine the ingredients, but do not stir.  
  4. Meanwhile, measure 9.5 cups of the popped pop corn into a greased large bowl--there will be a little extra leftover.  Make sure no un-popped or partially popped kernels make it into the bowl.  Measure the nuts into a separate bowl bowl. Hold the measured baking soda & vanilla extract off to the side too.  Line a rimed baking sheet with parchment paper or a Silpat
  5. When the caramel mixture comes to 250 F, remove from the heat.  Whisk in the baking soda and vanilla (be careful because the mixture will bubble violently).  Gently stir the nuts into the caramel sauce.  
  6. Pour the caramel/nut mixture into the greased bowl holding the pop corn.  Stir until well combined.  Transfer to the prepared baking sheet.  Bake for 1 hour, stirring every 20 minutes.  
  7. Once the baking has finished, remove the caramel corn from the oven & allow to cool for 20 minutes.  Break up the caramel corn into smaller pieces & serve.  Store any leftovers in an airtight container.  


Note: 
One of the times I made this caramel corn, I accidentally set the oven at 350 F (I think I was running on auto-pilot).  When I checked on the caramel corn at the 20 min mark to stir it, I realized my oven temp mistake.  The batch was definitely done!  It was not burned, but definitely much darker in color than the other batches I have made.  And crispier in texture too.  But, it ended up being one of the batches we liked the most--go figure!  So, if you want to make a faster, darker caramel corn, bake it at 350 F for just 20 minutes.  But still watch it carefully.... it may be done before 20 min!


Friday, January 25, 2013

Baked Rice Pudding


Since I cannot eat oats anymore, one of the foods I miss most is oatmeal.  Oatmeal isn’t a terribly glamorous food, but it is very comforting, especially for a January breakfast.


Baked Oatmeal has been one of my previously favorite ways to eat my oatmeal. One of my tasks, when I worked at Dakota Harvest Bakers, was making HUGE batches of the oatmeal, baked in an almost custard-like mixture & cut into generous squares.  The squares were warmed up for each customer and topped with additional milk and dried fruits & nuts. When I worked at Archives Coffee House, who sourced their baked oatmeal from Dakota Harvest, we took it a step further by putting steamed milk & garnishing with a dollop of milk foam. Either way is a perfect breakfast food, in my book.


I’ve been thinking about tweaking my personal baked oatmeal recipe & replacing the oats with a different grain.  Quinoa & rice were the two ingredients I immediately thought of using.  While I have eaten quinoa for breakfast, I find it’s slightly grassy flavor more suited for savory applications rather than sweet. So, I settled on rice instead.


Think of this variation as a sort of firm, baked rice pudding.  Par-cooked rice is mixed with eggs, coconut milk, brown sugar & spices.  The whole mixture is baked until set, chilled to allow it to set completely, and cut into squares. The squares are re-warmed, topped with dried fruit and nuts (apricots & pecans were my choice this time) & some additional frothy, steamed milk (I found this great tutorial from The Kichn that teaches you how to make foamy milk at home).


While it’s not exactly the same as my beloved baked oatmeal, the flavors and the texture are similar.  The first bite I took instantly reminded me of Dakota Harvest and Archives and of the wonderful time I had working at both places.  I think the next time I make this (which I’m sure will be soon) I I will use use brown rice, just to incorporate a little more of the nutty flavor I like in oatmeal and to make it a little healthier.


Baked Rice Pudding
slightly adapted from Helene Dujardin at Tartelette 
makes approximately 3 servings (or double the ingredients to fit in a 9x13 casserole dish) 

1/2 c White Rice
1/2 c Water
7 oz coconut milk (half of a can), divided in half
1/4 c Brown Sugar
3 eggs
1 tsp Vanilla
3/4 tsp Cinnamon
1/4 tsp Nutmeg
Dried fruit, for serving {I used Apricots}
Nuts, for serving {I used Pecans}
Milk, for serving
Brown Sugar, for serving

  1.  In a small saucepan, combine the rice with the water and half of the coconut milk.  Bring to a boil, then reduce the heat and simmer until the liquid has been absorbed.  Remove from the burner to cool slightly.  
  2. Preheat the oven to 350 F. Spray a 5x7-inch baking dish with cooking spray. Line with parchment paper and spray the parchment too. 
  3. In a bowl, whisk together the remaining coconut milk, the sugar, eggs, vanilla & spices.  Stir in the slightly cooled, par-cooked rice.  
  4. Pour the mixture into the prepared baking dish & bake for approximately 35 to 40 minutes, or until firm.  When the pudding jiggles just slightly (very slightly) it is done.  
  5. Cool completely and then refrigerate overnight to allow the pudding to set. 
  6. To serve, cut the rice pudding into squares & re-warm either in the microwave or a low oven.  Top with dried fruit and nuts and with some additional milk (foamed, if you like). Sprinkle with a little brown sugar & serve immediately. 

Saturday, January 19, 2013

Waffle Weekend: Banana Waffles


Some weekends, I have a pre-determined game plan for making brunch. Other weekends, I kind of wing it.  Most often our plans include waffles, of course :)  This past Saturday was one of those “wing-it” sort of weekends. I awoke knowing I wanted to make something waffle-y, but without any other clear direction.


I started a pot of coffee (in our new French press!) and began opening browsing the cabinets, refrigerator, freezer and counters. We had staple ingredients, like eggs and milk and maple syrup and butter.  But I didn’t want to make just “plain” waffles--too boring.


My eyes settled on the one-and-a-half bananas sitting on the counter.  They were very yellow and had begun to develop brown spots--two indications that they were no longer suitable to be eaten (yuck, I hate overripe bananas!).  But the bananas did seem perfect to add to a small batch of waffle batter.


Banana Waffles
Yields approximately 6 to 8 waffles

1 Tbl Brown Sugar
1 whole Egg
3 Tbl Vegetable Oil, plus additional for the waffle iron
1.5 whole Bananas, very ripe
1 c Milk
1 1/3 c Gluten Free Bisquick Mix (I was a little short, so I used 1 c (120 g) of Mix and added 1/3 c GF flour mix plus 1 tsp Baking Powder)

For Serving
Butter
Maple Syrup
Additional banana (optional) 


  1.  Preheat the waffle iron.  In a medium sized bowl, whisk together the sugar, egg and oil.  
  2. In a separate small bowl, mash the banana, either with a fork or your fingers.  Stir the milk into the mashed banana to combine the two.  Then, and to the egg mixture. 
  3. Whisk in the Bisquick mix. 
  4. Grease the preheated iron & portion the banana batter. Cook on the medium to medium high setting until the waffles are done.  
  5. Serve with butter, maple syrup & some additional banana slices (if you have any).  

Wednesday, January 16, 2013

Chocolate Chip Cookie Layer Cake


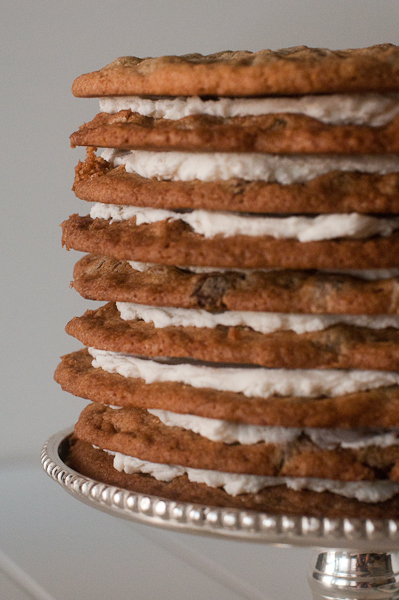
Is it a cake? Is it cookies? Well, really, it’s kind of both!  It’s a chocolate chip cookie layer cake!

For my husband’s birthday last month, I made two dessert items.  One was a giant coconut cake with homemade pineapple jam filling, which he took to his office for a holiday party. I felt like we also needed a birthday dessert at home for our celebration. And for this second item, I nixed a traditional cake went a bit on the avant guard side....


Although my husband does like traditional cake, I knew that by the time we had our celebration at home, he already would have eaten a portion of the cake I had made for his office.  Plus, he is really a fan of chocolate chip cookies.


I could have made a simple, single layer chocolate chip cookie cake, but instead I went the more tedious route: I layered 9 crispy, jumbo chocolate chip cookies with American buttercream between the cookies.  All stacked together they make an impressive sight!  And oh my goodness, was it delicious!  Especially with a nice cold glass of milk.


This cake does require a bit of planning and a good amount of time....  It’s not one you can just “whip up,” assemble, and serve immediately. The crispy cookies have to flattened, individually, all to the (relatively) same size (though not all were exactly perfect). And I could only bake two jumbo cookies at a time. So, I spent the better portion of a morning, just flattening & baking & cooling the cookie layers.  Then, once the cookies were baked & cooled, and the frosting was spread, the entire cake needed to chill at least 12 hours so that the “cake” would soften enough to be cut.


In the end, this may be one of my favorite “cakes” I have ever made. And the photo I "instagramed" of it was very well received too :)  I can foresee myself doing different flavor variations on this same concept--any flat, sturdy cookie & filling could work! And it’s a great “cake” for those crazy people who don’t like actual cake :)


Notes: 

  • Yes, both of the components to this cake use shortening, specifically Crisco.  Do I think it's healthy to consume Crisco on a daily basis?  No. However, I do believe in making exceptions for birthdays. My husband grew up eating Crisco-based icing on birthday cakes and I wanted to make icing that he would really like.  
  • I have also found that the crispiest cookies usually have some sort of shortening in them. I was under a bit of a time (and budget) crunch and thus could not experiment with other alternatives. This "cake" probably isn't one you would be making or consuming on a daily basis anyway :) 
  • I made my cookies gluten free (so that I could eat them) by substituting Jeanne’s Gluten Free AP Mix for the AP Flour.  I've made the cookies both GF and with regular flour & they turn out great either way.  


Chocolate Chip Cookie Base
Adapted from On Baking: A Textbook of Baking and Pastry Fundamentals (2nd Edition)  


Makes plenty of cookie dough--more than is needed for the cake. But once you have made your cake "layers" you can bake the rest of the dough as regular cookies or freeze the dough for future uses.

8 oz Vegetable Shortening
6 oz Light Brown Sugar
4 oz Granulated Sugar
2 each Eggs
1 tsp Vanilla
10 oz AP Flour (I substituted Jeanne’s Gluten Free AP Mix
1 tsp Baking Soda
1 tsp Fine Grain Sea Salt
1# Chocolate Chips (mini, if you can find them.  I couldn’t find any, so I used regular) 


  1.  Preheat the oven to 350 F. In a mixer fitted with the paddle attachment, cream together the shortening and the sugars. Scrape down the sides of the bowl to ensure everything is well mixed. 
  2. Add the eggs and vanilla. 
  3. In a separate bowl, whisk the dry ingredients to combine, then add to the mixer bowl. Mix half way. 
  4. Add the chocolate chips & mix until completely combined. 
  5. Line 4 half sheet pans with parchment paper.  Prepare 4 cooling racks. On one pan, portion approximately 6 Tbl of dough (I used my two scoops from my OXO Good Grips Large Cookie Scoop ) into the center of the pan.  Top the dough with a second piece of parchment & flatten the dough as much as possible, while still keeping the shape circular.  Repeat on a second pan.  
  6. Bake the two pans until golden and crispy, approximately 10 to 12 minutes. Rotate the pans half way through baking.  
  7. While the first two pans are baking, repeat the portioning & flattening with the remaining two pans to form an assembly line process for baking.  Continue the process until you have 8 to 10 giant cookie layers.  
  8. Cool baked cookies on cooling racks. 


American Buttercream 
4 oz/1 stick Butter, room temperature 
4 oz Vegetable Shortening
1# Confectioners Sugar, sifted
1 tsp Vanilla
Milk or cream, as needed 


  1.  Cream together the butter and shortening in a mixer fitted with the paddle attachment. Scrape the sides well.  
  2. Add the sifted confectioners sugar gradually. Scrape down the sides of the bowl often to ensure all the ingredients are being mixed.  
  3. Add the vanilla & thin with a little milk or cream if the icing is too thick to spread. 


Assembly

  1.  On a cake turntable, place one of the cooled cookies.  Add a scoop of icing (I, again, used my OXO Good Grips Large Cookie Scoop ) and spread the icing out with a small offset spatula.  
  2. Top with a second cookie & repeat the process until all the cookies are used.  
  3. Place the “cake” in the refrigerator for at least 12 hours before serving to allow the cookies to soften slightly
  4. When ready to serve, use a very sharp knife to cut the cake into wedges.  Note, the portions need not be large.... the cake is very rich (and very tall!) 


Friday, January 11, 2013

Broiled Grapefruit


I have been eagerly awaiting the citrus season here in Texas. Our grocery store is filled with huge bins of Texas oranges and grapefruits.


Before Christmas, I bought a bag of Texas oranges & made a batch of marmalade for Small Batch. But it’s the grapefruit I’ve truly been excited to eat.


Grapefruit seems like such a special, winter-time-only treat.  Yes, I know it is easy to get citrus year-round, but somehow my brain is programmed to think of them as a winter specialty.  Perhaps these thoughts date back to childhood memories of my dad patiently  dividing grapefruit sections among my sisters & me after winter dinners?


Most often, I eat my grapefruit relatively plain, just the segments alone, or I do have a certain fondness of grapefruit/avocado/arugula salads.  But the other morning, I decided to branch out and try something new to me: broiling the grapefruit with a little sprinkle of brown sugar over the surface.  Kind of like citrus meets creme brulee...only healthier & more citrus-y!


I wasn’t sure how I would feel about warm grapefruit. Would it be gross (like cooked bananas, blech)? Or would it surprise me and be delicious?


My verdict? Very tasty!  I can see broiled grapefruit becoming my new breakfast of choice throughout citrus season.  Yes, it’s a little weird to eat warm citrus.  But at the same time, it was both comforting & yummy & messy....


Messy? For my first broiled grapefruit experience, I also used a grapefruit spoon for the first time.  What a mess!  I was shooting grapefruit juice everywhere!  For future meals, I cut around the grapefruit and between the sections before I sugared & broiled it.  Much, much easier.

So, if you find yourself with grapefruit on hand, give broiling it a chance.

Broiled Grapefruit
makes 2 servings

1 large pink grapefruit
1 to 2 Tbl of brown sugar


  1.  Preheat your oven to broil. {I use our toaster oven}
  2. Cut the grapefruit in half. Use a paring knife to cut around the grapefruit & between the segments (if not using a grapefruit spoon to eat post broiling) & place the halves on a rimmed baking vessel.  
  3. Evenly sprinkle the sugar over the surface of the fruit. 
  4. Place the baking vessel under the broiler. Broil until the sugar melts, bubbles, and recrystalizes and until the surface is golden.  {Mine took about 7 minutes in our toaster oven}.  If the grapefruit does not get golden enough, you can torch the tops additionally with a butane/creme brulee torch.  
  5. Cool slightly and serve!  


Note: you can use other sweeteners too, such as honey, maple syrup, agave, granulated sugar, etc.  I just happen to like brown sugar :) 

Tuesday, January 8, 2013

Tropical Smoothies


There’s no place like home. After sickness, and holiday busyness, and lots of travel to spend nearly a week with each of our respective families, we’re finally back home.  As much as we enjoyed it all, we’re so thankful to be back in TX and to return to our regular daily lives. Sometimes it seems like you need a vacation from your vacation!


Over the course of just under two weeks, we consumed 5 Christmas meals! And also some other special meals, like New Years & my grandpa’s birthday.  It was a lot of mostly rich foods in a short amount of time!


On one of our plane rides back to TX, I mentioned that all I really wanted to eat was fruit.  Since then, I’ve definitely eaten my fair share of clementines, and oranges, and pineapple, and grapefruit.


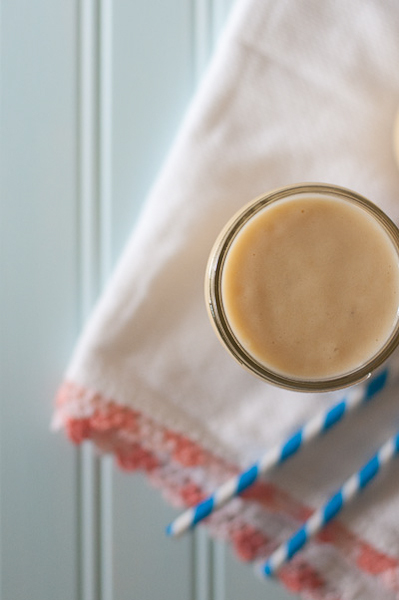
As we try to eat just a bit more healthy & shock our digestive systems back to reality, I have created this smoothie.  The tropical & tangy flavors have been just the thing to help me imagine we’re (haha) living on a tropical beach somewhere and relaxing in the warm sunshine. It also has been a great breakfast or snack option to jumpstart one of my  “Eat Healthier” goals for 2013.


Tropical Smoothie
makes 1 large breakfast-sized portion or two small snack-sized portions 

1.5 c Frozen Tropical Fruit Blend {mine included pineapple, mango, banana & peaches}
1 whole ripe Banana
1 small tub Vanilla Yogurt
1/2 c Almond/Coconut Milk (unsweetened)

1.  Combine all ingredients in a blender
2.  Blend on high until smooth.
3.  Enjoy immediately!