Showing posts with label Panna Cotta. Show all posts

Saturday, May 20, 2017

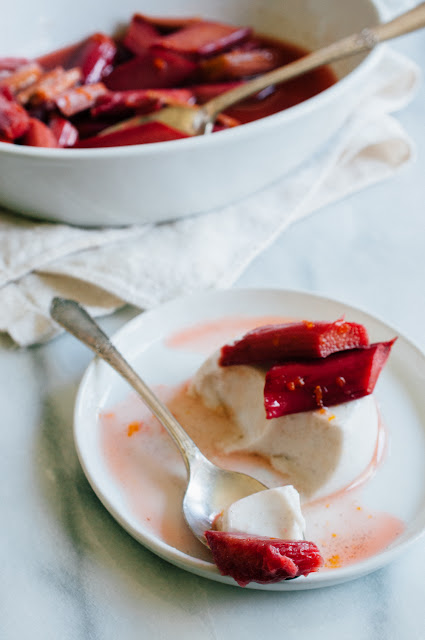
Panna Cotta with Roasted Rhubarb (AIP & Paleo)

Panna Cotta with Roasted Rhubarb (AIP & Paleo)

I love all produce seasons, but there is something extra special about rhubarb season. Anytime I see rhubarb for sale, I feel like I’ve found a treasure! I’ve been especially thrilled to find local rhubarb at the farmer’s market, and I dream of someday having my own rhubarb patch.

Panna Cotta with Roasted Rhubarb (AIP & Paleo)

In previous years, I’ve made rhubarb sauce to pair with pork, strawberry rhubarb crumbles, strawberry rhubarb compote, rhubarb cake, and a rhubarb galette, which are all super delicious. But this year, I decided to experiment even further by roasting the rhubarb. I also branched out from my usual flavor parings of rhubarb with strawberry, and pared it with orange and vanilla.

Panna Cotta with Roasted Rhubarb (AIP & Paleo)

When it comes to something to serve the roasted rhubarb on, I have returned to a favorite: coconut milk panna cotta. I’ve adapted my stand-by panna cotta recipe just slightly, adding a little more gelatin since this is an unmolded version, and sweetening it with orange blossom honey.

Panna Cotta with Roasted Rhubarb (AIP & Paleo)

So simple to make, very minimal added sweetener, and a good serving of gelatin. But, if panna cotta isn’t your jam, I’ve also served leftover roasted rhubarb on cupcakes and I also suspect it would be fantastic on pancakes or waffles.

Panna Cotta with Roasted Rhubarb (AIP & Paleo)

One final note: I don’t believe this recipe would work well with frozen rhubarb—I’m fairly certain that freezing the rhubarb would cause it to break down too much to retain it’s shape. But, if you don’t mind if the rhubarb turns more sauce-y, feel free to try frozen rhubarb.

Panna Cotta with Roasted Rhubarb (AIP & Paleo)

Coconut Milk Panna Cotta 
yields 4 to 6 servings, depending on molds/vessel size

1-13.5 oz can of coconut milk (I use smaller cartons & weigh out 13.5 oz)
1/8 teaspoon vanilla bean powder
21 g (1 tablespoon) honey (I used orange blossom honey)
10 g (1 heaping tablespoon) gelatin

  1. In a saucepan whisk together the coconut milk, vanilla, and honey. Carefully sprinkle the gelatin over the surface & mix gently. Allow to bloom for 10 minutes. 

  2. Heat the saucepan over medium heat, whisking constantly, until the gelatin melts & there are no lumps--do not boil! 

  3. Portion into small bowls/glasses or molds (I used a silicone muffin pan in these images). Chill in the refrigerator for at least 3 hours (or overnight). 
Roasted Rhubarb
8 oz fresh rhubarb stalks
63 g (3 tablespoons) honey (I used orange blossom honey)
1/8 teaspoon vanilla bean powder
1 teaspoon orange zest
2 tablespoons orange juice

  1. Preheat the oven to 350 F. 
  2. Cut the rhubarb stalks on an angle into 1" to 2" pieces. Place the cut pieces into an 8x8 baking dish. 
  3. Drizzle the honey over the rhubarb & sprinkle with the vanilla powder and orange zest. Add the orange juice. 
  4. Roast in the pre-heated oven for 10 minutes. Stir the rhubarb & roast an additional 10 minutes or until the rhubarb has softened, but is not falling apart. Cool to room temperature before serving. Store any leftovers in the refrigerator. The tart flavor of the rhubarb will continue to mellow the longer it sits in the fridge. 
To serve 

  1. Unmold the panna cotta, if desired—I ran a small offset spatula around the custards before gently popping them out of the silicone muffin pan I used as a mold—and plate. 
  2. Top with a few pieces of rhubarb & a generous spoon full of the rhubarb liquid. 
  3. Serve immediately. 
Note: 

  • The rhubarb will remain pretty tart, even with the 63 g (3 tablespoons) of honey. If serving this recipe to non-AIP/Paleo people, you may way to up the sweetener by a tablespoon or two in both the roasted rhubarb and in the panna cotta.  

Panna Cotta with Roasted Rhubarb (AIP & Paleo)

This post contains affiliate links, meaning Sweet Treats makes a small commission off items purchased 
after an Amazon link is clicked with no additional cost to you. Thanks for your support.

Friday, July 10, 2015

Berry Panna Cotta Pie (AIP & Paleo)

Berry Panna Cotta Pie (AIP & Paleo)

Last weekend, we celebrated Independence Day (aka the 4th of July) in the US. The holiday sort of sneaked up on me, after a busier-than-average June, so I did not have time to concoct a new AIP patriotic dessert this year. I planned to make the patriotic panna cotta I posted last year (actually, it’s one of my most favorite, easiest AIP desserts because you really can substitute almost any fruit you like). At the last minute, I had an epiphany to make the panna cotta into a pie by first making an AIP pie crust (I used a recipe from my friend Martine at The Paleo Partridge), then filling the baked/cooled shell with berries & adding the panna cotta custard liquid. 

Berry Panna Cotta Pie (AIP & Paleo)

The results were spectacular! The pie tasted very reminiscent of the fruit tarts I use to make in my pre-AIP/paleo days & are something that I really miss.  I remarked to my husband, as we sampled the pie, that it tasted so “normal.” Martine’s crust was almost like a short bread cookie, very similar to the pate sucree I use to make for all my tarts. The creamy coconut filling wasn’t overwhelmingly coconut-y & pared so well with ripe berries & the almost buttery crust. I had to pinch myself that the dessert was completely AIP!!

Berry Panna Cotta Pie (AIP & Paleo)

Though I hadn’t intended to do a blog post on this pie, the reactions to the image I posted on Instagram were so great that I thought a post would be nice to make the recipe easier to find (and let’s be honest, more pin-able, since I can’t keep track of recipes very well unless I can pin them to Pinterest). I believe this crust/fruit/panna cotta custard combination would work well with fruits other than berries (peaches, plums, nectarines, cherries, apples, pears, figs... etc) when berries are no longer in season. If you try another fruit variation, please post a picture on Instagram & tag me (@lauravein) in it!

Berry Panna Cotta Pie 
yields 8 servings, or one 9 inch pie  

250 g (approximately 2 cups) berries or other fruit of choice (I used strawberries, blueberries, blackberries & raspberries)
1 recipe of Panna Cotta custard 
  1. Make the sweet & savory pie crust according to the directions on Martine’s web site. The only changes I made were to skip piercing the bottom of the crust before baking (I didn’t want the filling to run out later) & to bake it 5 minutes longer because I didn’t want to risk the crust getting soggy from the filling. 
  2. While the pie shell is cooling, prepare the berries, cutting them if desired. Place the fruit into the bottom of the cooled shell. 
  3. Make the panna cotta custard according to the directions--Omit the vanilla for elimination phase AIP. Set the berry-filled pie shell onto a sheet pan for easier transport, then carefully pour the custard over the fruit. 
  4. Allow the pie to chill until the custard is set, approximately 2 hours. Let the pie sit at room temperature at least 10 minutes before serving. Refrigerate any leftovers, covered, in the refrigerator. The pie is best consumed within 24-36 hours, or else the crust begins to get soggy.

Monday, November 24, 2014

Pumpkin Panna Cotta Tart with Gingersnap Macaroon Crust (AIP)


Pumpkin pie, specifically my great grandma’s recipe, is the most quintessential Thanksgiving food in my opinion. But creating an AIP version of her pumpkin pie has been a bigger challenge than I anticipated (and has involved multiple failed attempts). Once I combined Great Grandma’s pumpkin pie flavor profile with her gingersnap cookie flavor profile, I finally came close to something that tasted like the “normal” holidays.


This holiday season is my first time navigating major holidays while following the Autoimmune Protocol.  I’m very much into tradition, especially when it comes to holidays & holiday foods. Coming to terms with the realization that not every dish I try to recreate AIP-style will taste (or look) exactly like it’s original can be really a challenge.


Also, can I just say that grain free, dairy free, refined sugar free, egg free, nut free baking is really hard? I’m still very much learning how new-to-me ingredients act during the scientific processes involved in baking. My multiple attempts at a traditional pie crust  turned AIP were unsuccessful, but repurposing my AIP Coconut Macaroon recipe into a crust worked really well. And to make it taste a bit more holiday-esque, I substituted a bit of the honey for molasses & added some ground ginger. Trying to create a custard-like pudding without the aid of eggs steered me towards the panna cotta side of things. Both the crust and the filling could be made & enjoyed separately, but I really enjoy them together. It might not taste exactly like “normal” pumpkin pie, but it’s still a flavorful treat that won’t derail healing processes.


Speaking of the holiday season, a group of AIP bloggers have put together a free holiday guide full of AIP-friendly holiday recipes. And Phoenix Helix has a great podcast about surviving the holiday season. If you need some inspiration, check those out. Have a wonderful Thanksgiving!


Pumpkin Panna Cotta Tart with Gingersnap Macaroon Crust
Yields 8 servings

Gingersnap Macaroon Crust 
120 g (1 1/2 c) Shredded, Unsweetened Coconut
7 g (1 Tbl) Coconut Flour
1 tsp Ground Ginger
Pinch of Sea Salt
26 g (2 Tbl) Coconut Oil, melted
65 g (3 Tbl) Honey (local or organic is best)
21 g (1 Tbl) Unsulphured Molasses
  1. Preheat the oven to 350 F.
  2. Pulse the shredded coconut, coconut flour, ground ginger and sea salt in a food processor until combined.
  3. Add the oil, honey and molasses & pulse until well mixed.
  4. Press the mixture into a 4" x 14" Rectangular Tart Pan
  5. Bake for 10 minutes in the preheated oven. Rotate the pan & bake for 10 additional minutes, or until the tart crust has turned a bit more golden, but is not scorched. 
  6. Cool completely. Remove the tart pan & place the crust onto a baking sheet. Proceed with the panna cotta filling.

Pumpkin Panna Cotta Filling 
4 g (approximately 1 tsp) Grassfed Gelatin
123 g (1/2 c) Organic Pumpkin
20 g (3 Tbl) Grade B Maple Syrup
2 tsp Vanilla Extract (optional for AIP)
Coconut Whipped Cream, for serving 
  1. Place the coconut milk into a small sauce pan. Sprinkle the gelatin over the coconut milk & mix gently--I usually use my fingers & break up any clumps that I can.  Set aside & allow the gelatin to bloom for 10 minutes. 
  2. Add the remaining ingredients. Heat over medium heat for five minutes, whisking constantly. 
  3. Pour into the prepared crust (note, you may not need all the filling; place any leftovers into a small ramekin-type vessel). Refrigerate at least 3 hours before serving. The tart may be made a day in advance.
  4. Cut the tart into diagonal slices. Serve with coconut whipped cream

This post contains affiliate links. Thanks for supporting Sweet Treats. 

Thursday, July 3, 2014

Patriotic Panna Cotta (AIP, Low FODMAP)

Update 7-31-15: a low FODMAP variation is now listed at the bottom of the recipe! 


Most every 4th of July (Independence Day for the US) of my childhood was spent at my family's lake cabin.  Sometimes we were on our own, just my parents, sisters, grandparents and me. Sometimes friends joined us.


The morning was spent getting up early and decorating our boat (as well as ourselves) with patriotic red-white-and-blue decorations before participating in the lake-wide boat parade where all the other decked out boats would lazily motor around our smallish lake. Our portion of the beach would be filled with many smaller American flags we stuck into the sand.


The food choices for the day would vary, but there was always a giant spread with many. Sometimes burgers, sometimes fish & even for several years, before the oven in the beloved vintage stove quite working, roasted a turkey with all the trimmings.


Once we kids were old enough to stay up, sparklers and fireworks became an important part of the evening. We would douce ourselves in bug spray & cover up as much skin as possible to ward off the mosquitos. When the sparklers were all used, we would move on to the smaller fireworks & then to a few bigger ones. My grandma would sit on the screened-in porch (blissfully mosquito free) and take notes on which particular fireworks we liked the best, so that we would know which ones to buy the following year.


Somewhere throughout the years, I started making a patriotic dessert. I'm fairly sure the first year's dessert was a fruit salad containing un-pitted cherries…. Luckily, my skills (and forethought) improved as the years progressed. Many desserts were inspired by things I'd seen in Martha Stewart Living magazine. One year, the cover of MSL featured the most gorgeous fruit tart, decorated to look like an American flag. While I couldn't make it exactly like the cover image, due to ingredient unavailability, my version became a favorite among family & friends. Pastry crust, chocolate, cream cheese/whipped cream filling, fresh berries…. I make some sort of variation on it nearly every year (you can find my recipe here).


As I was brainstorming something to make this year, I thought a bit sadly about my favorite fruit tart. Pretty much the only component of that tart I'm able to eat this year is the berries…. Nothing against berries, I just eat them most every day & thus have a hard time seeing them as a special Independence Day treat. Then I thought of panna cotta & how easy it would be to make a panna cotta out of coconut milk & add berries to it, sort of similar to the nectarine buttermilk panna cotta I made last year.  While I might be mourning my fruit tarts just a little bit, I'm consoling myself with the realization that this dessert is *much* faster to prepare (and less mess) and it's actually good for me!


Patriotic Panna Cotta / Coconut Panna Cotta with berries 
yields approximately 4-6 servings, depending on how big your vessels are

1 can (13.5 oz) Organic Coconut Milk (full fat)
1 Tbl (7g) grass-fed gelatin (like this one)
1 Tbl / 31g Organic Honey (local, if you can find it)
1/2 tsp Vanilla Bean Paste (optional for AIP)
around 1.5 c / 200g mixed organic berries (I used blueberries, strawberries & raspberries)

  1. Place the coconut milk nto a small sauce pan. Sprinkle the gelatin over the coconut milk & mix gently--I usually use my fingers & break up any clumps that I can.  Set aside & allow the gelatin to bloom for 10 minutes. 
  2. Meanwhile, prepare your vessels & berries. Place the vessels onto a pan (for easy transport). Fill each cup approximately 1/3 to 1/2 full of berries (either whole berries or cut). 
  3. Heat the sauce pan over medium heat & whisk constantly until all the gelatin just melts.  Remove from the heat and immediately add the honey & vanilla.   
  4. Give the coconut mixture a stir & then portion equally into the berry-filled vessels. 
  5. Refrigerate at least 2 hours before serving. The panna cotta may be made a day or two in advance, just cover the dishes with plastic wrap & store in the refrigerator until ready to eat. 
Note:
  • Right now I'm trying to incorporate lots of gelatin into my life (it's full of protein, can help heal your gut, and is good for hair/nails/skin, just to name a few benefits), so I've made this panna cotta a bit more firm than usual. If you like, reduce the gelatin by half to produce a softer "custard." 
  • This recipe could be easily doubled or tripled for a crowd. 

Low FODMAP Variation
1 can (13.5 oz) Coconut Milk, full fat & free from additives
1 Tbl (7g) grass-fed Gelatin
1 Tbl / 31g Organic Grade B Maple Syrup (optional, could be omitted for SIBO protocols)
1/8 tsp Vanilla Powder
around 1.5 c / 200g mixed organic Low FODMAP berries (I used blueberries, strawberries & raspberries)

  • follow the same instructions as above, substituting the maple syrup for the honey & ensuring to use only low FODMAP fruits. 

This post contains affiliate links. Thanks for supporting Sweet Treats

Friday, July 5, 2013

Nectarine Buttermilk Panna Cotta


There are different moments throughout life that really signal adulthood.  Times where you think to yourself “Wow! I really am a grownup now!.”


Some moments are major milestones, like graduations, living on your own for the first time, landing that first “big” job, getting married, having your own children, buying your own home etc. Some moments are not as glamorous, like paying all your own bills, or driving yourself to the doctor (or ER) when sick, or shoveling snow etc.


Recently, we have been housesitting & petsitting for some friends while they’re on vacation.  We are thoroughly enjoying this little getaway to their house, but it has been an eye-opening experience for us too.  Routine tasks like daily watering the grass  & giving the puppy a bath because she had a little too much fun playing in the yard & waking up early to feed the poor dieting cat who must think we’re starving him have all been little reminders to us of true adulthood.  


We realize just how relatively carefree we are in our pet-less, child-less apartment living.
It’s fun, though, to try out this different life for a while.  And it has reaffirmed our decision to wait to get pets until we are no longer living in an apartment--I can’t imagine trying to train a dog from our 3rd floor apartment!


Another part of adulthood, I think, is eating different foods--perhaps foods you didn’t think you liked before or foods you thought were too grown up/sophisticated/fancy.


Panna Cotta is a dessert I discovered in my adult life. It is essentially a custard that is thickened with gelatin instead of eggs.  They require only a handful of ingredients; they need very little prep time; they don’t even use the oven (a great bonus during summertime).


Panna Cotta made with buttermilk is a new-to-me flavor combination and seems like a very “grownup” option.  To balance out the tart, slightly acidic flavor of the buttermilk, I added some sweet, juicy nectarines to bottom of the panna cotta vessels.


As the base was poured in, the nectarines evenly dispersed themselves throughout the slightly thick custard.  After a short rest in the refrigerator to set the gelatin, the custards were ready.  The flavor was very reminiscent of peaches and cream, but somehow a bit more exotic.


These panna cotta custards have been the perfect ending to summer evenings at this home-away-from-home, especially after the grass and plants have been watered, and the rambunctious puppy is in bed for the night.


Nectarine Buttermilk Panna Cotta (Naturally Gluten Free) 
Serves 6, depending on vessel size 
Adapted from “The Last Course” by Claudia Flemming via  Saveur

1.5 tsp Granulated Gelatin
10 fl oz (1 1/4 c) Heavy Cream
7 Tbl (3.1 oz) Granulated Sugar
1 tsp Vanilla Bean Paste
14 fl oz (1 3/4 c) Buttermilk 
2 medium nectarines, ripe 

  1. In a small bowl, bloom the gelatin in 1 tsp of cold water. Stir together briefly (I use my clean fingers) and allow the gelatin to soften for about 5 minutes. 
  2. While the gelatin is blooming, gather the rest of the ingredients & leave them out at room temperature.  Place 6 small dishes (ramekins or small dessert vessels) onto a sheet pan for easy transport & set off to the side. 
  3. Add cream and the sugar into a small sauce pan.  Heat over medium heat, whisking occasionally, for approximately 5 minutes or until the sugar is completely dissolved.  
  4. Pour a little of the hot cream into the bowl with the gelatin & whisk to melt the gelatin.  Pour back into the sauce pan & whisk to combine, using the residual heat from the pan to melt any remaining unmelted gelatin.  Pour into a separate bowl (preferably one with a spout for ease of pouring later)& set aside to cool slightly while preparing the nectarines. 
  5. Cut the nectarines into small pieces.  Place 1/3 of each nectarine into the bottom of each small dish.  
  6. Add buttermilk into the slightly cooled cream mixture & gently whisk to combine.  Divide the liquid between the 6 dishes.  
  7. Refrigerate until set, approximately 2 to 3 hours. If planning on storing the custards in the refrigerator for longer, cover each one individually with plastic wrap. They will keep for several days in the refrigerator (though, the batches I have made always get eaten within 3 days!).