Showing posts with label Pavlova. Show all posts

Monday, May 5, 2014

Lemon Raspberry Pavlova (GF)


Forgive my unexpected time lapse between posts.  By now, I ought to know that when I’m taking a trip back to North Dakota (which is where I've been the past two weeks), I really won’t have time to finish a post, even if I have the best intentions of doing so, haha.  I’m also sorry for not sharing this lemon raspberry pavlova with you sooner! It’s a keeper. 


Every time I make a pavlova for dessert, I wonder why I don’t make it more often. It’s very easy to make & naturally gluten free, not to mention super tasty. Luckily, I’ve gotten a couple friends hooked on it, and they remind me to make it :) When one of those aforementioned friends celebrated her birthday a few weeks ago, I knew it was the perfect time to test out a pavlova variation that has been rolling around my head for quite a while.....


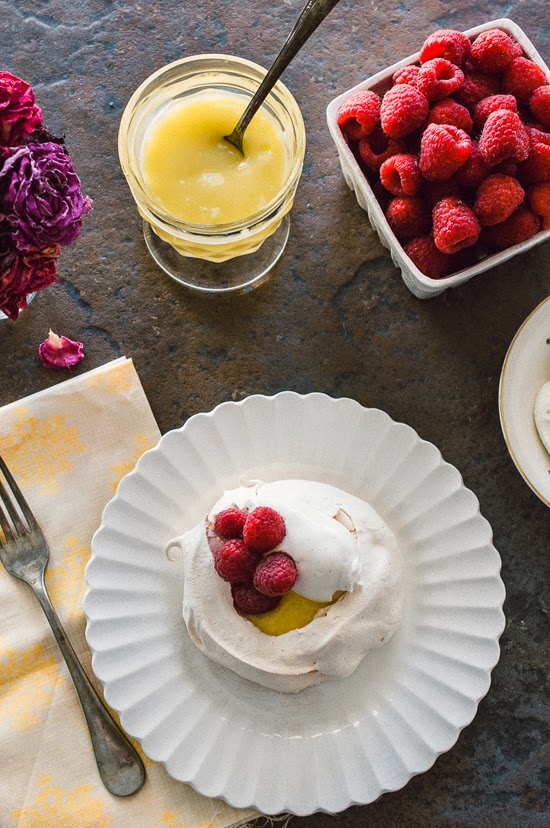
 Most often, when I’m making pavlova, I make a version of the Berry Pavlova I posted last July; however, this time, I switched things up. I don’t know if there’s a way to make a pavlova more elegant than it already is, but somehow crafting it into individual portions seems to do the trick. Plus, they’re easier to serve at a dinner party (which is where I served these). And using tart lemon curd as the filling pared wonderfully with the sweet meringue shell. Top little whipped cream and a few raspberries & you’re set with a spectacular dessert.


Pavlova Shells
Yields 4 servings 

2 ea Whites
3.5 oz / 1/2 c Granulated Sugar
Vanilla Bean Paste/Vanilla Extract (optional, I forgot to add it to mine & they still tasted great!) 
1 tsp Cornstarch

  1. Preheat oven to 250 F. 
  2. Line a baking sheet with parchment paper & spray with cooking spray .  
  3. In the very clean bowl of a stand mixer fitted with the whisk attachment, add the egg whites.  Mix on medium-low speed until they become foamy.  Gradually add the sugar, a couple tablespoons at a time. 
  4. Once all the sugar is added, increase the mixer speed to high & whip until the mixture holds stiff peaks and becomes very thick & glossy.  
  5. Scrape down the sides of the bowl & add a splash of the vanilla bean paste/extract. Mix on high speed one additional minute.  
  6. Remove the bowl from the mixer & sift the cornstarch over the meringue.  Use a silicone spatula to gently fold in the cornstarch, taking care not to deflate the meringue.  
  7. Use a large portion scoop to portion the meringue into 4 small mounds on the prepared parchment. Use a small offset spatula to hollow out the center slightly to make room for the filling & fruit that will be added after baking.  
  8. Place the pan into the oven & immediately drop the oven temperature to 225 F. 
  9. Bake the pavlovas for 30 minutes, rotate the pan & bake for 15 to 30 additional minutes.  When done, the outside will be dry & firm to the touch, but the interior will be soft & marshmallow-y Ideally, the pavlovas should remain very pale cream in color. If they begin to brown, reduce the oven temperature, or even turn the oven off & allow the residual heat to finish the baking process. 
  10. Cool completely before assembly. If not planning to assemble & serve the pavlovas immediately, tightly wrapped the completely cooled meringue shell & store at room temperature so that it retains it’s crispy shell. 

Lemon Curd
sorry, I do not have a volume measurement for this recipe. If you run out of time to make your own curd, you could substitute store bought :)

80 g Egg Yolks
126 g Granulated Sugar
100 g Lemon Juice
25 g Heavy Cream
65 g Butter
  1. In a small stainless steel saucepan, whisk together yolks, sugar, juice, cream, and butter and cook over moderately low heat, whisking constantly, 5 to 7 minutes, or until mixture just reaches a boil (do not let boil). 
  2. Strain curd through a fine sieve into a bowl. 
  3. Cool curd with its surface covered with plastic wrap (pressed into the curd, so that it doesn’t develop a skin), and chill. Alternately, chill over an ice bath (with plastic pressed into the curd). 
  4. Curd may be refrigerated for up to 2 days. 
Assembly
Assemble just before serving

Cooled Pavlova Shells
Chilled Lemon Curd
Whipped Cream
Fresh Raspberries
Mint (optional garnish--my grocery store was completely out, so I couldn’t use any...) 
  1. Gently press the center of the pavlova shell to indent it a little further. 
  2. Spoon a little lemon curd into the indentation.
  3. Top with a quenelle (or dollop) of whipped cream & sprinkle with a few raspberries. Optional: garnish with a few sprigs of fresh mint. 
  4. Serve immediately! 

Monday, July 1, 2013

Berry Pavlova


The weather is hotter than blazes, soaring over 100 F nearly every day. July is upon us, and with it will come American Independence Day, adventures, alfresco dinner parties & cook outs with friends (if we can survive the heat), and birthdays. July might just be one of my favorite months out of the whole year.


With the weather so stifling, I am less and less interested in turning on my oven to anything other than low. Instead, I search for & create desserts and meals that require little to no heat. Even better are items I can make in our toaster oven & thus not heat up the entire apartment.


Many years ago, I began making a patriotic, red-white-and-blue dessert for my family & friends to eat on 4th of July (American Independence Day). I have tried several different dessert variations over the years, but once I began making the fruit tarts I posted about last year, there was no going back! These tarts have reached legendary status & it is almost expected that I make them each year.  I don’t mind the expectations--I love the fruit tarts just as much as everyone else!


But this year, there are some factors that have inspired me to look beyond my tried-and-true, standby tart.  I need to make dessert for a crowd (which generally is rather difficult in a toaster oven). We’re house-sitting for some friends & I’m lacking in ambition to transport all my tart making supplies to this home-away-from-home (though side note, I LOVE this kitchen! It has windows! And natural light!).


And if I want to be able to partake of this patriotic dessert, it needs to be gluten free (nothing quite dampens a celebration or party like a raging case of hives).  I could make the tart crust gluten free, but honestly, it does get a bit expensive to make gluten free products for a crowd.


Instead, I brainstormed ways to keep the “essence” of my favorite traditional fruit tart (aka, the filling & fruit), but make it in a naturally gluten free form.  Enter the Pavlova.


Pavlovas, essentially a baked meringue made into a large dessert or into individual desserts, are very simple to make. They do not require as much of a time commitment. They are easy to make for a crowd or for a small group.


Pavlovas bake at a very low temperature to remain very light in color and to allow the outside to harden, but the inside to remain slightly soft & marshmallow-y. Pavlovas use minimal, inexpensive ingredients. They are naturally gluten free. And most importantly, they’re really delicious!


Most traditional pavlovas are topped with whipped cream & fresh fruit, but for my 4th of July version, I have made a few adaptions. Instead of just whipped cream as a topping, I’ve adapted my favorite cream cheese fruit tart filling by lightening the texture slightly.  And I finish the pavlova by piling on blue and red berries, like raspberries, blueberries, blackberries & sliced strawberries.


While part of me is sad to not make tarts this year, there is also something rather liberating about daring to try something new. Who knows, the pavlova may even become more popular than the fruit tart!


BERRY PAVLOVA
yields 8 to 10  servings

Pavlova Base
4 ea Eggs Whites 
1 c (7 oz) Granulated Sugar
1 tsp Vanilla Bean Paste (or good vanilla extract)
2 tsp Cornstarch

  1. Preheat oven to 250 F. 
  2. Line a baking sheet with parchment paper. In pencil, trace an 8” circle on the parchment. Flip the parchment & spray with cooking spray .  
  3. In the very clean bowl of a stand mixer fitted with the whisk attachment, add the egg whites.  Mix on medium-low speed until they become foamy.  Gradually add the sugar, a couple tablespoons at a time. 
  4. Once all the sugar is added, increase the mixer speed to high & whip until the mixture holds stiff peaks and becomes very thick & glossy.  
  5. Scrape down the sides of the bowl & add the vanilla bean paste. Mix on high speed one additional minute.  
  6. Remove the bowl from the mixer & sift the cornstarch over the meringue.  Use a silicone  spatula to gently fold in the cornstarch, taking care not to deflate the meringue.  
  7. Use the silicone spatula or a small offset spatula to spread the meringue into the 8” circle.  Hollow out the center slightly to make room for the filling & fruit that will be added after baking.  
  8. Place the pan into the oven & immediately drop the oven temperature to 225 F. 
  9. Bake the pavlova for 1 hour, rotate the pan & bake for 45 to 60 additional minutes.  When done, the outside will be dry & firm to the touch, but the interior will be soft & marshmallow-y Ideally, the pavlova should remain very pale cream in color. If it begins to brown, reduce the oven temperature, or even turn the oven off & allow the residual heat to finish the baking process. 
  10. Cool completely before assembly. If not planning to assemble & serve the pavlova immediately, tightly wrapped the completely cooled meringue shell & store at room temperature so that it retains it’s crispy shell. 
Cream cheese/whipped cream Filling
6 oz (3/4 c) Heavy Cream, cold
1.5 oz (3 Tbl) Granulated Sugar  
8 oz (1 brick) Cream Cheese, at room temperature
1 1/2 tsp Vanilla Bean Paste (or substitute good vanilla extract) 
  1. Add the heavy cream & granulated sugar to the bowl of a mixer fitted with the whisk attachment. Whip the cream & sugar on medium high speed until medium peaks form.  Transfer the softly whipped cream to a second bowl.  
  2. To the same mixer bowl (washing is not necessary), add the room temperature cream cheese. Switch to the paddle attachment & mix the cream cheese on medium speed until the cheese is lighter in consistency & completely smooth. Add the vanilla bean paste and mix until incorporated. 
  3. Add half of the whipped cream to the cheese & mix on low until combined. Scrape the bowl & mix again to ensure the cheese & whipped cream are well combined.  
  4. Remove from the mixer & fold in the remaining whipped cream.  
  5. If not using immediately, store the filling in the refrigerator. Filling may be prepared up to 24 hours before pavlova is assembled. Let the filling sit out at room temperature for 20 minutes before assembly if the filling has been stored in the refrigerator.  

Assembly
1 baked Baked Pavlova
1 recipe Cream Filling
1 pint  (approx) Berries (hulled & sliced strawberries, blueberries, raspberries, blackberries in a mix of your choice) 
  1. Wait to assemble until just before serving. 
  2. Dollop the cream filling into the center of the baked & cooled pavlova shell. Gently spread it nearly to the edge of the pavlova. 
  3. Sprinkle the berries over the filling
  4. Serve immediately.  Store any leftovers in the refrigerator, tightly wrapped, for 2 to 3 days. Note that the shell may weep slightly (give off moisture) and will become more soggy.  The fruit also will begin to loose it’s luster, but will still be tasty even if it is not as pretty.