Showing posts with label Peach. Show all posts

Wednesday, September 10, 2014

Stovetop Peach Blueberry Crisp (Paleo & Vegan)


“...the girls put their wits to work, 
and necessity being the mother of invention, 
made whatever they needed.” 
-Louisa May Alcott, Little Women

Since we don’t have a working oven at my family’s lake cabin in Minnesota, I had to be a little creative when it came to planning meals & treats. We made use of the stove top, outside grill, microwave & slow cooker for the main dishes & vegetables, but dessert was a little more challenging, especially considering my Autoimmune Protocol (AIP) dietary parameters.


There’s something about being around water all day that makes a person extra hungry. And, of course, the “I’m-on-vacation-and-am-allowed-to-splurge-a-little” thinking. In past years, splurging would have meant driving to the nearby gas station for half a gallon of ice cream & a can of Hershey’s syrup, or making s’mores around a beach fire, or eating packages of cookies. But thankfully, my family has been oh so understanding about what I can and cannot eat & they were on board with some AIP & Paleo splurges instead of our normal treats. We brought along some Coconut Milk Ice Cream , and I also made coconut milk panna cotta (with nectarines instead of berries).


Then one day, when the weather was grey, windy & rainy, I wanted to create a dessert that leaned more towards warmth and comfort than to cold & refreshing. We had some peaches that were nearly over-ripe & a bag of frozen blueberries that were originally slated for making smoothies. Almost immediately, the thought of a crisp/crumble came to mind….

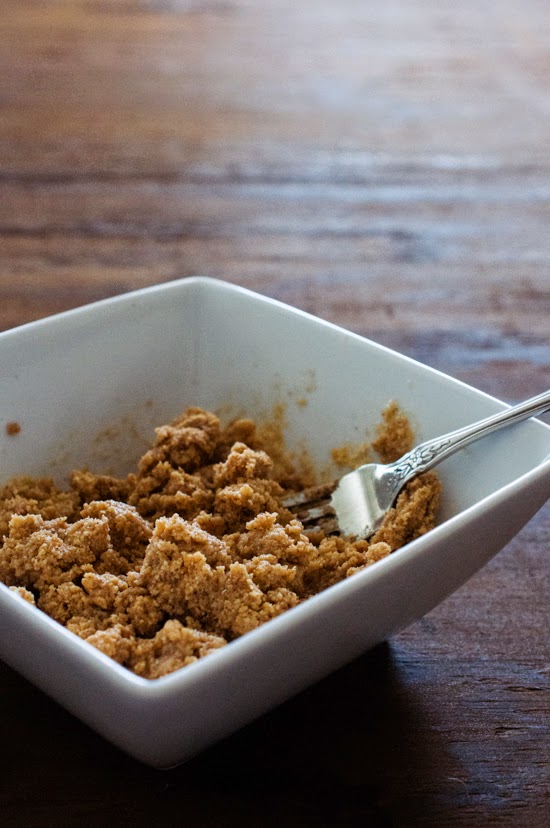
But how do you make a crisp without the oven? Easy. First, toast the topping in a skillet, then, once the topping is done & moved to a bowl, cook the fruit on the stovetop. Spoon the cooked fruit into bowls & top with the previously made crumble. Voila, fruit crisp, sans oven :)


I’ve previously made gluten free crisps & crumbles (like this one and this one), but grain free baking is still a new territory to me. I’m still cautious about working with different ingredients, like liquid sweeteners (i.e honey & maple syrup), arrowroot starch, coconut flour, and even coconut oil, but I am attempting to be more brave in my experimentation. It looks like I’ll probably be following some version of Paleo for the rest of my life, so I might as well get use to it :) Fortunately, crisps and crumbles are a bit more forgiving & don’t require quite as much scientific precision as say a cake or cookie needs. 


Since I am in the reintroduction phase of the Autoimmune Protocol & almonds seem to be ok (just in not giant quantities), I used a mixture of coconut flour & almond flour in the topping, but if you’re not yet to reintroducing almonds, using more coconut flour would also work. As I toasted the topping on the stove, several family members could smell its fragrance & came over to see what I was concocting--that’s always a good sign.


When we were ready to eat dessert, I spooned the thickened fruit into bowls & let each person top their own dish with as much crumble as he or she wanted. I’m usually a fan of ice cream on my crisp (or whipped cream), but this time, I splashed a little coconut milk to mimic the creaminess. We were all satisfied by how delicious it was & no one felt deprived by this “healthier” dessert. I’ll be remembering this stovetop method in the future for times when it simply is too hot to turn on the oven :)


Stovetop Peach Blueberry Crisp
serves 4 

42g / 5 Tbl Coconut Flour
56 g / 1/2 c Almond Flour (AIP Modification: omit almond flour & increase coconut flour instead)
1/4 tsp Sea Salt
1 tsp Ground Cinnamon
42 g / 3 Tbl Coconut oil, melted
1.5 oz / 2 Tbl Honey

300 g / 1.5 c Frozen Blueberries (may substitute fresh, but add a little water too)
2 medium-large peaches (around 400g), cut into thin slices, peeling is optional
2.75 oz / 4 Tbl Pure Maple Syrup 
1 Tbl Lemon Juice

Coconut Milk, for serving 
  1. To make the crumble topping: combine the coconut flour, almond flour, sea salt, and cinnamon in a small bowl.  Drizzle in the coconut oil & honey.  Mix with a fork until crumbly. 
  2. Toast the crumble in a large skillet over medium high heat, stirring constantly, for a couple of minutes, or until the crumble begins to brown slightly & smell toasty. Remove from the skillet & set aside. Give the skillet a quick rinse. 
  3. To make the filling: add the blueberries and peaches to the skillet. Drizzle with maple syrup and lemon juice  Cook over medium heat until the juices begin to boil. Cover the skillet, reduce the heat to a simmer & cook until the peaches are tender--approximately 10 minutes. Stir occasionally, as needed. Taste & add additional maple syrup if the filling isn’t sweet enough. 
  4. Remove 1/2 c of liquid from the pan & place into a small bowl. Into the liquid, stir in the arrowroot, making sure there are no lumps. Add the mixture back to the skillet and cook for an additional minute to allow the fruit to thicken & to cook out any starch flavor from the arrowroot. Remove from the heat. 
  5. Just before serving, spoon the fruit into bowls & sprinkle with the crumble topping (note: there may be leftover crumble topping). Top with a splash of coconut milk or a scoop of coconut milk ice cream. 
  6. Store any leftover fruit filling in the refrigerator. Keep any leftover crumble topping tightly covered at room temperature. 

This post contains affiliate links. 

Tuesday, September 3, 2013

Peach Surprise with Grandma Vein


“What’s the surprise?” asked my husband when I told him about my plans to make “Peach Surprise” with my Grandma Vein while we were back in North Dakota.  “I really don’t know.” I told him. And that’s the truth! I just know “peach surprise” is one of my absolute favorite summer-time desserts. 


After very suddenly losing my other grandma last year and since my sisters and I all live in different parts of the US, my motivation during trips back to North Dakota changed.  My number one focus has become spending as much time with family as possible. Grandparents are not alive forever. (really none of us are.) And we never know which visit will be our last.


Last month, we took a trip back to North Dakota/Minnesota to visit my family. We were fortunate to spend a few days in my hometown, followed by a few days at my family’s lake cabin in Minnesota.


My husband had to go back to work in Texas, but I stayed longer to spend some additional time in my hometown & to help my youngest sister move to Chicago.


One of the things I most wanted to do while in ND was to make something with my Grandma Vein. She’s a fabulous baker and cook! Last summer, we made a peach pie together, but this summer, I knew we needed to make “peach surprise.”


The recipe for “peach surprise” is straight out of an old lutheran church cookbook.  The pages where the good recipes are located are stained from years of use. Grandma has written her own notes & variations throughout the cookbook too.


Grandma’s favorite peaches are the elberta variety.  Every year, she patiently waits for them & buys them in mass quantities.  Grandma told me this year that she even called the store to reserve a whole lug of them (i.e. a little less than a bushel), fearing the store may run out before she could get any.


All those peaches get turned into delicious peach desserts, or sliced & eaten on their own with perhaps a splash of heavy cream.  Grandma also gives many of the peaches away to her sons so that their families may enjoy eating them.


One of the great things about “peach surprise” is that it is a no-bake dessert--just a graham cracker crust with peaches & a marshmallow/whipped cream filling.  But, since I can’t eat regular store bought graham crackers, we did have to turn on the oven to bake a batch of gluten free graham crackers first.


Grandma had suggested maybe we should make a gluten free cereal-based crust, using something like rice krispies, but I convinced her that gluten free graham crackers are rather fast and easy to make yourself. Honestly, I also just could not bear to change a classic too much!


While the gluten free graham crackers baked and later while the dessert was chilling in the refrigerator, Grandma and I had some good visiting time. She showed me all her latest photo albums & told me all the family news I’ve been missing. She has a hard time hearing voices over the phone, so our phone chats have been a bit difficult lately.  It was lovely to actually talk in person.


Though peach surprise is an easy dessert to make, I feel so fortunate and blessed to actually make it with Grandma. There are so many things she makes that my whole family loves to eat, but most of us don’t have those precious “memory food” recipes.


Even with my culinary school education, I treasure the times Grandma and I spend in the kitchen where she teaches me her tricks & techniques for making things.  I am actively trying to make sure that I document as many of her recipes, including the methods she uses that aren’t written in the recipes.


When I returned to Texas and told my husband and friends about my experiences making “peach surprise” with Grandma, they requested to try the dessert for themselves.  So for our Labor Day cookout yesterday, I made a pan of "peach surprise". It was the perfect way to celebrate the end of summer and a sweet finale to the evening.


Peach Surprise
yields approximately 12 servings

6 oz / 170 g / 4 cups Mini Marshmallows
4.95 oz / 139 g / 1/2 c Orange Juice

10 oz / 280 g /2 c Graham Cracker Crumbs {I used Gluten Free
2.45 oz / 69 g / 1/3 c Confectioner’s Sugar
4 oz / 112 g / 1 stick Unsalted Butter, melted

5 large ripe peaches {Grandma would suggest Elberta peaches}
16 oz / 448 g / 1 pint heavy cream

  1.  In a double boiler, melt the marshmallows with the orange juice. Stir often. Remove from the heat to cool while the crust is made. 
  2. To make the crust: crush the graham crackers (if they aren’t crushed already) using either a food processor or a ziptop bag with a rolling pin.  In a medium sized bowl, combine the crumbs with the confectioners sugar.  Add the melted butter and mix until all the crumbs are moistened by the butter. Press the mixture into the bottom of a 9x13” pan. Chill in the refrigerator while the filling is made.  
  3. To make the filling: Peel, and slice (and chop, if you like) 5 large peaches. Whip the cream to medium stiff peaks either by hand, or on high speed with a hand mixer, or on high speed in a stand mixer fitted with the whip attachment. Once the cream is whipped, fold it together with the previously made & slightly cooled marshmallow/orange juice mixture. Fold in the peaches.  
  4. To assemble: Spoon dollops of the filling over the prepared crust.  Smooth out the top surface of the filling. Cover the pan & refrigerate for 4 hours. 
  5. When ready to serve, cut the dessert into 12 pieces.  The dessert will keep for several days well covered in the refrigerator (if it isn’t entirely eaten immediately). 

Saturday, August 17, 2013

Roasted Peach Snickerdoodle Ice Cream Sandwiches


Greetings from Chicago! I’m at the tail end of a trip back north to visit family.  I intended to post several times during this time away.  I made things--photographed them even--but I seem to balk when it comes to the actual writing and posting.  So I’m going to keep this one shorter on the writing!


Snickerdoodle cookies are one of my absolute favorite cookies, if one can really pick a favorite cookie.  I have very fond memories of making them with my mom and sisters as a young child--snickerdoodles also happen to be one of my dad’s favorites, so I’m fairly sure we made them for him on many occasions.


This particular snickerdoodle recipe is a bit different than the traditional one I made in my childhood.  The cookies turn out a bit flatter and crispier, which I think is perfect for turning into ice cream sandwiches.  I made both a gluten free version, using my favorite Gluten Free Flour Mix, and a regular version using all purpose flour. There was virtually no difference between the two! In fact, I almost had to make a second batch of Gluten Free cookies because I couldn’t stop eating them!


I’ve been hearing about Jeni’s Splendid Ice Creams for a couple of years now, but it was only this past spring in Birmingham that I had the opportunity to try a flavor.  The texture (not to mention the flavor) is absolutely phenomenal, and I knew I needed to try one of her recipes at home.  I unfortunately do not have access to buying any of Jeni’s flavors near where I live.  I roasted some white peaches & yellow nectarines, pureed them and mixed them into the plain ice cream base.


One tip if you plan to make ice cream sandwiches out of homemade ice cream: spread the freshly churned ice cream onto a plastic-wrap lined baking pan.  Cover the pan completely with plastic wrap & freeze for a couple of hours.  The ice cream can then be cut to size with a circle cutter, placed directly onto the bottom of the first cookie, and topped with the second cookie.  So much easier than scooping!


Snickerdoodle Ice Cream Sandwiches with Roasted Peach Ice Cream

Roasted Peaches
16 oz pitted   peaches & nectarine combo (I used 2 nectarines & 2.5 white peaches; weight after they had been pitted) 
1/3 c Sugar

  1. Preheat the oven to 375 F.  
  2. Cut peaches in half, remove pits.  Place into an ovensafe baking dish.  Sprinkle with the sugar. 
  3. Roast until soft, approximately TIME
  4. Cool completely, then peel.  
  5. Process the roasted, peeled peaches in a food processor until completely pureed. Pour into an airtight container & refrigerate until cold.  

Ice Cream Base 
Adapted from Jeni’s Splendid Ice Cream via Saveur 

63g / 1/4 c Milk
11 g/ 4 tsp cornstarch

420 g/ 1 3/4 c Milk
290 g/ 1 1/4 c Heavy Cream
4.7 oz / 2/3 c Sugar
43 g / 2 Tbl Light Corn Syrup
1/4 tsp Salt

1.55 oz/3 Tbl Cream Cheese, softened 
1/4 tsp Cinnamon

  1.  In a small bowl, stir together the first measure of milk and cornstarch to make a slurry.  Mix it enough that there are no cornstarch lumps. Set aside. 
  2. In a 4 quart sauce pan, whisk together the milk, cream, sugar, corn syrup & salt.  Heat over medium high heat, stirring constantly for 4 minutes.  Remove from the heat. Whisk in the cornstarch slurry. Return the pot to medium high heat & continue whisking for an additional 4 minutes. Remove from the heat. 
  3. Place the softened cream cheese into a medium sized bowl. Whisk a little of the hot dairy into the cream cheese. Mix until there are no lumps. Gradually add the remaining dairy.  Whisk in the cinnamon. 
  4. Chill the ice cream base over an ice bath until cold.  Stir occasionally during the cooling process. 
  5. Once cold, add the pureed roasted peach/nectarine mixture.  Whisk to combine. 
  6. Churn the base in an ice cream maker according to the ice cream maker’s manufacturers instructions.  
  7. While the ice cream is churning, prepare a quarter sized sheet pan (or flat toaster oven pan) by lining it with plastic wrap.  Leave enough overhang to completely cover the pan.  Once the ice cream has finished churning, spread it evenly throughout the pan.  Smooth the top as much as possible.  Use the overhang of plastic wrap to completely encase the ice cream.  Smooth out any air bubbles (or you risk developing frost/freezer burn in those pockets. Place the covered pan in the coldest part of the freezer. Freeze a minimum of 4 hours, though overnight is preferred.  

notes: 

  • This recipe can be made in a 3qt sauce pan, but it comes dangerously close to boiling over.  I suggest using the larger size pot, but if you don’t have one, just be extremely extremely careful during the cooking process.
  • The original recipe called for chilling the ice cream base in a large ziplock bag, then cutting the corner of the bag to transfer the base into the ice cream maker.  I tried their recommended method the first time, but unfortunately the bag broke & spilled everywhere.  Such a mess! So, I prefer to just set a smaller bowl with the base inside a bowl of ice.  
  • I spread the finished ice cream onto a lined baking pan to make the assembly of the ice cream sandwiches easier.  If you just plan to make the ice cream for scooping, not making into ice cream sandwiches, portion it into airtight containers--I find heavy duty plastic containers help prolong the life of the ice cream. 

Snickerdoodles
4 oz Unsalted Butter, softened
4.5 oz Granulated Sugar
1 egg
1 tsp Vanilla Extract
6.25 oz Gluten Free Flour (I used my favorite blend, or you can substitute AP flour if you aren’t GF)
1/2 tsp Baking Soda
pinch Sea Salt

2 oz (heaping 1/4 c) Sugar
2 tsp Cinnamon

  1.  Preheat oven to 350. Line two baking sheets with parchment paper. 
  2. In the bowl of a stand mixer fitted with the paddle attachment, cream together the butter and sugar on medium speed until the mixture has fully combined, has lightened in color, and increased in volume, at least 2 minutes. Scrape down the sides of the bowl. 
  3. Add the egg and vanilla. Beat until combined. Scrape down the sides of the bowl.  
  4. In a separate bowl, whisk together the flour, soda, and salt.  
  5. Add the dry ingredients to the creamed mixture and mix just until combined.  
  6. In a separate bowl, mix together the sugar and cinnamon
  7. Use a small cookie scoop to make equal portions of dough.  Roll each dough piece in the cinnamon sugar.  
  8. Place the rounds onto the prepared baking sheet. Flatten slightly with the heel of your hand or the flat bottom of a drinking glass. 
  9. Bake in the preheated oven for approximately 10 minutes (if baking more than one sheet at a time, bake for 6 minutes, then rotate the pans and bake for an additional 4 minutes).  Let the cookies stand for  3 minutes on the baking sheet before moving them to a wire rack to cool completely. 
  10. Store in an airtight container until ready to assemble the ice cream sandwiches. 


Ice Cream Sandwich Assembly

  1.  Remove the ice cream from the freezer 5 minutes before you plan to assemble the sandwiches & allow to stand until slightly softened. 
  2. Use a large circle cutter to cut circles out of the sheet of ice cream.  
  3. Place each circle onto the bottom of one cookie & top with a second cookie. 
  4. Wrap each sandwich individually in plastic wrap.  Store in the freezer until ready to eat.  

Wednesday, August 22, 2012

Announcing "Small Batch" and Peach Lavender Crêpes


When I was in culinary school, one of my favorite courses was "Jams, Jellies, Chutneys, and Tarts."  I had other favorites too, but "Jams & Jellies" is one that perhaps has had more influence over my daily life than the others did.  We learned how to make a great number of different preserves: Jelly, Jam, Preserves, Fruit Butter, Pickles, Relish, Marmalade, Conserves, Chutneys, Condiments.... and the list continues.


It was during that course that the "canning bug" truly hit, and since then, I have made many many different preserved items at home.  Some, I've made for personal consumption (a PB & J sandwich is really the best when you use homemade jam) and some, I make to give as gifts (I love giving gifts that people can "use up").  One of my favorite preserved-item to make (and eat) is Peach Lavender Preserves.  We made a batch of it when I was in "Jams & Jellies" and I have subsequently made several batches at home. I enjoy this preserve so much that once I motivated myself to get up from a nap (when all I really wanted to do was go back to sleep) with the promise of a piece of fresh baguette slathered with peach lavender jam :)  I promise it does not taste like soap or potpourri, provided that culinary lavender is used.  


If you follow me on Instagram or Twitter or Facebook, you may have noticed that I've been busy canning, but, none of those jams nor preserves have made an appearance on this blog.  That lack of appearance is due to a very exciting new development in my life!  I am in the process of launching a brand new, home based baking & preserve business called "Small Batch Pastry & Preserves." Please feel free to check out the website and "like" the new Small Batch Facebook Page.  In preparation for the launch, I've been trying to build up a stockpile of preserves using as much local, fresh, in season produce as possible!  I've also been designing like crazy, working on developing a website, as well as labels (one of the law requirements for everything I sell) & packaging materials.


In the past (and in most other states) running a baking business required a state health department certified kitchen (and getting a certified kitchen is no picnic).  Under the Texas Cottage Food Law, you may operate out of your own home, so long as you meet their very detailed requirements.  The only big bummer is that you're prohibited from selling things online :(  So, if you want to buy anything, you'll have to come visit me in Texas!  I also anticipate doing a few jam give-aways on this site, so watch for those.

part of the stockpiled jams & preserves (so far) 

Later this week, I'll be handing out samples at an event my apartment complex is hosting for residents.  I'm excited, and I'll admit a bit terrified. This is a big step for me!  I'm hopeful this new venture will succeed, but only time will tell.  I plan to still keep this blog up and running, but my posting schedule may be a little less frequent, depending on how busy Small Batch gets.   


Ok, on to crêpes!  Crêpes may seem intimidating to make, but I promise they aren't as complicated as you may think.  Three of my favorite tools for crêpe making include a blender, a non-stick skillet (or an actual crêpe pan, if you have it), and a heat tempered spatula. I like to make my crêpe batter in the blender the night before I plan to actually cook the crêpes (if you don't have overnight, at least an hour will suffice), then refrigerate the batter in the blender jar.  The spout makes it easy to pour the batter right into the hot pan when you're ready to cook the crêpes.


As soon as the batter has set on the top of the cooking crêpe & the bottom of the crêpe has developed a hint of color, use the heat tempered spatula to easily flip it over.  One time, I accidentally used a regular spatula & melted it to my pan, so make sure you have a heat-tempered spatula instead :) The crêpes can be made ahead (with parchment between each crêpe so that they do not stick together) and even frozen, if needed.  Simply reheat slightly before serving.  


I love the combination of the crêpe, spread with a little of the peach lavender preserves, garnished with some additional sliced peaches and a scoop of vanilla ice cream.  The flavors & aroma remind me of traveling in France, mixed with culinary school, mixed with the summer classic "peaches and cream."


Dessert Crêpes
adapted from Crêpes
makes 10 to 12 crêpes 

2 large eggs
1 cup Milk
1/3 cup Water
1 cup All Purpose Flour
2 Tbl Granulated Sugar
1 tsp Vanilla Extract
2 Tbl butter, melted, plus additional for the pan.

1.  Add the ingredients in the order they are listed to a blender.  Blitz until smooth.  Move the batter to the refrigerator for at least 1 hour or up to 24 hours.

2.  Heat a nonstick crepe pan (or other large nonstick pan) over medium heat.  Grease it slightly with butter (I like to swipe a stick of cold butter over the surface of the hot pan to grease it).  If your batter has separated at all, stir it gently.

3.  Pour 1/4 cup of the batter into the hot pan, tilting and rotating the pan until the batter covers the entire surface.   Cook until the batter has just set and the edges are lightly brown.  If necessary, use a heat tempered spatula to loosen the edges.  Flip the crepe over and cook until the second side is lightly browned.

4.  Turn finished crêpe out onto a plate to cool. Repeat with the remaining batter, greasing the pan between each crêpe.

5.  Serve immediately, or keep crêpes covered and warm in a low oven.  If you want to freeze them, layer parchment between each crêpe before wrapping them well.

Peach Lavender Preserves
Because this is an item that I am now selling, I won't be posting my official recipe, but Lindsay over at Love and Olive Oil has a great version.  If you don't want to do the entire jam making route, you can cook peaches with sugar and a little bit of lavender water (made by adding culinary lavender to boiling water, allowing it to steep a few minutes, then straining off the lavender buds) until the peaches are tender.  

Assembly
Dessert Crêpes, warm
Peach Lavender Preserves (or homemade spread)
Sliced Peaches
Vanilla Ice Cream 
Culinary lavender buds optional for garnish

1.  Spread peach lavender preserves liberally over half of a warm crêpe.  Fold to make a half moon, then fold again into quarters.

2.  Garnish with sliced peaches & a scoop (or quenelle) of vanilla Ice cream.  Add a sparse sprinkling of culinary lavender buds, if desired, but note that less is more when it comes to whole buds.

3.  Enjoy immediately!